Owner's Manual and Installation Instructions Three-Speed with Options and Speeds Switch AUTOMATIC WASH ERS IMPORTANT: Read and follow all safety and operating instructions before first use of this product. Sears, Roebuck and Co., Hoffman Estates, IL 60179 U.S,A. Sears Canada Inc,,Toronto, Ontario, Canada M5B 2B8 www, sears,com 8526118 PRINTEDIN U.S.A.
BEFORE USINGYOUR NEW WASHER ..... 2 KENMORE AUTOMATIC WASHER WARRANTY 3 WASHER SAFETY 4 INSTALLATION REQUIREMENTS 6 INSTALLATION INSTRUCTIONS 10 OPERATING YOUR WASHER 14 LAUNDRY TIPS 25 CARING FOR YOUR WASH ER 27 TROUBLESHOOTING 28 SEARS MAINTENANCE AGREEMENT Please read this manual. It will help you install and operate your new Kenmore washer in the most economical way. For more information about the care and operation of Kenmore appliances call your nearest Sears store.
Limited Lifetime Warranty on White Porcelain Basket For the lifetime of the washer from the date of purchase, Sears will replace the white porcelain wash basket if it chips or rusts due to defective material or workmanship. You will be charged for labor. Limited 10-Year Warranty on Plastic Tub* For the second through tenth year from the date of purchase, Sears will replace the plastic tub if it is defective in material or workmanship. You will be charged for labor.
Your safety and the safety We have provided on your appliance. of others are very important. many important safety messages in this manual and Always read and obey all safety messages. This is the safety alerL symbol. This symbol alerts you to potential hazards that can kill or hurt you and others. All safety messages will follow the safety alert symbol and either the word "DANGER" or "WARNING." These words mean: You can be killed or seriously injured if you don't immediatel,L follow instructions.
IMPORTANT SAFETY INSTRUCTIONS WARNING: To reduce the risk of fire, electric shock, or injury to persons when using your washer, follow basic precautions, including the following: • Read all instructions before using the washer. • Do not wash articles that have been previously cleaned in, washed in, soaked in, or spotted with gasoline, dry-cleaning solvents, other flammable or explosive substances as they give off vapors that could ignite or explode.
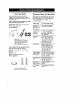
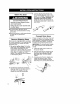
Tools and Parts Alternate Assemble the necessary tools and supplies before beginning the washer installation, The parts supplied are in the washer basket. Tools needed for connecting the drain hose and water inlet hoses: • Pliers that open to 17`6in. (3.95 cm) • Flashlight (optional) Parts supplied: 3 4 5 1. Drain hose 2. Silver, double-wire hose clamp (for the bottom of the drain hose) 3. Yellow, single-wire hose clamp (for the top of the drain hose) 4. Water inlet hoses (2) 5.
Location Requirements Selecting the proper location for your washer improves performance and minimizes noise and possible washer "walk." Your washer can be installed in a basement, laundry room, closet, or recessed area. (See "Drain System.") Proper installation is your responsibility. You will need: • • • • • A water heater set to deliver 120°F (49%) water to the washer. A grounded electrical outlet located within 4 ft (1.2 m) of where the power cord is attached to the back of the washer.
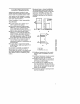
Drain System The washer can be installed using the standpipe drain system (floor or wall), the laundry tub drain system, or the floor drain system, Select the drain hose installation method you need. (See "Alternate Parts You May Need.") Floor drain system (view 2) The floor drain system requires a siphon break that may be purchased separately. (See "Alternate Parts You May Need,") The siphon break must be a minimum of 28 in. (71 cm) from the bottom of the washer. Additional hoses might be needed.
• Tominimize possible shock hazard, the cordmustbeplugged intoa mating, 3 prong, ground4ype outlet, grounded in • • • • accordance with local codes and ordinances. If a mating outlet is not available, it is the personal responsibility and obligation of the customer to have the properly grounded outlet installed by a qualified electrician. If codes permit and a separate ground wire is used, it is recommended that a qualified electrician determine that the ground path is adequate.
Before You Start 3. Cut the shipping strap about 16 in, (40 cm) from plug end. Look for the words "CUT HERE." Discard end with the cotter pins, Slide remainder of shipping strap from the power cord. You will use the remainder of the shipping strap later to secure the drain hose. • To prevent floor damage, set the washer onto cardboard before moving across floor. • Move the washer to within approximately 3 feet (90 cm) of the final location.
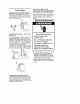
4. Open clamp. Twist hose back and forth while pushing down onto drain connector at the bottom of the washer, Continue until hose contacts the ribbed stop on the cabinet, • For floor drain installation, see kit num* ber required under "Alternate Parts You May Need." Connect the Inlet Hoses 5. Place clamp over area marked "CLAMR" Release clamp. 1/4" 1, Insert new flat washers (supplied) into each end of the inlet hoses. Firmly seat the washers in the couplings.
Clear the water lines 5, Run water through both faucets and inlet hoses, into a bucket or laundry tub, to get rid of particles in the water lines that might clog the inlet valve screens. Connect the inlet hoses to the washer 6, Attach the hose with the red coupling to the HOT (bottom) inlet valve. Attaching the red coupling first makes it easier to tighten connection with pliers, Screw on coupling by hand until seated on the washer. Using pliers, tighten the couplings with an additional two4hirds turn.
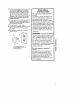
4, Tiltthewasher backandremove the 3, woodblock, Gentlylowerthewasher tothefloor. 4, 5. Slide to final location. 6. Check the levelness of the washer by placing a level on the top edges of the washer; first side4o-side, then front4o-back. Check to be sure you have all of your tools, Checkto be sure thattheyellow shipping _rap was removed from the back of the washer and used to secure the drain hose. 5, Dispose/recycle materials. all packaging 6, Check to be sure the water faucets are on, 7.
To get the maximum cleaning and fabric care from your washer, please read and follow these instructions. NOTE: The drawings in this section show the basic features of all models covered by this manual, Refer to the supplied "Feature Sheet" for your washer's particular features. Fire Hazard Never place items in the washer that are dampened with gasoline or other flammable fluids. No washer can completely remove oil. Do not dry anything that has ever had any type of oil on it (including cooking oils).
2. SELECT CYCLE Choose more time for heavily soiled loads and less time for lightly soiled loads. 3. PULL TIMER TO START ..... Lid must be closed to complete cycle. PUSH TIMER TO STOP Antiperspirants Grass Treat with a paste of ammonia and color-safe bleach. Let stand for 30 minutes. Wash in hottest water safe for fabric. Use an enzyme presoak or rub enzyme detergent on the stain. Launder with detergent and bleach appropriate for the fabric.
STARTING YOUR WASHER STEP 1. Add measured detergent directly into washer basket. Then place a load of sorted clothes in the washer. STEP 6. Set the WATER TEMPERATURE Control _l k STEP 7. Set RINSE OPTIONS Control STEP 2. (OPTIONAL STEP) If desired, add measured liquid chlorine bleach to the liquid bleach dispenser. STEP 8. Set SPEEDS Control according to the type of fabric in the load. STEP 3. (OPTIONAL STEP) If desired, add measured liquid fabric softener to the fabric softener dispenser. STEP 9.
WATER LEVEL CONTROL _seJaft*J_a Washers with 4-position or Water Level Control: • To change to a higher water setting after the washer has agitate, turn the knob to the new setting. :I_] a[_ [[a This control gives you the flexibility to save water when washing small loads. Your washer lets you select a water setting based on the size of your wash load. LOAD u 5-position level started to desired mLGqD |MM.
AUTOMATIC TEMPERATURE CONTROL (ATC) ATC takes away the worry of undissolved detergent and ensures consistent cleaning results from season to season with warm and cold washes, ATC electronically senses and maintains a uniform water temperature by regulating incoming hot and cold water. • Even in cold wash, some m warm water is let into the WARM 100" washer to maintain a COLD temperature minimum of 70°F (21°C).
CYCLE SELECTOR (TIMER) CONTROL Use this control to choose the agitation time and to start the washer. • For heavy soil and sturdy fabrics, use the full time. • For light soil and delicate fabrics, use less time. PERMANENT PRESSI The PERMANENT PRESS I Cycle includes a load cooling spray rinse that reduces wrinkling compared to other cycles. You can select up to 10 minutes of wash time. PERMANENT ULTRA CLEAN Use this cycle for most loads to get between 4 and 14 minutes of wash time.
RINSE OPTIONS CONTROL A second rinse will remove more detergent residue. It is especially beneficial if extra detergent has been used to remove heavy soils. RINSE AND SPIN When using extra detergent for heavily soiled clothes, or washing special-care items, you may find an extra rinse and spin is needed. STEP 1. Set WATER LEVEL Control. STEP 2. Set WATER TEMPERATURE Control. STEP 3. Set RINSE OPTIONS Control to ONE RINSE.
UNDERSTANDING WHAT HAPPENS IN EACH CYCLE PERMANENT PRESSI* ULTRA CLEAN PERMANENT PRESSII* PREWASH Fill to selected level Fill to _ _ Wash selected time Wash selected time no spin rain- no spin Drain- _ Spin/Spray _ selected level Fill to selected level Fillto _ Rinse no spin Drain• Spin/Spray 2ND Off or RINSE _ _ selected level FilI to Wash selected time _ Pause Fill to selected level Fill for cool down Rinse Wash Spin/ Spray Off *on some models Wash selected time Partial
QUIET PAK TM The QUIET PAK System is designed to reduce water sounds and ringing noises. The cabinet is insulated with sounddampening material for better vibration and sound-dampening characteristics. TM QUIET PAK TM II (on some models) The QUIET PAK II System is designed to reduce water sounds and ringing noises, The cabinet is insulated with three sound-dampening materials for superior vibration and sound-dampening characteristics.
UNDERSTANDING NORMAL WASHER SOUNDS Your new washer may make sounds that your old one did not. Because the sounds are unfamiliar, you may be concerned about them. The following describes some of the normal sounds you may hear and what causes them. During Washing When you select a small load size setting for a small wash load, your washer has a lower water level. With this lower water level, you may hear a clicking sound from the upper portion of the agitator.
USING THE LIQUID FABRIC SOFTENER DISPENSER After loading the washer, measure and add the recommended amount of fabric softener into the dispenser. Follow manufacturer's directions. NOTE: Pouring too much fabric softener into the dispenser will cause the fabric softener to dispense instantly into the load due to siphoning action. This instant "dump" could damage fabrics and will make it appear that your dispenser is not working correctly. To remove the Fabric Softener Dispenser for cleaning: STEP 1.
PREPARING CLOTHES FOR WASHING Follow these recommendations to help you prolong the life of your garments. • Close zippers, snaps, and hooks to avoid snagging other items. Remove pins, buckles, and other hard objects to avoid scratching the washer interior. Remove non-washable trim and ornaments. SORTING • Separate heavily soiled items from lightly soiled ones, even if they would normally be washed together. Separate lint-givers (towels, chenille) from lint4akers (corduroy, synthetics, permanent press).
LOADING Ir _'j_itm_l ;[q i[q I'[" • Reduce wash time by using a lower water level setting. Loads with only a few small items need less wash time. Proper loading of your washer contributes to proper cleaning and fabric care and reduces machine noise. • Drop items into washer loosely, Fill to the top of the basket (top row of holes). Do not wrap items around the agitator, Items should move easily through wash water for best cleaning and wrinkle4ree results. Items should sink and reappear later.
CLEANING YOURWASHER Proper care of your washer can extend its life. This section explains how to care for your washer properly. Exterior Wipe up detergent, bleach, and other spills with a soft, damp cloth or sponge as they occur. Occasionally wipe the outside of the washer to keep it looking like new. Do not put sharp or metal objects in your washer. They can damage the finish. Check all pockets for pins, clips, money, bolts, nuts, etc. Do not lay these objects on your washer after emptying pockets.
Most laundering problems are easily solved if you understand the cause. Check these lists for common laundry and washer problems. If you need further assistance, see the back page. Problem Possible Cause Solution Washer Leaks Household plumbing isleaking. Repair plumbing. Inlet hoses not tight. Tighten hoses (see "Installation Instructions"). Inlet hose washers not properly seated. Reseat washers (see "Installation Instructions"). Drain hose not properly clamped or is off.
Problem Possible Cause Solution Won't Drain/ Won't Spin/ Wet Loads (cont.) Low voltage or using an extension cord. Check electrical source or call electrician. Do not use extension cords. Cold rinses. Cold rinses leave loads wetter than warm rinses,This is normal. Continues to Fill/ Continues to Drain/ Cycle Stuck Drain hose is less than 39 in (99 cm) above floor. Raise the drain hose (see "Installation Requirements"). Drain hose fits tightly into standpipe. Drain hose taped into standpipe.
Problem Possible Cause Solution Machine Power cord not plugged in. Plug into a grounded 3 prong outlet. Stops No power at plug. Check electrical source or call electrician. Fuse blown or circuit breaker open. Replace fuse or reset circuit breaker. if problem continues, call electrician. Using an extension cord. Do not use extension cords. Timer is not lined up. Turn timer to the right slightly and pull to start. Timer knob not pulled out. Set and pull out knob.
Problem Possible Cause Solution Tearing Overloading. improper use of washer, Loads should move freely during wash. Wash smaller loads or increase water level improper use of chlorine bleach. Undiluted bleach wilI damage fabrics. Do not pour chlorine bleach directly on load. Wipe up bleach spills. Sharp items not removed from pockets; fasteners not fastened. Clean out pockets before washing. Zip zippers before washing.
WE SERVICE WHAT WE SELL Your purchase has added value because you can depend on Sears Home Central °, for service. With over 12,000 trained repair specialists and access to over 4.2 million parts and accessories, we have the tools, parts, knowledge and skills to ensure our pledge: We Service What We Sell. Sears Maintenance Agreements Your Kenmore appliance is designed, manufactured and tested to provide years of dependable operation. Yet any major appliance may require service from time to time.
Forrepairofmajorbrandappliancesin your own home... no matterwho madeit, nomatterwhosolditl 1-800-4-MY-HOME (1-s00._9.4_3) _ _.llaam._m An_, dayornight (U.SAandCanada) WWW.84MIrs,c8 Forrepairofcarry-inproducts likevacuums,lawnequipment, and elecVonics, callforthe Ioc_on ofyournearest Seam Partsand Flef_r Center. 1-800-488-1222 _, dayornight (U.S.A. only) www.sears.