
Installation guide


INSTALLATION
INSTRUCTIONS
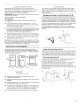
2.
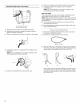
Firmly
grasp
the
power
cord
and
pull
to
completely
remove
the
power
cord,
cord
restraint,
and
pin
from
the
rear
panel.
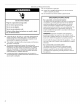
AWARNING
Excessive
Weight
Hazard
Use
two
or
more
people
to
move
and
install
washer.
Failure
to
do
so
can
result
in
back
or
other
injury.
NOTE:
To
avoid
floor
damage,
set
the
washer
onto
cardboard
before
moving
across
floor.
3.
Confirm
that
the
power
cord
restraint
(A),
and
pin
(B)
are
removed.
Remove
Shipping
Materials
Removing
the
shipping
material
is
necessary
for
proper
operation.
If
the
shipping
material
is
not
removed,
the
washer
will
make
excessive
noise.
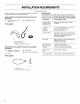
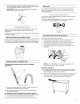
1.
Move
the
washer
to
within
approximately
3
ft
(90
cm)
of
its
final
location.
2.
The
washer
must
be
in
the
upright
position
and
not
tilted
before
removing
the
shipping
material.
3.
Locate
the
yellow
shipping
materials
on
the
rear
of
the
A.
Power
cord
restraint.
BB.
Pin
machine,
near
the
bottom.
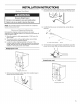
Follow
the
steps
for
your
particular
, ,
model,
either
the
one
with
the
straight
power
cord
and
cord
4.
To
remove
the
power
cord
from
the
cord
restraint,
push
the
restraint
or
the
looped
power
cord
version.
power
cord
in,
press
TAB,
and
then
pull
the
power
cord
out.
Straight
power
cord
Straight
power
cord
1.
Remove
power
plug
and
yellow
strap
from
machine
base
to
release
the
rear
leveling
system.
“>,
Looped
power
cord