
Installation guide

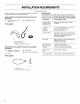

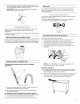

1.
Firmly
grasp
the
yellow
shipping
strap
and
pull until
both
2.
Screw
the
locknut
onto
each
foot
to
within
1°
(2.5
cm)
of
the
ends
are
completely
removed
from
washer.
foot
base.
3.
Screw
the
feet
into
the
threaded
holes
at
the
front
corner
of
the
washer
until
the
nuts
touch
the
washer.
Twist
the
feet
to
install.
NOTE:
Do
not
tighten
the
nuts
until
the
washer
is
level.
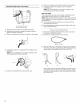
2.
Check
that
two
(2)
shipping
pins
were
removed
with
the
shipping
strap.
4.
Tilt
the
washer
back
and
remove
the
wood
block.
Gently
lower
the
washer
to
the
floor.
Steps
in
Final
Location
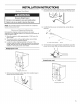
1.
Slide
the
washer
to
its
final
location.
2.
Tilt
the
washer
forward
until
the
rear
of
the
washer
is
at
least
4"
(10.2
cm)
off
the
floor.
You
may
hear
the
self-adjusting
rear
feet
click
into
place.
Lower
the
washer
to
the
floor.
1
pray,
gral
Lolly
Fn
yonder
gon
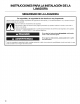
Level
the
Wasner
Properly
leveling
your
washer
avoids
excessive
noise
and
vibration.
Install
the
Front
Leveling
Feet
1.
Prop
up
the
front
of
the
washer
about
4”
(10.2
cm)
with
a
wood
block
or
similar
object.
The
block
needs
to
support
the
weight
of
the
washer.
re
4"
(10.2
cm)
A.
Self-adjusting
feet
3.
Check
the
levelness
of
the
washer
by
placing
a
level
on
the
top
edges
of
the
washer,
first
side
to
side,
then
front
to
back.
(10.2
cm)
A.
Threaded
holes
for
feet
4.
If
the
washer
is
not
level,
move
the
washer
out
slightly,
tip
back,
prop
up
the
front
of
the
washer
with the
wood
block
and
adjust
the
feet
up
or
down
as
necessary
by
twisting
the
feet.
Turn
the
feet
clockwise
to
raise
the
washer
or
counterclockwise
to
lower
the
washer.
Repeat
steps
1
through
4
until
washer
is
level.