Owner's Manual Vacuum Cleaner Model 116.31722 116.31732 CAUTION: Read and follow all safety and operating instructionsbefore first use of this product. Sears, Roebuck and Co., Hoffman Estates, IL 60179 U.S.A. www.sears.com PART NO. CO1ZBFE1_IUa(_-8191585 Printed in U.S.A.
Before Using Your New Vacuum ....... 2 Kenmore Vacuum Cleaner Warranty ... 2 Important Safety Instructions ......... 3 Parts and Features .................. 4 Assembly Instructions ............. 5-6 Operating Instructions ............... Pile Height Selection and Setting ........ Carpet]Bare Floor Selector ............ Releasing the Handle ................. ON/OFF Switch ..................... Attachments ..................... Attachment Use Chart ............... Vacuuming Tips ....................
VV, WARNING Your safety is important to us, To reduce the risk of fire, electrical shock, injury to persons or damage when using your vacuum cleaner, follow basic safety precautions including the following: Read this manual before assembling or Do not use with any opening blocked; using your vacuum cleaner. keep free of dust, lint, hair and anything that may reduce air flow. Use your cleaner only as described in this manual. Use only with Sears recommended attachments.
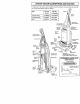
Itisimportant toknowyourvacuum cleaner's partsandfeatures toassure itsproper andsafe use.Review thesebefore using yourcleaner. Item Part No. In U.S. Part No.
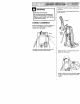
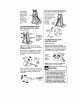
WARNING Electrical Shock Hazard Position the handle as shown in the illustration below. Slide the handle into the opening at the top of tile vacuurn. Do not plug into the electrical supply until the assembly is complete. Failure to do so could result in electrical shock or injury, HANDLE ASSEMBLY Before assembling your vacuum cleaner, be sure you have all the parts as shown in PARTS AND FEATURES. Remove the screw located just below the top edge of the back of the vacuum.
Using a screwdriver, tighten thescrew. Lock Ihe cord Into place by forcing it into the locking notch on the body of the quick release upper cord hook as shown. This helps keep the power cord out from under the vacuum cleaner agitator, Wrap the power cord around the upper lower cord hooks and lock the power cot plug onto the power cord. CAUTION Do not overtighten. Overtightening could strip the screw holes. Do not operate the cleaner the screw in place.
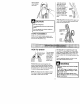
Toselecta pileheightsetting: Turn off cleaner. Select a pile height setting by tilting the cleaner back until front wheels are lifted slightly off the floor as illustrated. iiiiiiii ¸ Slide the adjustment lever to the correct setting. SUGGESTED PILE HEIGHT SE'N'INGS You may need to raise the height to make some jobs easier, such as scatter rugs and longer pile carpets. Suggested settings are: I 'WARNING Personal Injury Hazard HIGH: shag carpet, long pile, plush, scatter rugs. MED: medium to long pile.
Release the handle by pressing down on the handle release pedal with your foot and pulling back and down on the handle with your hand. HANDLE MOUNTED SOME MODELS To start the vacuum cleaner, slide the On/Off switch trorn the OFF positiof'L to the ON position. To stop the vacuum cleaner, slide (he OnOff switch 1o Illo OFF position. Remove the lower end of the stretch hose from the cleaner by grasping the hose co1lar, twisting and pulling straight out. The attachments can now be added to the hose.
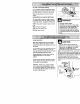
The attached hose swivels to make cleaning easier in every direction. Remove the hose from Ihe hose clip by pulling straight out. Align the tabs on the extension wand with the "J" slots in the hose. Push the wand into the hose and twist to the right to lock. To achieve maximum reach with the attachments, add the crevice tool to tile end of Ihe wand by Hose inserting and twistSuction Control ing slightly.
TO STORE ATTACHMENTS: EXTENSION Remove dusting brush or combination brush. Snap into appropriate storage rocation. SOME MODELS HOSE: Some rnoders include an extra hose which connects to the stretch hose on the vacuum for a longer cleaning reach, Remove crevice tool from the wand by twisting. Lay aside. Unit Hose _ Extension Hose Remove the extension wand from the hose. Twist the wand to the left and pull from the hose end.
Carpet edges. Guide either side or the front of the nozzle along a baseboard. The full length brushes help remove dirt at carpet edges. For best cleaning results, keep theair flow passage clear. Occasionally, check each of the areas indicated for clogs. Stairs. Put handle in full upright position.Place the carpet/bare floor selector in the bare floor position. Use the crevice tool or fabric brush, Set the On/Off switch to ON. " I=[l_ _!_| &_, Unplug the cleaner from the outlet before checking.
DIRT SENSOR WARNING SOME MODELS The electronic dirt sensor is a feature which will detect particles as they pass through the vacuum cleaner. Electrical Shock And Personal Injury Hazard Disconnect electrical supply before servicing or cleaning the unit. Failure to do so could result in electrical shock or personal injury from cleaner suddenly starting. The dirt sensor indicators and sensor sensitivity switch are located on the front of the switch cover.
Always follow all safety precautions when cleaning and servicing the vacuum cleaner. I WARNING , i Electrical Shock And Personal Injury I Hazard Disconnect electrical supply before servicing or cleaning the unit. Failure to do so could result in electrical shock or personal injury from cleaner suddenly starting. Gather the cord and wrap it loosely around the upper and lower cord hooks.
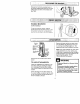
Always emptythedustbinwhendirt TO EMPTY DUST BIN: level reaches the "MAX" line. TO REMOVE DUST BiN: Rotate dust bin lid counterclockwise and lift off. WARNING I Always unplug power cord from I electrical outlet before performing any service on vacuum. Lift dust bin handie located at the Pour dust bin contents into a trash container. OustBin ,4J_)_ Release Handle -_ TO REPLACE DUST BIN: Pull the handle forward and lift duet bin up and out of the vacuum cleaner.
!• TO REPLACE PRIMARY FILTER: WARNING Electrical Shock Hazard Unplug power cord from electrical outlet. Do not operate the cleaner without the primary filter. Be sure the filter is properly installed to prevent motor failure and/or electrical shock. Replace filter and rotate it until handie drops into the slots. Check sliders and remove any obstructions Slots _._,_..--,.,._ Slider PRIMARY FILTER The filter CANNOT be washed as it will lose its dust trapping ability.
EXHAUST HEn FILTER SECONDARY FOAM The exhaust filter cartridge must be replaced when dirty. It should be replaced regularly depending on use conditions. The filter CANNOT be washed as it will lose its dust trapping ability. wARNING not operate without exhaust r. Check secondary filter frequently and change when dirty. ! I NOTE: See PARTS AND FEATURES for the exhaust tilter #.
f ! '.f l WARNING _ Tabs I I L Depress tabs on rear of agitator cover and rotate forward to release from the nozzle body. Electrical SIlock Or Personal Injury Hazard Disconnect electrical supply before servicing or cleaning the unit. Failure to do so could result in electrical shock or personal injury from cleaner suddenly starting, Agitator Cover_,f_ " The light bulb socket assembly does not have to be removed. Lay the agitator cover over to the side out of the way.
TO CLEAN AGITATOR: TO REPLACE NOTE: in order to keep cleaning efficiency high and to prevent damage to your vacuum, the aoitator must be cleaned every time the belt is changed. Make sure that the carpet/bare floor selector is in the carpet position. Loop the new belt on the motor shaft. BELT: Motor Shaft The agitator must also be cleaned every 7 to 10 uses. Remove any dirt or debris in the belt path area or in the agitator area.
NOTE: See PARTS AND FEATURES for belt #. Lower the agitator cover to its original position. After positioning the agitator cover, push forward on the two (2) locking tabs in order to ensure that they are securely in place. Loop the other end of the belt on the belt pulley on the agitator. insert the agitator by placing the rounded portion of the end cap down into the slot in the nozzle base. Re-fasten Ihe lurniture guard retainers to the posts on both sides of the agitator cover.
Always follow all safety precautions when cleaning and servicing the vacuum cleaner. Re-insert the hose into the opening on the lower body from which it was removed. Press firmly to assure connection. E ,I wARNING Electrical Shock Or Personal Injury Hazard Disconnect electrical supply before servicing or cleaning the unit. Failure to do so could result in electrical shock or personal injury from cleaner suddenly starting.
WARNING Electrical Shock Or Personal Injury Hazard Disconnect electrical supply before servicing or cleaning the unit. Failure to do so could result in electrical shock or personal injury from cleaner suddenly starting. Remove the light bulb by pushing the bulb in while turningcounterclockwise to release from the slot.Then pull the light bulb straight out. TO REMOVE LIGHT BULB: To replace the light bulb carefully insert and turn clockwise to securely fit into slot.
I = TO REPLACE AGITATOR: WARNING Remove the nozzle cover, agitator cover and agitator. See BELT CHANGING AND AGITATOR CLEANING. Electrical Shock Or Personal Injury Hazard Remove the end caps and bearing covers. Disconnect electrical supply before servicing or cleaning the unit. Failure to do so could result in electrical shock or personal injury from cleaner suddenly starting. Replace the agitator with a new one. Replace the bearing covers and end caps.
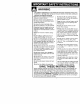
Review this chart to find do-it-yourself solutions for minor performance problems. Any service needed, other than those described in this owner's manual, should be performed by an autbodzed service representative. _or cleaning the unit, Failure I to d_lt Cleaner won't run, Poor job of dirt pick-up. fl, in electrical shock or personal injury. ! 1. Unplugged at wall outlet. g. Reset circuit breaker or replace fuse 3. On/off switch not turned on. 3. Push on/off swilcb to on, 4.
' Get it fixed, at your home or ours.I For repair of major brand appliances in your own home... no matter who made it, no matter who sold itt 1-800-4-MY-HOME sMAnytime, dayornight (1"800"469"4663) www,sears.com To bring in products such as vacuums, lawn equipment and electronics for repair, call for the location of your nearest Sears Parts & Repair Center. 1-800-488-1222 Anytime, day or night www,sears.