Owner's Manual Manual Dei Propietario Vacuum Cleaner Aspiradora Model, Modelo ? 116.22412 116.22413 CAUTION: Read and follow all safety and operating instructions before first use of this product, CUIDADO: Lea y siga todas las instrucciones de operaci6n y seguridadantes del uso de este producto. Sears, Roebuck and Co., Hoffman Estates, IL 60179 U.S.A. www.sears.com Part No. CO1ZBRFOOUOO-8192346 Printed in U.S.A.
Before UsingYour NewVacuum ....... 2 Kenmore Vacuum Cleaner Warranty . .. 2 Important Safety Instructions ......... 3 Parts and Features ................. 4-5 Assembly Instructions ............. 6-7 Use ............................ How to Start ........................ Vacuuming Tips ..................... Suggested Pile Height Settings ......... Attachments ....................... Attachment Use Chart ............... Performance Features ............... How '(our Vacuum Works ............. ....
WARNING Your safety is important to us.To reduce the risk of fire, electrical shock, injury to persons or damage when using your vacuum cleaner, follow basic safety precautions including the following: Read thismanualbeforeassemblingor usingyourvacuumcleaner. Do notoperate the cleanerwitha puncturedhose. The hose contains electrical Use yourcleaneronlyas describedin this manual.Use ontywithSears recommended wires. Replaceif cut or worn. Avoid picking attachments. up sharp objects.
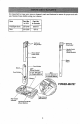
it is important to know your vacuumcleaner's parts andfeatures to assure its properand safe use. Review these before using your cleaner. Item Part NO, In U.S. Part No.
HOSE 2-Way ATTACHMENTS On/Off Power-Mate Jr, e (Some Models) Switch Bare Floor/Carpet (Some Models) Crevice Tool Handle Brush Combination Brush Floor _tJ __ Handi.Mato Jr._ (Some Models) NOTE: All models haveone set of attachments in the canister.Some models have an additional set, which can be kept in the accessory bag for garage use. CANISTER item Part NO. In U.S. Part No.
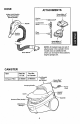
I IWARNING Electrical Shock Hazard Handle DO NOT plug into electrical supply until assembly is complete. Failure to do so could result in electrical shock or injury, Before assembling vacuum, check the PACKING LIST on the cover of the separate Repair Parts List. Use this list to verify that you have receivedall the components of your new Kenmore vacuum. Lock Button WANDS Slide wands together until wand button snaps into place. Cord Holder Wand-_-_ POWER-MATE ® 1.
HOSE 1. Line up the hose latchtab with notch in canister and insert hose into canisteruntil it snaps in place. To remove: Press hose latch tab and pull hose out. Hose Latch Tab \, 2. Insert handle into wand until lock button snaps in place. Be sure hose is not twisted. To remove: Notch Press handle release but- ton and pull up on handle. To store: Disconnect hose from wands and canister to prevent stress on hose during storage.
HOW TO START • WARNING ' Personal Injury and Product Damage Hazard - DO NOT plug in if switch is in ON position. Personal injury or damage could result. • The cord moves rapidly when rewinding. Press cord rewind with foot only. Keep children away and provide a clear path when rewinding the cord to prevent personal injury. , DO NOT use outlets above counters. Damage from cord to items in surrounding area could occur. Pile Height Adjuster Overload Protector (Reset Button) 3.
Suggested sweeping pattern. For bestcleaningaction,the Power-Mate® shouldbe pushedstraightaway from you and pulledstraightback.At the end of each pullstroke, the directionof the Power-Mate_ shouldbe changedto pointintothe next sectionto be cleaned.This pattern should be continuedacross the rug with slow,gliding motions. For best cleaning results, keep the airflow passage open. Check each assembly area in HOWYOUR VACUUM WORKS occasionally for clogs. Unplug from outlet before checking.
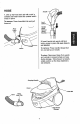
ATTACHMENTS ON WANDS CAUTION 1. To remove wands from PowerMate®, lock wands in straight-up position. DO NOT attach or remove handle or wands while cleaner is ON. This could cause sparking and damage the electrical contacts. ATTACHMENTS ON HANDLE NOTE: If the Power-Mates is attached, turn cleaner off before removing handle from wands. Lock === 2. Remove Power-Mate®plug and cord from holders. 3, Disconnect 1, Press lock button, then pull ==. Upper dle from wand.
AUTO-CLEANING SYSTEM EDGE CLEANER This vacuum is equippedwith a auto-cleaning system. Eachtimethe power cordis extended a cleaningcam locatedinside the dustbin rotatesand cleans the filter. cleaners are on both sides ofthe PowerMate®.Guide either side of the PowerMate®along basective brush edge boards or next to furniture to help remove dirt trapped at carpet edges. 1_ OVERLOAD POWER-MATE ®STORAGE SOME MODELS The lowerwand has a "U" shapedflange in the area where the power cord attaches.
The vacuum cteaner creates suction that picks up dirt. Rapidly moving air carries the dirt to the dust bin through the [ ._--_'______ airflow passages. The dust bin lets /._, ij_ the air pass throughl while it traps z_,_,f" the dirt. ,/_/ For best cleaning results, keep ._/z the airflow passage open. ._7" Check the starred areas _z_/_, / occasionally for clogs. ,4_" Unplug from outlet /_'t.7" Dust Bin before check_ 1. Unpiug cord from wall outlet; • 2.
TO EMPTY DUST BIN: Always empty the dust bin when dirt level reaches the "MAX FILU' line. TO REMOVE DUST BIN: While ho[dingdust bin over a trash can, remove lid from dust bin by lifting off. WARNING I lectrical Shock And Personal Injury Hazard Always unplug power cord from electrical outlet before performing any service on vacuum. ..... Pour dust bin contents into a trash container. Press down on the dust bin release tab located above the handle of the dust bin.
TO CLEAN FILTER The filter may be cleaned by tapping it on a trash container or by rinsing it under a faucet. WARNING Electrical Shock Hazard Unplug power cord from electrical outlet. Do not operate the cleaner without the primary or exhaust filters. Be sure the filters are properly installed to prevent motor failure and/or electrical shock. PRIMARY Rinse with water only, do not use any detergent or soap. Allow the filter to dry for 24 hours before putting it back into the vacuum.
SECONDARY FILTER FOAM WARNING Secondary Filter Electrical Shock Hazard Do not operate the cleaner without the motor safety filter. Be sure the filter is properly installed to prevent motor failure and/or electrical shock. Always unplug power cord from electrical outlet before performing any service on vacuum. Wash the secondary filter in warm soapy water, rinse and dry thoroughly by squeezing the filter in your hand and letting it air dry. ill Check secondary filter frequently and clean when dirty.
EXHAUST FILTER ELECTROSTATIC TO REPLACE FILTER The exhaust filter must be replaced when dirty. It should be replaced regularly depending on use conditions, Slide new filter into cartridge so that the white side will Paceaway from the canister, as shown. The filter CANNOT be washed as it will lose its dust trapping ability, NOTE: See PARTS AND FEATURES for the exhaust filter number, _.
2. Push in and turn bulb counterclockwise to remove. 1. Remove lightcoverby pressing in and lifting both sides as shown. 3. Replace the bulb. Bulb must not be higher than 15 Watts (130 volts). Close light cover until it snaps in place. NOTE: See PARTS AND FEATURES for Bulb Number, TO CLEAN AGITATOR: The agitator must also be cleaned according to the fol]owing schedule: Disconnect cleaner from electrical outlet.
Base 4. Carefully insert and lift screwdriver at each brush support to free brush from base. Brush Support TO REPLACE BELT 1. Slide washers and brush supports onto brush assembly, 2. Install new belt in belt groove on the brush assembly, then over the motor shaft. Be sure belt is under the belt guard. 5, Remove belt from motor shaft, NOTE: See PARTS AND FEATURES for Belt number. 3. Insert both 6, Remove worn belt. ! • CAUTION support tabs into the base slots. Then snap brush supports into place.
TO REPLACE BRUSH DOWEL WARNING 1. Remove Power-Mate ® cover, belt and brush assembly, See "To Remove Belt" in BELT CHANGING AND BRUSH CLEANING. Electrical Shock Or Personal Injury Hazard Disconnect electrical supply before servicing or cleaning the unit, Failure to do so could result in electrical shock or personal injury from cleaner suddenly starting, 2. Remove brush supports and washers from ends of brush assembly. 3. Reassemble brush assembly.
Review this table to find do-it-yourself needed, other than those described rized Sears Service Center. Cleaner won't start. Poorjob of dirt pick-up. Cleaner starts but cuts off. solutions for minor performance 1. Unplugged at wail outtat. 2. Tripped circuitbreakerib_ownfuse at householdservice panel. 3. Loosehoseelectrical connections. 4, Tripped thermat protector in canister. 't. 2. 3. 4. 5, 6, 7. 8. 9. Fullor clogged dust bin, Clogged airflow passages. Dirty _ters. Wrong pile heightsetting.
Antes de usar su aspiradora nueva ..... I Garantia de la aspiradora de Kenmore ... 1 Instrucciones importantes de seguridad ............................ Piezas y caracteristicas .............. Instrucciones de ensemblado ......... Use .................................. Para comenzar ....................... Sugsrenciaspara aspirar ............... Sugerenciassobre el ajuste de nivel de pelo de la alfombra .................... Accesorios ........................... Usede {os accesorios ..................
ADVERTENCIA Su seguridad es muy importante para nosotros. Para reducir el riesgo de incendio, cheque elOctrico, lesion corporal o da_os a! utilizar su aspiradora, actbe de acuerdo con precauciones b._sicas de seguridad, entre elias: Lea este manualantes de armar o utilizarsuaspiradora. Use su aspiradora0nicamenteen Iafarina descrita en este manuel.Use,3nicamentecon accesorios recomendadosper Sears. Para reducirel riesgo de chequee]Octrico,no use su aspiradoraalaire libre ni sabresupe_cies mojadas.
Es importanteconocer las piezas y caractedsticas de su aspiradorapara asegurarsu uso adecuadoy seguro. Examinelasantes de usar su aspiradora. Objeto Pieza N° en EUA Pieza No Canad_ Bombilla 20-5240 596181 Correa 20-5285 40110 Sujetadordel cord6nye! enchufe _.-Sujetadordel cord6nyel enchufe Bot6n de liberaclSn r_plda del mango (Algunos modalos) *-- Cord6n el_ctrico de Power-Mate ® -- Tubo -SuJetador de} cord6n Tubo Tubo superior Luz (Algunos modelos) Sujetador del ¢ord6n ,\ fen EUA #20-52
MANGUERA ACCESORIOS Interruptor de encendido/ apagado de dos posiciones (Piso expuesto/A/fombra) (Alguno$ modelos) Herramienta para hendiduras _ Mango Power-Mate Jr._ (Algunos modelos) I _ cepmop=,_ _ combinaciOn _ _ Cepitlo para pisos (Algun°s rn°delos)-_'-_ll _ _ Handi-Mate Jr." (Algut]os modelos) NOTA:Todoslos modelos cuentancon unjuego de accesoriosen el recept_cu!o.Algunos modelos cuentan con unjuego adiciona]que puedealmacenarse en la botsa pare accesorios de uso e en e] garaje.
Peligro de chequeeI_ctrico No conecte la aspiradora hasta que termine de armarla. De Io contrariopodriacausar un cheque el_ctrico o lesi6n corporal. Antes de armar la aspiradora,chequeela LISTA DE EMBALAJE en la cubiertaseparada de la Lista de Partes para Reparacibn. Use esta listapareverificar que ha recibidotodas las componentesde su nueva aspiradora Kenmore. Bo_n c_r_ del TUBOS Una los tubos desliz_ndolos hasta que el bot6n quede fijo en posici6n.
MANGUERA 2. Jntmduzcael mango en ef tubo hasta que el bot6n quede en posici6n.Aseg_rese de que la manguera no est_ torcida. 1. Alinee Ia pestafia de suieci6n de Ia manguem Con la ranura de Ia aspiradora e introduzca Ia manguera en el recept_culo hasta que quede fija en posici6n. Para retirar: Presione el seguro de Ia manguera y saque la manguera, Pest'aria Bot6n del cierre ...... Bot6n de ......... /iberaci6n r6pida del mango (A/gunos de-:- sujeci6n dela manguera ...........Para retirar:..........
PARA COMENZAR ADVERTENCIA Peligro de lesi6n personal y daSo al producto , NO enchufe la aspiradora si el interrupterest,. en la posici6n ON. Podria causar lesi6n personal o da6o al producto. • El cord6n el6ctrico se mueve r_pidamentedurante el enrollamiento. Presione el rebobinado del cable eI_ctrico con el pie solamente. Msntengaslejados a los ni6os y asegure espacio libre suficientepara evitar Iesiones personales al enrollar el cord6n. • NO use los enchufes Iocalizados sabre los muebles.
Estilo delimpleza sugerido. Para abtener la majoracci6n de limpiezase recomienda empujar la Power-Mate®en direcci6n directamente opuesta a usted y jalarla en linea recta. AI final de cada pasada de regreso,cambie ta dJrecci6n de Ia Power-Mate®hacia la siguiente secci6n a Iimpiar. Continee asia trav6s de toda ta alfombra de una manera lenta y deslizante. Mantenga el paso de afre abierto para lograr los mejores resultados de limpieza, Examine de vaz.
ACCESORIOS DEL TUBa CUIDADO | NO instate n_retire el mango n[ los tubas I cuando la aspiradora est_ encendida. | Esto podria causar chispas y daSar los 1.PararetirarIos tubas de la PowerMate®, col6quelos en la posici6n vertical de bIoqueo, contactos ei_ctricos. ACCESORIOS [I M I1 /j'_ DEL MANGO NOTA:Si tiene instalada la Power-Mate®,apague Ia aspiradora antes de quitar el mango de los tubas, Bot6n cierre 2. ReUreel enchufey el cord6nde la Power-Mate®de lossujetadares.
LIMPIADOR DE ORILLAS SlSTEMA DE AUTO-LIMPIEZA. Active los cepilIosiimpiadoresde orillas a cada lade de la PowerMate®.Pase la PowerMate®junto a [as paredes o junto a los muebles para ayudar a eliminer Ia tierra acumulade en las orillas de la alfombra. Est_aspiradora esta equipada con un sistemade auto-limpieza.Ceda vez qua se extiendeel cable el_ctrico una [eva de limpiezasituada dentro deI cube de [a basuragira y limpia el filtro.
Laaspiradora crea succ{6n o aspiraci6nque levanta latierra. La tierra es irnpulsada a trav_s de las v[as de flujo aire hasta el cubede la baseura per una r&pida corriente de aire, El cube de la baseura ...__ bolsa para po[vo permiteel flujo de aire, pete ("7/"'_ atrapa ta_e,_a. / _"-_----_,, Para [ograr los mejores resultados de _ limpieza,mantenga abiertas las vias ._ de aire. Examine peri6dicamenteIas ./.,f/ _ireasindicadascon asteriscos para /_,_" asegorarse de que no est_n hie- _.,_,_" queadas.
Siempre vacie elcubo delabasura cuando el nivel debasura alcanza la]inea "MAX FILL." PARA VACIAR EL CUBO DE LA BASURA: PAPASACAR EL CUBO DE LA BASURA: Mientrasque sostiene el cubo de la basura sobre uri envase de basura, quite la tapa deI cubo de ta basura levantandola. ADVERTENCIA re desconecteel cord6n _lectrico de reparar alguna parte de la aspia. Presione hacia aba_oen el seguro de desbIoquear el cubo de Ia basura situado sobre la manija del cubo de la basura.
UMPAR EL FILTRO ADVERTENCIA El filtro puede ser limpiado golpeandolo ligeramente en el Iado de un envase de la basura o Enjuaguelo bajo un grifo de agua. Peligrode choque el_ctrico Desenchufeel cable de poderdel tomacorriente. No opere la limpiadorasin ei filtro prlmario o el filtm de escape. Est_ seguro que el flltros est_ Znstalado propiamente para prevenir falla del motor yfosacudida el_ctrica. Enjuague con agua solamente; no utilice ningOn detergente o jabbn.
FILTRO SECUNDARIO ESPUNJA Peligro de choque el_ctrico No opere la aspiradora sin el filtro de seguridad del motor. Asag_urese de que el fiJtro est# seco e instalado adecuadamente pare impedir que ei motor falle y/o que se produzca un choque el_ctrico, Siempre desconecteel cord6n_Jectrico antes de reparar a]guna parte de ta aspiradora. Lave el tiltro secundario con agua caliente y jab6n, enju&gueloy s_quelo bien apret_ndolo con la mano y dejando qua se seque aI aire libra.
FILTRO DE ESCAPE ELECTROSTATICO PARA CAMBIAR EL FILTRO Desliseel nuevo flltro en el cartucho de modo que la cara blanca del illtro yea hacia Este cartuchodel filtroescape se tieneque cambiar est_ sucio.DebecambiarseperibdicamentesegOn las condicionesde use. El filtro no se puede lavarpues perderi_su capacidad para atrapar altrapar polvo. afuera de la aspiradora, segen Io mostrado.
! . i___ _ _ _ _% _'lr_=_ 2. Empuje Ia bombilla hacia adentro y girela en direcci6n opuesta al sentide de las manecillasdel reloj para retirarla. ta de la bombilla ejerciendo presibn 1. Retire hacia adentro la cubiery levantando ambos costados como se muestra. 3. Cambie la bombilla.Esta no debe exceder 15 vatios(130 velt_os),Cierre Ia cubierta de la bombilla hasta que quedebien cerrada, NOTA:Censulte la PIEZASY CARACTERISTICAS para determ]nar el N°. de {a bombilla. CUIDADO .....
Para cambiar la correa 4. Introduzcacuidadosamenteel destornillador y emp_jelo hacia arriba en el lugar delsoperte'dei cepilloparedesprender el cepillo de Ia base. 1. Reinstaielas arandelasy los soportesdel cepilloen el ensemble. 2. ]nstaleuna cortea nueva en la ranura correspondiente del ensarahie del cepi!Io. pas_ndoladespu_s sobre el eje del motor.Asegfirese de que ia correa quede pot debajo dei protector, NOTA: Consulte la PIEZASY CARACTERJSTICAS paradetermineret N°, de coffee. 3.
PARA CAMBIAR MAZO DEL CEPILLO ADVERTENCIA 1. Retire la cubierta, correa y ensembledei cepiilo de le Power-Mate ®Consulte "Pare retirar Ia correa" bajo CAMBIO DE LA CORREAY LiMPIEZADEL CEPILLO. Peiigrode choque eldctrico o lesi6n corporal Desconecte la unidad antes de limpiar!a o darle ser_icio. De Io contrariopodria producirse un choque el_ctrico o causar lesi6n corporal si ta aspiradoraarranca de manera imprevista, 2. Retire Ia sopor_ede] cepilloy arande]asde las ensambledeI cepillo. 3.
Consulteeste tabia pare encontrar soEuciones queustedmismo puedereatizarcuandotenga problemas menoresde rendimiento, Cuatquierservicio que necesite aparte de otros descritos en este manual tienen que ser hechos per un represetante de servicio autorizadoSeam. ADVERTENCIA Pe,gro dochoque el ctrico Desconecte la aspiradoraantes de darle servicio o limpiarla. De Io contrariopodria producirse un cheque el_ctrico o causer lesiSn corporal. ,',,, ii :"_i_............... 1, Es_ desconectade. 2.
Your Home For repair- in your home - of all major brand appliances, lawn and garden equipment, or heating and cooling systems, no matter who made it, no matter who sold it! For the replacement parts, accessoriesand owner's manuals that you need to do-it-yourself. For Sears professional installation of home appliances and items like garage door openers and water heaters. 1-800-4-MY-HOME ® (1-800-469-4663) www,sears.com Anytime, day or night (U.S,A. and Canada) www.sears.