
Manual


CAUTION
DO NOT attach or remove handle or
wands while cleaner is ON. This
could cause sparking and damage
the electrical contacts.
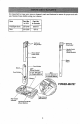
ATTACHMENTS ON HANDLE
NOTE: If the
Power-Mates is
Lock attached, turn
cleaner off
before removing
handle from
wands.
1, Press lock
=== ==. button, then pull
to remove han-
Upper dle from wand.
I
If your modet has the optional feature of a
handle release, press it
in similarly. __
2, Slide attachments firm-
ly on handle as needed.
See chart below.
ATTACHMENTS ON WANDS
1.To remove
wands from Power-
Mate®, lock wands
in straight-up posi-
tion.
2. Remove Power-Mate®plug
and cord from holders.
3, Disconnect cord
and steady Power-
Mate ®with foot and
turn wands until lock
button disappears,
then pull wands out
of Power-Mate _.
4, Put attachment on
wands as needed. See
chart.
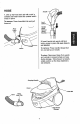
CLEANING AREA
Between Bare Carpeted
ATTACHMENT Furniture*Cushions* Drapes* Stairs Floors :loors/Rugs Walls
Combination Brush &(Some Models) X X X X
CreviceTool
X X
(Some Models) -""-_----,_"
Floor Brush
!_Some Models) X X X
Power-Mate®
(Some Models) X*** X
Handi-Mate Jr.®
X
X
(Some Models)**
Power-Mate Jr.®
ISomoModel,l" , x x i
*Alwaysclean attachments before using on fabrics, ** 2-way On/Off switchshould be in ON position,
*** Handi-Mate Jr.= and Power-MateJr.®attachment instructionsare inctuded with the products, *_ (Some Models)
Power-Mate switchshould bein OFF position.
NOTE: When separatingwands,depress lockbutton completelybefore pullingwandsapart. If
wand lock button is difficultto aepress:push thetwo wandsmore tightly togernerto lineup
the lockbutton withthe hole. uepress Iock bu_on and thenpullwanas apart,
10