Owner's Manual Manual Del Propietario Vacuum Cleaner Aspiradora Model, Modelo 116.22612 116.22613 CAUTION: Read and follow all safety and operating instructions before first use of this product. CUIDADO: Lea y siga todas las instrucciones de operaci6n y seguddad antes del uso de este productor Sears, Roebuck and Co., Hoffman Estates, IL 60179 U.S.A. www.sears.com Part No. C01ZBPW40U00-8192062 Printed in U.S,,A.
Before Using Your New Vacuum ......... Kenmore Vacuum Cleaner Warranty .... 2 Important Safety Instructions .......... Parts and Features ..................... 3 4-5 Assembly 6-7 Instructions ................ Use ................................... How to Start .... ........................... Canister 2 8 8 Vacuuming Tips ........................ 9 Suggested Pile Height Settings ............. 9 Dirt Sensor ............................. 10 Attachments ......................
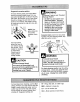
WARNING Your safety is important to us. To reduce the risk of fire, electrical shock, injury to persons or damage when using your vacuum cleaner, follow basic safety precautions including the following: lured hose. The hose contains electrical Read this manual before assembling or wires. Replace if cut or worn. Avoid picking using your vacuum cleaner_ up sharp objects. Use your cleaner only as described in this manual..
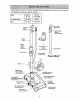
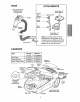
It is importantto knowyourvacuumcleaner'spartsandfeaturesto ensureits properandsafe use,Reviewthesebeforeusingyourcleaner, _em Part No. In U.S. Part No. In Canada Headlight Bulb 20-5240 59618 t Belt 20-5201 20-40979 _-- Cord and Plug Holder Cord and Cord Hotder-_ -- Handle Quick Release (Some Models) Upper Wand Wand Swivel (Some Models) Power-Mate Jr,,,_ Caddy (Some Models) Upper Wand Cord i Power Cord Power-Mate s Belt Wand Quick Release Pedal (Some Models) ._ Power.
HOSE ATTACHMENTS 3-Way On/Off Switch Off/Floor/Carpet (Some Models) Power-Mate Jr.. _ (Some Models) Crevice Tool Dusting Brush Handle Fabric Brush Floor Brush Handi-Mate Jr. _ (Some Models) NOTE: All models have one set of attachments in the canister,, Some models have an additional set, which can be kept in the accessory bag for garage use or other dirty areas° Hose Swivel CANISTER Item Part No, In U.S. Dust Bag Exhaust Part No. In Canada 20-50557 ......
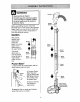
Handle Electrical Shock Hazard DO NOT plug into electrical supply until assembly is complete.
CANISTER HOSE 1. Open the canister hood. 2. Check to see that the dust bag is properly installed,, See BAG CHANGING instructions. for 3, Check to see that the motor safety filter is properly installed_ See MOTOR SAFETY FILTER CLEANING for instructions_ HOOD AND COVER tt is normal for the canister hood and cover to come off when opened further than needed. Line up the hinge slots, insert the hinges into the slots, and close the hood and cover to reinstall. 1.
HOW TO START Personal Hazard Pile Height Indicator Models) Injury and Product Damage Handle • DO NOT plug in if switch is in ON position. Personal injury or damage could result. • The cord moves rapidly when rewinding. Keep children away and provide a clear path when rewinding the cord to prevent personal injury. Pile Height Pedal (Some Models) 3. Lower wand from upright position by pressing on the handle release pedal.
Suggested sweeping pattern, For best cleaning action, the Power-Mate _ should be pushed straight away from you and pulled straight back. At the end of each pull stroke, the direction of the Power-Mate _ should be changed to point into the next section to be cleaned. This pattern should be continued across the rug with slow, gliding motions,, NOTE: Fast, jerky strokes do not provide complete cleaning. Personal Injury Damage Hazard and Product • DO NOT run over power cord with Power-Mate _.
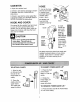
SOME MODELS TO CLEAN THE LENSES The dirt sensor light system is mounted on the Power-Mate ®nozzle near the reset but- 1o Remove the ton. It consists of a series of three red lights and one green light.
ATTACHMENTS ON WANDS 1 SOME CAUTION DO NOT attach or remove handle wands while cleaner is ON. This or 1.To rem ove wands from PowerMate _, lock wands in could cause sparking and damage the electrical contacts. iiiii i ATTACHMENTS ON HANDLE Handle NOTE: If the Power-Mate _ is straight-up position, attached, turn cleaner off before remov- Lock Button ing handle from wands.
CLEANING Between Furniture* Cushions* ATTACHMENT Dusting brush X Crevice tool x Fabric brush X Drapes* AREA Bare Floors Stairs Carpeted Floors/Rugs X x x x Floor brush (SQme Mode{s) l X x CSome X × X** Power-Matee Handi-Mate Jr2 WalIs x x Power-Mate Jr2 x {Some Models)*** "Alwaysclean attachments before using on fabrics *'* Handi-Mate Jr,, _ and Power-Mate Jr '_ attachment ** 3-way OnlOff switch should be in FLOOR position. instructions are included with the prod_.
ELECTRONIC BAG/HOSE CHECK INDICATOR SOME SOME STORAGE MODELS MODELS The light comes on whenever the airflow becomes blocked, dust bag needs changing or canister safety filter needs cleaning. NOTE: The light may come on when using certain attachments, due to reduced airflow through attachment, Refer to TROUBLESHOOTING. MECHANICAL BAG/HOSE CHECK INDICATOR SOME POWER-MATE MODELS When the unit is running, the indicator window wilt be green if there are no clogs.
The vacuum cleaner creates suction that picks up dirt. Rapidly moving air carries the dirt to the dust bag through the airflow passages. The dust bag lets the air pass through, while it traps the dirt, /z(t.,,,_j,_L ///._ \ /_/" .///" J.e,_ For best cleaning results, keep the airflow _.,_._.2" passage open. Check the starred areas ..'.*.2' occasionally for clogs, Unplug from /.._7 outlet before checking.._'_ Motor Safety _ BAG CHANGING Filter,_ FilterEXhaust 7.
1. Unplug cord from wall outlet. DO NOT drip water on cleaner. 2. Clean exterior using a clean, soft cloth that has been dipped in a solution of mild liquid detergent and water, then wrung dry. Wipe dry after cleaning. Do not use attachments if they are wet. Attachments used in dirty areas, such as under a refrigerator, should not be used on other surfaces until they are washed. They could leave marks. 3. To reduce static electricity and dust buildup, wipe outer surface of cleaner attachments.
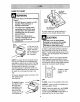
2. Slightly push the exhaust filter WARNING Exhaust cartridge to the side, as shown in the illustration, and pull up to remove° Do not operate with a clogged filterElectrical or without the exhaust I exhaust ire and/or Shock Hazard fi!!e r or exhaust filter cover installed. EXHAUST FILTER 3.
TO CLEAN AGITATOR: TO REMOVE BELT NOTE: In order to keep cleaning efficiency high and to prevent damage to your vacuum, the agitator must be cleaned every time the belt is chan_,, Mate ® upside I down. 2. Unscrew the The agitator must also be cleaned according to the following schedule: two (2) Power1. Turn PowerMate ® cover screws. 3. Turn PowerMate ¢ right side up,, Press handle release pedal and lower the swivel,. Lift rear latches up.
TO REPLACE BELT 4o Line up front of cover and baser Rest 1, Install new belt over motor drive, then over brush cover sprocket, PARTS AND NOTE: See FEATURES for belt number,, on front edge of base as shown. %' Cover e i_ _ _/O_____is_k '_ I[ _1 _ , ,_ Base II _T_ , _ _ Top View 2, Place agitator assembly back into Power-Mate ® _ 5.
TO REPLACE AGITATOR ASSEMBLY Electrical Hazard Shock Or Personal Injury Disconnect electrical supply before servicing or cleaning the uniL Failure to do so could result in electrical shock or personal injury from cleaner suddenly starting° .......... iiii qlll I iiiil,lql TO CHECK AGITATOR ASSEMBLY -_=:::=__ ___are Base Support Bars When brushes support bars, wornthe to the replace level of the base agitator assembly., 1.
Reviewthis table to find do-it-yourselfsolutionsfor minor performanceproblems.Any service needed,other than those describedin this owner'smanual,should be performedby an authorizedSearsServiceCenter. Cleaner won't start, Poorjob of dirt pfck-up, Cleanerstarts but cutsoff 1 Unpluggedat wailoutlet, 2. Trippedcircuit breakedblownfuse at household service panel 3, Loosehoseelectrical connections. L Plug in firmly, push ON/OFFswilch to ON 2o Reset circuitbreakeror replace fuse 3.
Your Home : = For repair - in your home - of all major brand appliances, lawn and garden equipment, or heating and cooling systems, no matter who made it, no matter who sold it! ;:::_bl_i/(_::_!; For the replacement parts, accessories and owner's manuals that you need to do-it-yourself. Ld'd 4i For Sears professional installation of home appliances and items like garage door openers and water heaters.