Use & Care Guide ManuaJ de Uso y Cuidado Kenmore }d_®de/#,/%®deo "/16,_ 26'/4 Vacuum Cleaner Help Line: 1-877-531-7321 8:00am-5:00pm EST, M-F (U.S.A. and Canada) Sears Brands Management Hoffrnan Estates, 60179 USA www.kenmore.corn www.sears.corn www.krnar t.
Before Using Your New Vacuum Cleaner .............................................................................. Packing List .......................................................................................................................... Kenmore Vacuum Cleaner Warranty .................................................................................... important Safety instructions ................................................................................................
KENMORE LIMITED WARRANTY FOR ONE YEAR from the date of sale this appliance is warranted against defects in material or workmanship when it is correctly installed, operated and maintained according to all supplied instructions. WITH PROOF OF SALE, return a defective appliance to the retailer from which it was purchased for free repair or replacement at option of seller. This warranty applies for only 90 DAYS from the sale date if this appliance for other than private household purposes.
Read all instructions in this guide before assembling or using your vacuum cleaner. WARNING: Your safety is important to us. To reduce the risk of fire, electrlcal shock, injury persons or damage when using your vacuum cleaner, follow basic safety precautions including the following: to Use your vacuum cleaner only as described in this guide. Use only with Sears recommended attachments. Use extra care when cleaning on stairs. Do not put on chairs, tables, etc. Keep on floor.
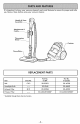
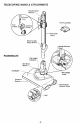
It is important to know your vacuum cleaner's parts and features to ensure itsproper and safe use. Review these before using your vacuum cleaner. Handle & Hose Attachments & Cadd_ Telescoping REPLACEMENT PARTS Item StymeNo. Belt CB-3 Headlight Bulb Part No. in USA Part No. in Canada 20-53013 20-40]]8 ..... 20-5248 20-40601 Exhaust Filter EF-9 20-53296 20-40195 Primary Filter ..... Available through KC44KDMTZ000 Sears Service Centers.
TELESCOPING WAND & ATTACHMENTS Handle Quick Pet PowerMate pic Wand Wand Length Adjust -Handle Pedal Release POWERMATE Pile Height Belt Reset Headlic Pedal Furniture Guard Release Belt -6- Quick Pedal
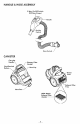
HANDLE & HOSE ASSEMBLY 3-Way On/Off Switch Off/FIo_ /Carpet Hose Swivel CANISTER Carrying Filter (Inside) Cord Rewind Dust Cup Cord Tray Hose Port HEPA Media Exhaust Filter (Inside) -7-
Please pay special attention to these hazard alert boxes, and follow any instructions given. WARNING statements alert you to such dangers as fire, electric shock, burns and personal injury. CAUTION statements alert you to such dangers as personal injury and/or property damage. WARNING Electrical Shock Hazard DO NOT plug into electrical supply until assembly is complete. Failure to do so could result in electrical shock or injury.
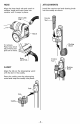
HOSE ATTACHMENTS Align the hose latch tab and notch in canister hood and insert hose into canister until it snaps in place. Instalt the crevice tool and dusting into the caddy as shown. Hose Latch brush Crevice _ Notch S To remove: Press hose latch tab inward and pull out on hose. usting Brush 111 Hose Latch Crevice Tool_ CADDY Brush Align the tab on the telescoping with the slot in the caddy. wand Press the caddy onto the telescoping wand and snap the caddy into place. Tab-\ Slot- -9-
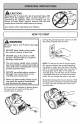
,CAUTION Moving parts! To reduce the risk of personal injury, DO NOT touch the agitator when vacuum cleaner is on. Contacting the agitator while it is rotating can cut, bruise or cause other injuries. Always turn off and unplug from electrical outlet before servicing. Use caution when operating near children. HOW TO START 2. Plug the polarized power cord into a 120 Volt outlet located near the floor.
3. Lower handle from upright position pressing on the handle release pedal. by 5. Select a switch position on the handle. OFF - turns off both the canister and the PowerMate motors. FLOOR - turns on the canister motor only. Handle CARPET - turns on both the canister and the PowerMate motors. NOTE - When this switch is in the FLOOR position, the headlight DOES NOT function since no electricity flows to the PowerMate. 4.
VACUUMING _WARNING Personal Hazard WARNING injury and Product Damage Personal injury Hazard Use care if canister is placed on stairs. may fall, causing personal injury or property damage. DO NOT run over power cord with PowerMate. Personal injury or product damage could result. DO NOT pull plug from wall by the power cord. if there is damage to the cord or plug, personal injury or property damage could result.
ATTACHMENTS ATTACHMENTS ON TELESCOPING WAND _CAUTION DO NOT attach or remove handle or telescoping wand while vacuum cleaner ON. This could cause sparking and damage the electrical contacts. 1. To remove telescoping wand from PowerMate, lock telescoping wand in straight-up position. is / ATTACHMENTS ON HANDLE / NOTE: If the PowerMate is attached, turn off and unplug vacuum cleaner before removing handle from telescoping Lock Button Handle Quick Release Button-- 2.
ATTACHMENT USE TABLE CLEANING ATTACHMENT Crevice fool Furnito_o 1 Between Cushions1 Drapes 1 v' v' v' _ Dusting brush _ v' AREA Stairs v' Bare R.... Carpeted Roors/Rugs Wails v' v' PowerMafe Pet PowerMafe 3 _ v' v' ]. Always clean attachments before using on fabrics. 2. 3-way switch should be in FLOOR position. 3. Pet PowerMate attachment instructions are included with the product.
BELT RESET SUCTION The PowerMate has built-in protection against motor and belt damage should the agitator jam. If the agitator slows down or stops, the belt reset shuts off the PowerMate. The canister motor will continue The suction control allows you to change vacuum suction for different fabrics and carpet Bo..o.o, Button_ //fl _ the weights. Opening the control decreases suction for tO run.
REMOVING CLOGS The vacuum cleaner creates suction that picks up dirt. Rapidly moving air carries the dirt to the dust cup throughthe airflow passages. The dust Cup lets the air pass through, while it traps the dirt. For best cleaning results,keep the airflow passage open. Check the starred areas occasionally for clogs. Turn off and unplug vacuum cleaner from outlet before Tele,copic checking. Primary PowerMate TO CHECK FOR CLOGS: If the vacuum suction, Check dust cup and empty if full.
EMPTYING TO REMOVE DUST CUP TO EMPTY DUST CUP 1. Turn off and unplug vacuum 2. Lift dust cup handle of the dust cup. DUST CUP 1. Rotate dust cup handle to the vertical position. cleaner. located at the top Dust Cup Handle Cup 2. Hold dust cup over a trash container. Handle Cup 3. Press the dust cup latch slightly outwards and downward to Cup release the door. _Dust Latch The door will swing open and the debris will fall into the trash container. 3.
PRE-FILTER CLEANING To Reinstall: The pre-fitter is located inside the dust cup. Check the pre-filter frequently and clean when dirty. 1. Align the slots on the pre-fitter 1. Remove the dust cup as outlined in the DUST CUP CLEANING (page 17). NOTE: Make debris before -Tabs Slots alignment tabs with the inside dust cup lid assembly. sure dust cup is free of opening. //. ,//_ '2. Rotate prefilter clockwise to lock in '2.
PRIMARY RLTER CLEANING The primary filter is located inside the dust To Relnstalh cup lid. 1. Place the primary cup lid. filter into the dust It is recommended to clean the primary filter with cold water at least every (1) month, Check the primary filter frequently and clean when dirty, NOTE: When the cleaning of the filter no longer restores vacuum cleaner suction to full power, replace the filter. Primary Filter 1. Remove the dust cup as outlined in the DUST CUP CLEANING (page 17). 2.
EXHAUST FILTERCHANGING 3. Replace exhaust filter cartridge. Place the new filter cartridge into the exhaust filter tray as shown. WARNING Fire and/or Electrical Shock Hazard Do not operate with a clogged exhaust filter or without the exhaust filter or exhaust filter tray installed. HEPA MEDIA EXHAUST FILTER _h The exhaust filter cartridge must be replaced when dirty. Replace the filter when the entire surface area is covered evenly. The filter CANNOT be washed as it will lose its dust trapping ability.
Always follow all safety precautions when performing maintenance on the PowerMate. WARNING Electrical Shock Or Personal Injury Hazard. Always turn off and unplug vacuum cleaner before performing maintenance to the vacuum cleaner, Failure to do so could result in electrical shock or personal injury from vacuum cleaner suddenly starting. BELT CHANGING AND AGITATOR CLEANING TO REMOVE BELT TO REPLACE BELT 1. Turn PowerMate upside down. 2. Unscrew two (2) PowerMate cover screws. I.
TO CLEAN AGITATOR: iMPORTANT NOTE: in order to keep cleaning efficiency high and to prevent damage to your vacuum cleaner, the aqitator must be cleaned every time the belt is chan eqed. Turn off and unplug vacuum cleaner from electrical outlet. Check and remove hair, string and lint build-up frequently in the PowerMate agitator and end cap areas.
AGITATOR SERViCiNG TO REPLACE AGITATOR ASSEMBLY ,_WARNING Electrical Shock Or Personal injury Hazard Turn off and unplug vacuum cleaner elecfrlcal supply before performing maintenance to the vacuum cleaner. Failure to do 1. Remove PowerMate cover, belt and agitator assembly. See "To Remove Belt" in BELT CHANGING AND AGITATOR CLEANING (pages 21-22). so could result in electrical shock or personal injury from vacuum cleaner suddenly starting. 2.
Review thistabletofinddo-it-yourself solutions forminorperformance problems. Anyother service needed should beperformed bya Sears orotherqualified service agent. WARNING Always turn off and vacuum cleaner. unplug vacuum cleaner before performing Failure to do so could result in electrical Vacuum cSeaner won't start. 1. Unplugged 2. Tripped circuit breaker/ blown fuse at household Poor job of dirt pick-up. service panel. Loose hose electrical connections. 1. 2. 3. 4.
Vacuum cleaner picks up moveable rugs -or- PawerMate pushes too hard. 1. Wrong 2. Suction Light won't work. 1. Burned out light 2. Tripped overload in PowerMate. Cord won't rewind. 1. Dirty power cord. 2. Cord jammed. Vacuum cSeaner leaves marks on carpet. 1. Wrong vacuuming pile height too strong. setting. bulb. protector 1. Adjust 2. Open setting. suction control. 1. Change light bulb. 2. Remove any items that may be caught or jammed, then reset.
- 26 -
Antes de usar su aspiradora nueva ................................................. Lista de embalaje ........................................................... Garantia de la asplradora de Kenmore .............................................. Instrucclanes importantes de secjuridad ............................................. Piezas y caracteristicas ......................................................... Instrucciones de ensamble ...............................................
Garanfia limitada de Kenmore DURANTE un afio a partir de la fecha de compra este aparato est6 garantizado contra defectos de material o mano de obra cuando sees instalado correctamente, operado y mantenido seg6n las instrucciones suministradas. CON LA PRUEBA DE COMPRA, devuetva el aparato defectuoso a la tienda donde Io compr6 para la reparaci6n o reemplazo sin costo a discreci6n del vendedor.
Lea las instrucciones en este manual antes de armar o usar su aspiradora. 4k ADVERTENCIA Su seguridad es muy importante pare nosotros. Para reducir ei riesgo de incendio, choque electrico, lesi6n corporal o daEos al utilizar su aspiradora, act_e de acuerdo con precauciones b&sicas de seguridad, entre elias: Use su aspiredere Onicemente en le forme descrite en este manual. Use Onicamente cen accesorios recomendedos por Sears. Desconecte el cord6n el_ctrico antes de componer o limpier el 6tee del cepillo.
Esimportante conocer laspiezas ycaracteristicas desuaspkadora paraasegurar suusoadecuado yseguro, Examlnelas antes deusarsuaspiradora, Ensamble de manguera V mane Accesorios V bande" Tubo Telesc6 " Recept6culo PARTES DE REEMPLAZO Objeto EsfiloNo. Correa CB-3 Pieza N° en EUA Pieza N° en Canad6 20-53013 20-40118 Bombilla ..... 20-5248 20-40601 Filtro de escape EF-9 20-53296 20-40195 Filtro primario ..... Disponible en el centro de servicio I
TUBO TELESCOPICO & ACCESORIOS para hendiduras Pet PowerMate Soporte de herramientas T_, Telesc6pico Bot6n de ajuste de - Pedal de liberaci6n del mango Indicador de nivel de pelo de la Bot6n de restauraci6n "Reset" Protector de Protector muebles-- Pedal de selecci6n de nivel de pelo de la alfombra de Pedal de liberaci6n r6pida del tubo Correa -5-
MANGUERA Y MANGO Interruptor de encendido/ apagado de tres posiciones (Off/FSoor/Carpet) (Apagado/Piso/Alfromba) gO Dispositivo de la manguera RECEPTACULO Manija de transportaci6n-_ Be_tr6anden -_ ;/'_ /-- Filtro primario (dentro) _ /-- Contenedor el_ctrico _ _depolvo .
Pot favor pongo especial atenci6n a 6stos recuadros con olerta de riesgo. Advertencla: Este informaci6n le alertor6 del peligro de fuego, choques el6ctricos, quemadas y lesiones. Culdado: Esto informaci6n le alertara de petigros como lesiones y dodos de propiedad. _ADVERTENCIA Manc Pellgrode choque el6ctrlco No conecte la aspiradora basra que termine de armarla. De Io contrarlo podfia causar un choque el6ctrico o lesi6n corporal.
MANGUERA ACCESORIOS Alinee la pestaSo de sujeci6n de la monguero y la ranuro de la cubierta det recept6culo e introduzca la manguera en el recept6culo hosta que quede fija en posici6n. Coloque la herramienta para hendiduras y el cepillo para sacudir en la bandeja. Herramienta para _illo para sacudir Para retirar: Presione et pestitlo de la manguera y tire de la manguera.
CUIDADO iPartes en movlmlento! Para reduclr el rlesgo de da_os corporales, no toque el agltador cuando la asplradora est6 encendida. El tocar el agitador mientras que est6 glrando puede cortar, contusionar o causar otras lesiones. Siempre apague y desconecte del tomacorriente antes de dar mantenlmlento. Tenga culdado al asplrar cerca de ni_os. PARA COMENZAR 2. Conecte el cord6n el_ctrico polarizado en un enchufe de 120 voltios que se encuenire cerca del piso.
5. Seleccione una posici6n det interruptor en e! mango. 3. Baje el tubo desde la posici6n vertical pisando el pedal de liberaci6n del mango. OFF - apaga los motores del recept6culo y de la PowerMate. Pedal de liberaci6n del mango FLOOR - s61oenciende et motor del recept6culo. CARPET - enciende los motores del recept6culo y de la PowerMote. 4. Seleccione una altura de pelo de la alfombra usando el pedal pequeSo ubicado en la parte posterior de la PowerMate.
SUGERENCIAS PARA ASPIRAR _ADVERTENCIA Peligro de lesi6n :_roducio personal y da_o al Tenga cuidado si coloca el recept6culo sobre escalones. Si se cae, podHa causar Peligro de lesi6n personal No atropelle el cord6n el@ctrico con la PowerMate. Hay un peligro de lesi6n corporal o unos da_os de posesiones. No tire del cord6n el@ctrlco de la pared para desenchufarlo. Si hay dodos en el cord6n el@ctrico o el enchufe, hay un peligro de lesi6n corporal o unos dodos de poseslones.
ACCESORIOS ACCESORIOS DEL TUBa _CUIDADO 1. Para retirar el tuba de la PowerMate, col6quelos en la posici6n vertical de bloqueo. NO instale nl retire la manguera ni los tubas cuando la asplradora est_ encendlda. Esto podria causar chispas y da_ar los contactos el_ctricos. / / ACCESORIOS DEL LA MANGUERA NOTA: Si tiene instalada la PowerMate, apague y desconecte la aspiradora antes de quitar la manguera de tuba Bot6n telesc6pico, de cierre 1.
CUADRO DE USO DE LOS ACCESORIOS AREA A LIMPIAR ACCESORIO Moebles Herramlenta para hendiduras _ I Entre cojines I v' Cortinas I v' Escal .... d .... Pisos biertos Pisos alfornbrados/ alfornbras Paredes v' Cepillo sacudir para v' v' v' v' PowerMate Pet PowerMate 3 1. Siempre limpie los accesorios antes de usar sabre telas. 2. El interruptor de 2 posiciones debe estar en la posici6n FLOOR (PISO). 3. Pet HandiMate incluyen sus propias instrucciones para usa de accesodos.
CONTROL DE ASPIRACION PROTECTOR DEL MOTOR El control de aspiraci6n le permite cambiar la potencia de aspiraci6n de la aspiradora dependiendo del grosor de la tela o alfombra. La aspiraci6n se disminuye, para limpiar cortihas y tapetes ligeros, abriendo el control; para aspirar mueblesy alfombras, el control debe cerrarse para aumentar la aspiraci6n.
REMOVER OBSTRUCCIONES La aspiradora crea succi6no aspiraci6n que levanta la tierra. Esta r6pida corriente de aire impulsa la tierra a trav_s de losconductos de aire hasta el contenedor de polvo. El contenedor de polvo atrapa la tierra, pero permite el paso de1aire. Para Iocjrar los mejores resultados de limpieza, mantencja abiertas las vias de aire. Examine peri6dicamente las 6reas indicadas con asteriscos para asecjurarsede que no est_n bloqueadas.
LIMPIEZA DEL CONTENEDOR DE POLVO PARA RETIRAR EL CONTENEDOR DE POLVO PARA VACIAR EL CONTENEDOR DE POLVO 1. Apague 1. Gire el mango del contenedor de basura a la posici6n vertical. y desconecte la aspiradora. 2. Levante el cerrojo del canasto de basura o de la contenedor de polvo de polvo del contenedor de polvo de polvo 2. Coloque el contenedor de basura sobre un recipiente de basura. = _"_\ \-_,ll \_,,,_/ ______ 3.
LIMPIEZA El pre-fittro contenedor frecuencia sucio DEL PRE-FILTRO Para relnslalar: se encuentra dentro del de polvo. Inspeccione con el pre-filtro y ffmpielo si est6 1. Alinee la ranura det pre-filtro con la lengLieta L,/I /]- LangLietas Ranuras ocozo eo 1. Retirar et contenedor de polvo. Vea LIMPIEZA DEL CONTENEDOR DE POLVO (P6g ]6). del contenedor de polvo. NOTA: Vaci@ el contenedor de polvo. '2. Gire et pre-filtro hacia la derecha 2.
LIMPIEZA DEL FILTRO PRIMARIO El filtro primario se encuentra dentro de la tapa del contenedor de basura. Para remplazar: 1. Poner el filtro primario dentro tapa del contenedor de polvo. de la Es recomendable limpiar et filtro con agua frfa por Io menos una vez al mes. Revisar el filtro primario cuando sea necesario. y limpiarlo primario lavable NOTA: Una vez que haya limpiado el filtro, y la aspiradora no alcanza la potencia m6xima de succi6n, necesitar6 reemplazar el filtro. '2.
CAMBiO DEL FILTRO DE ESCAPE 3. Reemplace el filtro de escape. Coloque un nuevo filtro de escape en la bandeja del filtro coma se muestra. ADVERTENCIA Pellgro de choque el_ctrlco No opere can un filtra de escape bloqueada a sin el filtra de escape a la cubierta del filtra de escape instalados. FILTRO DE ESCAPE Filtre de escape El filtro de escape se debe cambiar cuando est_ sucio. Cambie el filtro cuando su superficie est_ cubierta par completo.
Siempre deber6n seguirse todas las precauciones de seguridad antes de efectuar mantenimiento en la PowerMate. ,i_ ADVERTENCIA Pellgro de choque el_ctrico o lesi6n corporal Desconecte la corriente antes de efectuar rnantenimiento a su aspiradora. podria produclrse un choque el_ctrico o causar lesi6n corporal si la aspiradora manera imprevista. De Io contrario arranca de CAMBIO DE LA CORREA Y LIMPIEZA DEL AGITADOR PARA RETIRAR LA CORREA 4. Para quifar la cubierfa, agarre los lados y jale hacia fuera. 1.
PARA RETIRAR LA CORREA correa LIMPIEZA DEL AGITADOR NOTA: Para mantener una aita eficiencia de limpieza y evitar el daSo a la aspiradora, hay que limpiar el agitador cada vez que se cambia la correa. nueva sobre el impulsor 1. Instale de1 una motor y r ,uego sabre-_\_ la ruta de la _orrea, ._./ \ _ Agitador \ _ Ruta de _ _o.
CAMBIO DE LA BOMBILLA ADVERTENCIA Peligro de choque poral el_ctrlco _CUIDADO o lesi6n cor- No use una bombllla de m6s de 9W (13V). Cuando se use la asplradora por un largo periodo de fiempo, el calor de la bombilla puede calentar las partes de pl6sfico cerca. Apagu_ y desconecte la unldad antes de limplarla o darie servlcio. De Io contrario podria producirse un choque el_ctrico o causar lesi6n corporal sl la asplradora arranca de manera imprevlsta. 3.
CUIDADO DEL AGITADOR PARA CAMBIAR EL AGITADOR _ADVERTENCIA 1. Retire la cubierta, correa y ensambledel agitador de la PowerMate Consulte "Para retirar la correa" ba]o CAMBIO DE LA CORREAY LIMPIEZA DELAGITADOR. Pellgro de choque el_ctrlco a lesi6n corporal Desconecte la corriente antes de efectuar el mantenimlento a su asplradora. De b contrarlo podria produclrse un choque el_ctrlca o causar lesi6n corporal sl la aspiradara arranca de manera imprevista. 2. Reemplace el agitador. 3.
Revise este recuadro para encontrar soluciones a problemas que puede corregir usted mlsmo. Cualquler otro servlclo debe ser realizado por SEARS u otro agente de servlclo caEficado. Apa__ento asu aspiradora. De Io con|rarlo podHa produclrse un choque el_ctrlco o causar lesi6n corporal. La aspiradora arranca. no 1. Est6 desconectada. 2. Cortacircuitos botado o fusible quemodo en el toblero de servicio de la residencio. 3. Conexiones el_ctricos de la manguera sueltas. No aspira satisfactoriamente.
La aspiradora Sevanta tapetes o es diflcil empujar Sa PowerMate. 1. Ajuste incorrecto de nivel pelo de Io olfombro. 2. Abro el control de de ospiroci6n. 1. Ajuste el nivel. 2. Aspiroci6n demosiodo potente. La luz no funciona. 1. Bombilla fundida. 2. Protector contro sobrecarcjos de Io PowerMote botodo. 1. Cambie Io bombilla. 2. Retire cuolquier objeto atorodo o atoscado, luego restablezco.
Your For troubleshooting, Home product manuals and expert advice: managemylife www.managemylife.com For repair - in your home - of all major brand appliances, lawn and garden equipment, or heating and cooling systems, no matter who made it, no matter who sold it ! For the replacement parts, accessories and owner's manuals that you need to do-it-yourself. For Sears professional installation of home appliances and items like garage door openers and water heaters. 1-800-4-MY-HOME ® (1-800-469-4663) www.