Owner's Manual Manual Del Propietario Vacuum Cleaner Aspiradora Model, Modelo 116.23312 116.23313 CAUTION: Read and follow all safety and operating instructions before first use of this product. CUIDADO: Lea ysiga todas las instruccionesde operaci6n y seguridadantes del uso de este producto. Sears, Roebuck and Co., Hoffman Estates, IL 60179 U.S.A. www.sears.com Part No. Ca1ZCFTf30U(3_-8192776 Printed in U.S.A.
Before Using Your New Vacuum ....... Kenmore Vacuum Cleaner Warranty Important Safety Instructions ......... Parts and Features ................. Assembly Instructions ............. 9 9 10 10 11 Care ...................... 12 Bag Changing ..................... Cleaning Exterior and Attachments ..... Motor Safety Filter Changing .......... Exhaust Filter Changing .............. 2 3 4-5 Power-Mate ®Care 8 8 VacuumingTips ..................... Suggested Pile Height Settings ......... Attachments.....
Yoursafety is importantto us,To reducethe risk of fire, electrical shock, injury to persons or damagewhen using your vacuumcleaner,follow basic safety precautions including the following: Read this manualbeforeassemblingor usingyourvacuumcleaner. Use your cleaner onlyas described in this manual. Use only withSears recommended attachments. To reduce the risk of electrical shock - Do not use outdoors or on wet surfaces. Disconnect electrical supply before servicing or cleaning out brush area.
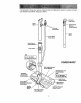
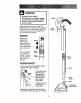
It is important to know your vacuum cleaner's parts and features to assure its proper and safe use. Review these before using your cleaner. _- Upper -- Cordand CordHolder -- Power Cord and Plug Holder Handle Quick Release (Some Models) Upper Wand Cord Wand Swivel (Some Models) _ [ Belt In U.S. #20-5285 In Canada #20-40110 POWER-MATE® Pile Height Indicator (Some Models) Headlight and Lens (Some Models) Bulb and Quick elease Pedal In U.S.
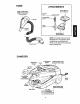
HOSE ATTACHMENTS Power-Mate Jr." (Some Models) 3-Way On/Off Switch Off/Bare Floor/Carpet (Some Models) Crevice Tool _ Combination Brush Handle Floor Brush Handi-Mate Jr.° (Some Models) NOTE: All models have one set of attachments in the canister. Some models have an additional set, which can be kept in the accessory bag for garage use.
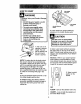
Electrical Shock Hazard DO NOT plug into electrical supply until assembly is complete. Failure to do so could result in electrical Handle shock or injury. Before assembling vacuum, check the PACKING LIST on the cover of the separate Repair Parts List. Use this list to verify that you have received all the components of your new Kenmore vacuum. Handle WANDS Slide wands together until wand button Bu@on snaps into place. Turn wand button to the slotted area of the wand swivel.
CANISTER 1. Open the canister Handle- hood. 2. Check to see that the dust bag is properly installed. See BAG CHANGING for instructions. 3. Check to see that the motor safety filter is properly installed. See MOTOR SAFETY FILTER CLEANING for instructions. HOOD It is normal for the canister hood to come off when opened further than needed. Line up the hinge slots, insert them, and close the hood to replace it. M dels) _ 2. Insert handle into wand until lock HOSE button snaps in place.
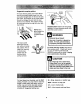
HOW TO START Pile Height icator Pe_SaOr;alInjury and Product Damage • DO NOT plug in if switch is in ON position. Personal injury or damage could result. Handle • The cord moves rapidly when rewinding. Keep children away and provide a clear path when rewinding the cord to prevent personal injury. Release Pedal 3. Lower wand from upright position by pressing on the handle release pedal. • DO NOT use outlets above CAUTION counters. Damage from cord to items in surrounding area could occur.
Suggested sweeping pattern. Suction Control For best cleaning action, the Power-Mate ® should be pushed straight away from you and pulled straight back. At the end of each pull stroke, the direction of the Power-Mate ® should be changed to point into the next section to be cleaned. This pattern should be continued across the rug with slow, gliding motions. Carpeted stairs need to be vacuumed regularly. For best cleaning results, fully close the suction control.
I ATTACHMENTS ON WANDS CAUTION i It DO NOT attach or remove handle or wands while cleaner is ON. This J_s t. To remove wands from PowerMate ®, lock wands in straight-up position. could cause sparking and damage the electrical contacts. ATTACHMENTS ON HANDLE NOTE: If the Power-Mate ®is 2. Press wand attached, turn cleaner off Handle before removing handle from wands. Release Pedal release pedal with foot and m pull the wands straight up out of Power-Mate ®. 1.
PERFORMANCE INDICATOR SOME MODELS EDGE CLEANER Active brush edge cleaners are on both sides of the PowerMate ®. Guide either side of the PowerMate ®along baseboards or next to If the performance indicator turns entirely red check for a full dust bag, or a clog in the vacuum. See HOW YOUR VACUUM WORKS. furniture to help remove dirt trapped at carpet edges.
The vacuum cleaner creates suction that picks up dirt. Rapidly moving air carries the dirt to the dust bag through the airflow passages. The dust bag lets the air pass through, while it traps the dirt. For best cleaning results, keep the airflow passage open. Check the starred areas occasionally for clogs. Unplug from outlet before checking. Motor Safety Filter BAG CHANGING Exhaust Filter 7. The red bag mount will flip forward after removing bag.
1. Unplug cord from wall outlet. DO NOT drip water on cleaner. 2. Clean exterior using a clean, soft cloth that has been dipped in a solution of mild liquid detergent and water, then wrung dry. Wipe dry after cleaning. Do not use attachments if they are wet. Attachments used in dirty areas, such as under a refrigerator, should not be used on other surfaces until they are washed.They could leave marks. 3. To reduce static electricity and dust buildup, wipe outer surface of cleaner and attachments.
WARNING Fire and/or Electrical 2. When the exhaust filter Shock Hazard becomes dirty, remove it by pulling straight up. Do not operate with a clogged exhaust filter or without the exhaust filter or exhaust filter cover installed. EXHAUST FILTER HEPA 3. Place the new filter into the motor cover with the The exhaust filter cartridge must be replaced when dirty. Replace the filter when the entire surface area is covered evenly.
1. Remove light cover by pressing in and lifting both sides as shown• Push In _ And r_,q.._ Turn 2, Push in and turn bulb counterclock3. Replace the bulb• Bulb not be wise must to remove. higher than 15 Watts __ cover it snaps (130V).until Close light in place. NOTE: See PARTS AND FEATURES for Bulb #. TO REMOVE BELT 4. Turn PowerMate ®right side up. Press handle release pedal and lower the swivel. Rotate cover forward from back • \ until front snaps free. 1.
TO CLEAN AGITATOR: TO REPLACE BELT NOTE: In order to keep cleaning efficiency high end to prevent damage to your vacuum, the agitator must be cleaned every time th_ belt is changed. MoOr Drive The agitator must also be cleaned according to the following schedule: Vacuum Use Clean Agitator HEAVY (used daily) every week MODERATE - Brush Suppo_ every month (used 2-3 times/week) LIGHT - every 2 months (used 1 time/week) NOTE: See PARTS AND FEATURES for Belt #. Brush Sprocket 2.
TO REPLACE AGITATOR Electrical Hazard 1. Remove Power-Mate ®cover, belt and agitator assembly. See "To Remove Belt" in BELT CHANGING AND AGITATOR CLEANING. Shock Or Personal Injury Disconnect electrical supply before servicing or cleaning the unit. Failure to do so could result in electrical shock or personal injury from cleaner suddenly starting. 2. Replace Agitator 3. Replace belt, agitator assembly, PowerMate®cover, light bulb and light cover.
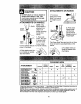
Review this chart to find do-it-yourself solutions for minor performance problems. Any service needed, other than those described in this owner's manual, should be performed by a Sears authorized ! service representative. Disconnect electrical supply Failure to do so could result Cleaner won't start. Poorjob of dirt pick-up. Cleaner starts but cuts off. before servicing or cleaning the unit. in electrical shock or personal injury, 1. Unpluggedat wall outlet. 2.
Antesde usarsu aspiradoranueva ..... 1 Garantia de la aspiradora de Kenmore ... 1 Instrucciones importantes de seguridad ............................ 2 Piezas y caractedsticas .............. 3-4 Instrucciones de ensemblado ......... 5-6 Use .................................. Para comenzar ....................... Sugerencias para aspirar ............... Sugerencias sobre el ajuste de nivel de pelo de la alfombra .................... Accesorios ........................... Uso de los accesorios .............
ADVERTENCIA Su seguridad es muy importante para nosotros. Para reducir el riesgo de incendio,choque el_ctrico, lesi6n corporal o dahos al utilizar su aspiradora, actBe de acuerdo con precauciones bdsicas de seguridad, entre elias: Leaeste manualantesde armaro utilizarsuaspiraNo use laaspiraderasi la mangueraest', rota.La dora. mangueracontienealambres electricos.Cdmbiela si esta rotao desgastada.Eviteaspirar objetos Usesu aspiradera0nicamenteen la forma descfita en este manual.
Es importante conocer Laspiezas y ¢.,aracter(sticasde su aspiradora para asegurar su uso adecuado y seguro. Examinelas antes de usar su aspiradora. -_-- uJetador del cord6n y el enchufe superior Su]etador del cord6n y el enchufe Cord6n el_ctrtco de Power.
MANGUERA ACCESORIOS Interruptor de encendido/ apagado de tres posiciones (Apagado/Piso expuesto/Alfombra) (Algunos modelos) Herramienta pare Power-Mate Jr.* (Algunos modalos) combinaci6n _ Cepillo pare pisos _ -_11 CA,ounosmo o,os Handi-Mate Jr.® (Algunos modelos) NOTA:To(loslos modelos cuentan con un juego de accesoriosen el receptdcu. Io.Algunosmodelos cuentancon unjuego adicionalque puede almacenarseen la bolsapara accesoriosde uso e en el garaje.
ADVERTENClA Peligro de choque eldctrico No conecte la aspiradora hasta que termine de armada. De Io contrario podrfa causar un choque eldctrico o lesi6n corporal. Antes de armar la aspiradora, chequeela LISTA DE EMBALAJE en la cubierta separada de la Lista de Partes para Reparacion. Use esta lista para verificar que ha recibido todas las componentes de su nueva aspiradora Kenmore. TUBOS Una los tubos desliz_ndolos hasta que el bot6n quede fijo en posici6n.
RECEPTACULO 2. Introduzca el mango en el tubo hasta que el bot6n quede en posicion. Aseg_rese de que la manguera no 1. Abra la tapa del recept&culo. 2. Examine la bolsa para polvo este instalado correctamante.Consulte las instruccionesde instalaci6n en la CAMBIO DE LA BOLSA. 3. Examineel filtro de seguridad del motor este instaladocorrectamante. Consulte las instrucciones de instalaci6n en LIMPIEZA DEL FILTRO DE SEGURIDAD DEL MOTOR.
PARA COMENZAR lndicador de nivel Io de la alfombra _eodgrotdo e lesi6n personal y daho al • NO enchufe la aspiradora si el interruptor estd en la posicion ON. Podria causar lesi6n personal o daho al producto. • V Pedal de liberaci6n del mango • El cord6n el_ctrico se mueve rdpidamente durante el enrollamiento. Mantenga alejados a los nihos y asegure espacio libre suficiente para evitar lesiones personales al enrollar el cord6n, selecci6n de nivel de pelo de la alfombra 3.
Estilo de limpieza sugerido. Control de Para obtener la mejor acci6n de limpiezase recomienda empujar la Power-Mate®en direcci6n directamente opuesta a usted y jalafla en linea recta. AI final de cada pasada de regreso, cambie la direcci6n de la Power-Male® hacia la siguiente seccion a limpiar. Continee asi a traves de toda la alfombra de una manera lenta y deslizante. Los escalones alfombrados requierenlimpieza periSdica.
! ACCESORIOS CUIDADO NO instale ni retire el mango ni los tubos cuando la aspiradora est_ encendida. Esto podria causar chispas y dahar los ¢ontactos eldctricos. NOTA:Si tiene instaladala Power-Mate®,apague la aspiradora antes de quitarel mangode lostubos. m me rdpida del tubo mr No es necesario retirar el enchufe y cord6n el_ctrico de la Power-Mate® para usar los accesorios del tubo. Si su modelo cuenta con ta caracteristica adicional de un dispositivo para liberar el mango, oprfmalo. (',%. 2.
LIMPIADOR DE ORILLAS INDICADOR DE RENDIMIENTO ALGUNOS MODELOS Active los cepillos limpiadores de orillasa cada lado de la PowerMate®.Pase la PowerMate='iunto alas paredes o junto a los muebles para ayudar a eliminar la tierra acumulada en las orillas de la alfombra. Si el indicador de performance se pone completamente rojo, chequee per una bolsa Ilena de polvo, o un obstaculo en el vacio. Consulte la FUNCIONAMIENTO DE SU ASPIRADORA.
Laaspiradora creasucci6n o aspiraci6n queievanta latierra.Latierraesimpulsada atravesdelas viasdeflujoairehastalabolsaporunar&pida ] ._-"-_ corriente de aire. La bolsa para polvo permite _, el flujo de aire, pero atrapa la tierra. Para Iograr los mejores resultados de /f_/" limpieza, mantenga abiertas las vias de .,/L//" aire. Examine periSdicamente las /._ areas indicadas con asteriscos para _,_ asegurarse de que no esten .,_'Y bloqueadas. Desconectedel recept_,culode revisarlo.
1. Desconecteel cord6n electrico de la clavija de la pared. NO choree agua sobre la aspiradera. CUIDADO 2. Limpie el exterior con un trapo suave y limpio, que ha side exprimido despu_s de remojar en una solucion de agua y detergente liquido ligero. Seque el exterior con un trapo seco despu_s de limpiar. No use los accesorios si est_n mojados. Los accesorios que se utilicen en _reas sucias, debajo del refrigerador,no deben usarse en otras superficies sin antes ser lavados. Podrfan dejar maroas. 3.
! ADVERTENCIA est_ sucio, tiredel filtro hacia arriba. Peligro de choque eldctrico No opera con un filtro de escape bloqueado o sin el filtro de escape o la cubierta del illtro de escape instalados. i 2. Cuando el filtro FILTRO DE ESCAPE HEPA Filtro de Este cartucho del filtroescapetiene que cambiar este sucio. Cambie el filtro cuando el _.reasuperficial este cubierta pot comp]eto. El filtro no se puede lavar pues perderfa su cspacidad para atrapar altrapar polvo. 3.
1. Retire la cubierta de la bombilla ejerciendo presi6n hacia adentro y levantando ambos costados como se muestra. 2. Empuje la bombilla hacia adentro y girela en direcci6n opuesta al sentido de las manecillas del reloj para retirarla. Empuje hacia adentro y gire r_q._ 3. Cambie la bombilla, I_stano debe exceder 15 vatios (130V). Cierre la cubierta de la bombilla hasta que quede bien cerrada. NOTA: Consulte la PIEZAS Y CARACTERiSTICAS para determinar el NQ,de la bombilla. 4.
LIMPIEZA DEL AGITADOR PARA CAMBIAR LA CORREA NOTA: Para mantener una alta eficiencia de limpieza y evitar el daSo a la aspiradora, hay aue limDiar el aaitador cada vez aue se cambia !_,._ 1. Instaleuna correa nueva sobre el impulsor del motor y luego sobre la rueda dentada del cepillo.
PARA CAMBIAR MAZO DEL AGITADOR 1. Retire la cubierta, correa y ensamble del agitador de la Power-Mate®Consulte "Para retirar la correa" bajo CAMBIO DE LA CORREAY LIMPIEZA DEL AGITADOR. Peligrodechoqueel_ctricoo lesi6ncorporal Desconecte launidadantesdelimpiarlao darleserviclo.DeIocontrariopodriaproducirseunchoqueel6ctricoo causar lesi6ncorporalsi la aspiradora arranca de 2. Reemplace el agitador. 4.
Consulte este cuadro para encontrar soluciones que usted mismo puede realizar cuando tenga problemas menores de rendimiento. Cualquier servicio que necesite aparte de otros descritos en este manual tienen que ser hechos por un represetante de servicio autorizado Sears. La asp]radora no arranca. No asplta satisfactoriamente. 1. Eel&desconeclada. 2. Cortacircuitos botado o fusible quemado en el lablero de servido de ]a residenela. 3. Conexionos el_lricas de la manguera sueltas. 4.
Get it fixed, at your home or ours! Your Home For repair - In your home - of all major brand appliances, lawn and garden equipment, or heating and cooling systems, no matter who made it, no matter who sold it! For the replacement parts, accessories and owner's manuals that you need to do-it-yourself. For Sears professional installation of home appliances and items like garage door openers and water heaters. 1-800-4-MY-HOME ¢ (1-800-469-4663) Anytime, day or night (U.S,A. and Canada) WWW.sear8.