Owner's Manual Manual Dei Propietario Vacuum Cleaner Aspiradora Model, Modelo 116.25812 116.25813 IMPORTANT Before returning this product_acement parts=p!ease contact: Sears Parts and Repair Center (1-800-488-1222) Anytime, day or night (U.S.A_ only) F__oranyother issue, please contact; Vacuum Cleaner Help Line (1-877-531-7321) 7:30am-4:00pm EST, M-F (U.S.A. and Canada) CAUTION: Read and follow all safety and operating instructions before first use of this product Sears, Roebuck www.sears.
Before Using Your New Vacuum Cleaner .................. Kenmore Vacuum Cleaner Warranty Important Safety Instructions ........ Parts and Features ................. Assembly Instructions ......... Power-Mate Jr3 Storage ............ Canister Care ..................... 15 Bag Changing ................... 15 Cleaning Exterior and Attachments ........ 15 Motor Safety Filter Changing ........ 16 Exhaust Fiiter Changing ................ !7 2 ,_ 3 4 5-6 7-8 8 Power-Mate ® Care ................... Dirt Sensor .
OneYear Limited Warranty Whenassembled,operatedandmaintainedaccordingto all instructionssuppliedwith the product,if this vacuumcleanerfails dueto a defectin materialor workmanshipwithin oneyearfrom the date of purchase,return itto any Searsstore,SearsParts& Repair Centeror other Kenmoreoutletfor free repair. If this vacuum cleaner is used for other than private family purposes, this warranty applies for only 90 days from the date of purchase.
WARNING Your safety is important to us. To reduce the risk of fire, electrical shock, injury to persons or damage when using your vacuum cleaner, follow basic safely precautions including the following. Read all instructions in this manual before assembling or using your vacuum cleaner Use your vacuum cleaner only as described in this manual Use only with Sears recommended attachments. Disconnect electrical supply before servicing or cleaning out brush area..
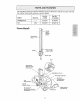
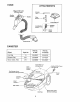
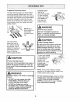
It is important to know your vacuum cleaner's parts and features to ensure its proper and safe use_ Review these before using your vacuum cleaner., Object Style No. Headlight Bulb Belt CB-3 Part No, in USA Part No, in Canada 20-5240 20-40600 20-5218 20-40118 Power-Mate@ Quick Release Button Telescoping Wand Flange Wand Length Adjust Button Wand Light Be;t Wand Quick Release Pedal (Net Shown) Protector/Belt Reset Button Pile Height Handle Release Peda!.
HOSE ATTACHMENTS 3_Way On/Off Switch Off/Floor!Carpet Crevice Tool _ Suct/on Brush Floor Power.Mate Jr. ® I ................. Combination : _ Brush _ _j _ _ Dusting urusn i_l_---Fabrlc _u Brush L ................. E Hose Swivel CANISTER Object Part Noo in USA Style No. Q Dust Bag Exhaust Filter EF-1 20-50557 20-86889 Motor Safety Filter CF-1 20-86883 Part No. in Canada 20-50410 20_40324 20-4032! Power.Mate Storage Cord Rewind Button Tool Storage Cover (Attachment Storage .
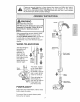
Please pay special attention to these hazard alert boxes, and follow any instructions given. WARNING statements alert you to such dangers as fire, electric shock, burns and personal injury CAUTION statements alert you to such dangers as personar injury and/or property damage. WARNING Electrical Shock Hazard DO NOT plug into electrical supply until assembly is complete. Failure to do so could result in electrical shock or Loci{ injury.
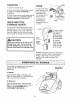
CANISTER 1. Open the canister HOSE hood 2. Check to see that the dust bag is properlyinstalled. See BAG CHANGING for instructions. 3. Check to see that the motor safety filter is properly installed, See MOTOR SAFETY FILTER CHANGING for instructions HOOD AND TOOL STORAGE COVER It is normal for the canister 1.
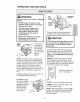
OPERATING iNSTRUCTiONS iii iiii ii ii i WARNING Personal Hazard Injury Pile Height and Product Indicator ,(_ Damage Pedal-.,_ • DO NOT plug in if switch position. Personal injury damage could result. is in ON or property Pedal----_- . The cord moves rapidly when rewinding+ Keep children away and provide a clear path when rewinding the cord to prevent personal injury. ++++++:,7 + 3.
Carpeted stairs need to be For best cleaning action, the Power-Mate e should be pushed straight away from you and pulled straight back. At the end of each puil stroke, the direction of the Power-Mate _ should be changed to point into the next section to be cleaned This pattern should be continued across the carpet with slow, gliding motions. Suction Control vacuumed regularly For best cleaning results, use Power Level HIGH and fulfy close the suction control.
For best deep down cleaning, use the XLO setting. However, you may need to raise the height to make some jobs easier, such as scatter rugs and some deep pile carpets, and to prevent the vacuum cleaner from shutting ofL Suggested settings are: HI - Shag, deep pile, or scatter rugs MED - Medium to deep pile. LO - Low to medium pile XLO -- Most carpets and bare floors. To remove, press latch and lift out. DO NOT attach or remove handle or wands while vacuum cleaner is ON.
Carpeted FIoorsfRugs ATTACHMENT Walls bDUst]ng {_ Combination rush brush Fabric brush ........ I_ Crevice tool v" Floor brush v" =/ Power-Mate _ v, 2 ................ Handi-Mate Jn®2 Power-Mate Jro_3, 4 ,_ The Power-Mate s has built-in v_ = i,,' v" _' v" 1. Always clean attachments before using on fabrics. 2. 3-way On/Off switch should be in FLOOR position & Some Models; Handi-mate Jr.® and Power-mate Jr.® attachment with the products 4. Power-Mate Jr.® can only be used on hose handle.
SUCTION CONTROL The suction control allows POWER-MATE ®STORAGE \ The wand has a "U" shaped flange that slides into I the "U" shaped slot on the canister.. suction the vacuum .I suction for Decrease you to change / Increase different fabrics suction and carpet weights, LOW POWER decreases suction for draperies and lightweight rugs, while HIGH increases suction for upholsteries and carpets.
DIRT SENSOR IN OPERATION The dirt sensor When the Power-Mate e is being moved back and forth on the floor, the lights will change from one configuration to another as dirt is being vacuumed., As long as the red lights are on, dirt is passing through the wand to indicate that the surface still needs cleaning. light system is mounted on the Power-Mate '_ nozzle near the reset button.
CANISTER CARE For best cleaning results, the dust bag should be changed often, The electronic performance indicator will come on when the bag needs to be changed or the airflow is blocked NOTE: See PARTS AND FEATURES Bag Number, 7. The red bag mount will flip forward after removing bag. This will prevent the hood from closing until a new bag is installed Note: for 8. Rotate red bag mount down and 1. Unplug cord from wail outlet.
WARNING Electrical Shock Hazard 2. Lift the rubber Unplug power cord from electrical outlet. Do not operate the vacuum cleaner without the motor safety filter. Be sure the filter is dry and properly installed to prevent motor failure and!or electrical shock. ii , i retainer and pull out motor safety filter as shown. iiiiiii1,11 iii ........... 3, Replace the filter, white side out, facing the dust bag, by sliding it back into place under the ribs in the bag cavity.
WARNING iiiii1,1,1111 i Fire and/or ull, ,i Electrical i 2. Pull the exhaust Shock Hazard filter up and out from the rear of the canister Fi/ter Do not operate with a clogged exhaust filter or without the exhaust filter or exhaust filter cover installed, illllliiiiii EXHAUST ,,lllnlU n nul lUl 3.
Althoughthe dirt sensorfeaturein your KenmorePoweFMate e is designedforyearsof troublefreeuse,the passageof dirt through the airpassagesystemcancoatthe lens causingthe greenlighttocomeonandstay on - neverswitchingto red.Whenthishappens the lensesmustbe cleaned, 3 ½ Inches or 90 mm ,,,,/.
TO CLEAN AGITATOR: NOTE: In order to keep cleaning efficiency high and to prevent damage to your vacuum cleaner, the agitator must be cleaned every time the belt is chart eg__d 2. Place agitator assembly back into Power-Mate e The agitator must also be cleaned according to the following schedule: Vacuum Cleaner Use Clea__l__n_A_itator HEAVY (used daily) every week MODERATE (used 2-3 times/week) every month LIGHT - every 2 months ./__J_"!"_///'_" cover on baseoRest front edge _ shown.
_ 1. Remove Power_Mate ® cover as shown in BELT CHANGING AND AGITATOR CLEANING section_ And Turn Turn _. _15 2, Push in and turn bulb counterclock- Push in Push In And wise, then pull out to remove, bulb clockwise, to replace. 3_ Push inBulb and must turn not be higher than Watts(130 4. Reinstall Power-Mate e cover as shown in BELT CHANGING AND AGITATOR CLEANING section. NOTE: See PARTS AND FEATURES bulb number, Shock Or Personal Injury 1.
Review this table to find do-it-yourself solutions for minor performance service needed, should be performed by a Sears or other qualified service agent, probfems, Any other WARNING Disconnect electrical supply before performing maintenance to the vacuum cleaner, Failure to do so could result in electrical shock or personal injury. ,i,,,,11,, ,i,i,,,,i ,i,,,,,,, ,i i, Vacuum cleanerwon't start t Unplugged _I waif outlet. 2.
Antes de usar su aspiradora nueva Garantia de la aspiradora de Kenmore 1 • •2 Instrucciones importantes de seguridad .......................... Piezas y caracteristicas ............... Instrucciones de 3 4-5 ensamblamiento ............... 6-7 Almacenaje del Power-Mate Jr.@ ....... 7 Instrucciones de operatiSn ........... 8 Pare comenzar ..................... 8 Sugerencias pare aspirar .............
Garantfa limitada de un afio Siesta aspiradora fa!la por un defecto en sus materiales o fabricaci6n en el perfodo de un aP,o desde la fecha de compra, cuando se instala, maneja y mantiene siguiendo todas las instrucciones incluidas con el producto, devu61vata a cuatquier tienda Sears, Sears Parts & Repair Center (Centro de Reparaciones y Piezas Sears) distribuidor Kenmore para que reparen el aparato de forma gratuitao u a otro Si esta aspiradora se utiliza para otros fines que no sea uso familiar priva
ADVERTENCIA Su seguridad es muy importante para nosotros. Para reductr el riesgo de !ncendio, cnoque el6ctrico, lesi6n corporal o dafios al utilizar au aspiraaora, act_e ae acuerao con precauciones b&sicas de seguridad, entre elias: Lea las Instrucctones en este manual antes de armar o usar su asplradora, Apague redes los controles antes de desenchufar, Use su aspiradora 0nlcamente en la forma descrita en este manual.
Es importanle conocer las piezas y caracter[sticas de su aspiradora para asegurar su uso adecuado y seguro Exam[netas antes de usar su aspiradora, Esti!o No. Objeto Bombilla Correa CB-3 Pieza Ng en EUA Pieza Ng en Canad_ 20-5240 20-40600 20-5218 20-40118 Power-iVlate® Bot6n de /iberaci6n r#pida de! mango Tubo telesc6pico Reborde Control de extensi6n adjustable de/tubo Luz Correa Pedal r_pfda de liberaci6n del tubo (No se muestra)_......_ Luz Ndmeros de serte de/ modelo Power-Mate _ CPa.
MANGUERA ACCESORIOS Interrupter de encendide/ apagado de tres pesiciones (Off/Floor/Carpet) (Apagado/Piso/Alfombra) Control Herramlenta para hend/duras------_ de aspiraci6n Mange para pfsos Cepltlo t 4 Power.Mate Jr. ® 1.................... _ Cepillo para comb/nact6n _ Cepdlo para sacudlr _. _ _ I1_ i -coptHo para telas Dispositivo giratorio de la manguera RECEPT/ CULO Objeto Estilo No.
Manc Peltgm de cheque el_ctrico No conecte la aspiradora basra clue terrninede armada° De Io contrario podria causar un cheque el_ctrico o lesi6n corporal Antes de armar la aspiradora, chequee la USTA DE EMBALAJE en la cubierta separada de la Lista de Partes para Reparaci6n, Use esta tisla para verificar que ha recibide todas las compenentes de su nueva aspiradora Kenmore.
RECEPT/ CULO MANGUERA 1. Abra la tapa del recept&culo 2. Examine la balsa para polvo este instalado correclamante Consulte las instrucciones de instalaci6n en la CAMBIO DE LA BALSA 3. Examine el fiitro de seguridad del motor este instatado correctamante.
INSTRUCCJONES n nlll,u i i DE OPERATION ii ADVERTENCtA Peligro de lesi6n personal y dare a! _roducto NO enchufe la aspiradora si et interrupter est_ en la posici6n ON. Podria causar tesiOn personal o dare al producto. El cordon el_ctrico se mueve r&pidamente durante el enrollamiento.
Estilo de tirnpieza sugerido, Para obtener ta rnejor acciOnde [irnpiezase recornienda ernpujar ta Power-Mate® en direcciOndirectarnente opuesta a usted y jalarla en tinea recta At final de cada pasada de regreso, carnbie [a direcciOn de la Power-Mate®hacia la siguiente secciOna lirnpiar ContinlJeasf a travOsde loda ta alfornbra de una manera Ionia y deslizante, NOTA: fas pasadas r_ipidasy jalonadas no logran una limpieza compteta Control de aspiraciOn Los escalones alfornbrados requieren lirnpieza peri
UseelajusteXLO(baje)paraobtener tamejorlimpiezaarondoPoretrapart®, quiz_.s serequiera etevarelnivelparafacilitar atgunas tareas, comeper HI - Pelo muy largo y euelto, lapetes, alfombras muy acojinadas. ejempio cuando se tratade tapetes y atgunas alfembras de pele largo, y para impedirque fa aspiradora se apague Se sugieren los siguientes a}ustes: LO - Pelo corto a mediano MED - Pelo mediano a large. XLO - La mayer{a de las alfembras y pisos deseubiertes ,CUIDADO \_"-'-_ NO instale nt retire el mango
:: i_ii!_!ii¸:i_!¸I:̧,!!i;i AREA A LIMPIAR ACCESORIO t4eubles I cojines 1 .... Entre [Cepiilo para Cepillo para sacuuir combtnaci6n Cepillo ,,_ para telas Herramienta para hendiduras Cortinas I v' V v' V it' Escalones descubterto., _Ifornbrados/Paredes Ptses Aifombras P{sos ................... v' v' v' Cepillo para ptsos v,2 Power_Mate_ Handi-Mate Jr. _'2 ...... Power-Mate Jr?'3,4 1. 2 3. 4. v' v' v' v' v' Siempre limpie los accesorios antes de usar sobre teJas.
CONTROL DE ASPIRACION TAPA Y ALMACENAMtENTO PARA POWER-MATE® Et control de aspiraci6n le perAumentar mite cambiar la aspiraciSn potencia de aspiI raciSn de la aspiDisminuir radora depenaspiraciSn diendo del grosor de la teta o alfombra.
DETECTOR DE TIERRA Detector de tlerra El sistema indicador del detecter de tierra est,. mentade en la boquilfa de la Power-Mate®,cerca del bol6n de restablecimiente. Censiste en una serie de des indicaderes luminoses rojos y dos verdes. Las ]uces indican la cantidad de particulas de tierra que est#,npasande a trav8s del detector at ser transpertadas hacia Fabofsa para pelve.
CUIDADO DEL RECEPT.4,CULO La botsa debe cambiarse seguido para legrar los mejores resuttados de limpieza.
t. Desconecte et cord6n el_ctrico de la clavija de la pared NO choree agua sobre la aspiradora, CUIDADO 2. Limpie el exterior con un trapo suave y limpio, que ha sido exprimido despu_s de remojar en una soluci6n de agua y detergenle liquido tigero Seque el exterior con un trapo seco despu6s de limpiar No use los accesorios si est_n mojadoso Los accesorios que se utilicen en _reas sucias, debajo del refrigerador, no deben usarse en otras superficies sin antes ser lavados_ Podrian dejar marcas_ 3.
2, Jals el filtro de escape hacia arriba y hacia fuera de la parts posterior de la aspiradora, ADVERTENCIA Peligro de cheque el_ctrico No opere con un filtro de escape bloqueado o sin el filtro de escape o la cubierta del filtro de escape instaladoso , ,,,,, ,, FILTRO DE ESCAPE 3, Reemplace et cartucho dei fittro de1 escape Cetoque el illtro nuevo en la aspiradera con el lade de esponja en direcci6n a la aspiradorao HEPA Este cartucho de! filtro escape tiene que cambiar est_ sucio Cambie el filtro cuan
Aunque la funci6n de detecci6n de tierra de la PowerMate®de Kenmore est_ diseSada para brindar touches aries de funcionamienlo interrumpido, et paso de tierra a trav6s det sistema de las vias de aire puede causar una escama en la lente, haciendo que se encienda y continue encendido e! indicador verde, sin cambiar nunca a roio. Cuando esta suceda, tiene que Iimpiar tas lentes. ! i ii,rl,,ill,l,, ,i i ....
LIMPIEZA DEL AGITADOR NOTA: Para mantener una alta eficiencia de limpieza y evitar el daSo a la aspiradora, h.a_y _'a_L&E.e! agitador cada vez que seca_ la unidad dei agitador e(_fa PowerMate Coloque otra vez _L_2, Tambi_n hay que limpiar el agitador segt)n el siguiente horario: Ftecuente (usada dirariamente) cada semana Moderado (usada 2 o 3 veces por semana) cada rues 3. Alinee la parte frontal de la cubierta con ta base. Coloque la cubierta sobre et borde delantero de la base como se muestra.
I Empujehacia I adentro y g/re | 1. Quite la cubierta de la Power-Mate® como se describe an la secci6n CAMBIO DE LA CORREA Y L1MPIEZADEL AGITADOR Empuje haela adentro 2. Empuje hacia adenfro y gire la bombitla en el sentido sontrario al de Ias agujas del reloj, fuego tire hacia afuera para sacar, 3. Empuje hacia adentro y gire en el sentido contrarioel de tas agujas del reloj para reemptacer. La bombilla no debe set m_s de 15 valios( 130 voltios) 4.
Revise este recuadro pare encontrar soluciones a probtemas que puede corregJrusted mismo. Cualquier Dire servic[o debe set realizado per SEARS u otro agenle de servicio calificado, UUUlU i Ul nlrll................ iii i I u ............... i,ilUllUU, I, ADVERTENCiA I Desconecte la asplradora antes de efectuar e! mantenimiento a su aspiridora. De Io contrario podr{a _producirse un choque el_ctrico o causar lesion corporal, ,, -T .........................................................................
21
Your Home For repair - in your home - of all major brand appliances, lawn and garden equipment, or heating and cooling systems, no matter who made it, no matter who sold itl For the replacement parts, accessories and owner's manuals that you need to do-it-yourself, For Sears professional installation of home appliances and items like garage door openers and water heaters. 1-800.4-MY-HOME ® (1-800-469-4663) Anytime, day or night (US.A. and Canada) wwwosears.com wwwosears.