Owner'sManual ManualDel Propietario VacuumCleaner Aspiradora Model, Modelo 116.30612 116.31412 116.31512 116,31612 116.31612A 116.31613 116,32612 116,32613 116.33612 116.33613 116.34612 116.34613 CAUTION: Read and follow all safety and operating instructions before first use of this product. CUIDADO: Lea y sigue todas las instrucciones de operacion y seguridad antes del uso de este producto. Sears, Roebuck and Co., Hoffman Estates, IL 60179 U.S.A. www.sears.com Part No.
Before Using Your New Vacuum ........ 2 Kenmore Vacuum Cleaner Warranty .... 2 ImportantSafety Instructions ........... 3 Parts and Features ................... 4 Assembly Instructions ............... 5-6 Operating Instructions ................. 6 Pile Height Selection and Setting ........ 7 Carpet/Bare Floor Selector ............ 7 Releasing the Handle ................. 8 ON/OFF Switch ..................... 8 Attachments ..................... 8-10 AttachmentUse Chart ............... 10 VacuumingTips .....
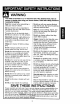
Your safety Is importantto us. To reduce the risk of fire, electrical shock, Injury to persons or damage when using your vacuum cleaner, follow basic safety precautions including the following: Read this manual before assembling using your vacuum cleaner. or Do not use with any opening blocked; keep free of dust, lint, hair and anything that may reduce air flow. Use your cleaner only as described in this manual. Use only with Sears recommended attachments.
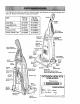
It is important to know your vacuum cleaner's parts and features safe use. Review these before using your cleaner. Item Part No. In U.S. Part No.
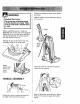
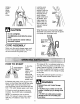
! Position the handle as shown in the illustration below. WARNING Slide the handle into the opening at the top of the vacuum. ElectricalShock Hazard Do not plug into the electricalsupply untilthe assembly is complete. Failure to do so could result in electrical shock or injury. Before assembling vacuum, check the PACKING LIST on the cover of the separate Repair Parts List. Use this list to verify that you have received all the components of your new Kenmore vacuum.
Lock the cord into place by forcing it into the locking notch on the body of the quick release upper cord hook as shown. This Using a screwdriver, tighten the screw. helps keep the power cord out from under the vacuum cleaner Power Cord agitator. Wrap the power cord around the upper and lower cord hooks and lock the power cord plug onto the power cord. Do not overtighten. Overtightening could stdp the screw holes. Do not operate the cleaner without the screw in place.
To select a pile height setting: Turn off cleaner. Select a pile height setting by tilting the cleaner back until front wheels are lifted slightly off the floor as illustrated. Slide the adjustment setting. SUGGESTED lever to the correct PILE HEIGHT SE'I-FINGS WARNING You may need to raise the height to make some jobs easier, such as scatter rugs and longer pile carpets. Suggested settings are: HIGH: shag carpet, ter rugs.
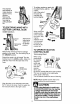
Release the handle by pressing down on the handle release pedal with your foot and pulling back and down on the handle with your hand. iL, HANDLE MOUNTED SOME MODELS To start the vacuum cleaner, slide the On/Off switch from the OFF position to the ON position. To stop the vacuum cleaner, slide the On/Off switch to the OFF position. Remove Crevice Tool hose from the cleaner by grasping the hose collar, twisting and pulling straight out. The attachments can now be added to the hose.
To achieve maximum reach with the attachments, add the crevice tool to the end of the wand by Suction inserting and Control Slide--_ The attached hose swivels to make cleaning easier in every direction. Remove the hose from the twisting slightly. hose clip by pulling straight out. Wand TELESCOPING WAND WITH Crevice Tool SUCTION CONTROL SLIDE SOME When using the dusting brush or the combina- MODELS Crevice Remove the Toot telescoping wand from ,Telescoping its storage position.
EXTENSION HOSE TO STORE A'I-I'ACHMENTS SOME Remove dusting brush or combination brush. Snap into appropriate storage location. MODELS Some models include an extra hose which connects to the stretch hose on the vacuum for a longer cleaning reach. Remove crevice tool from the wand by twisting. Lay aside. Unit Hose _ Extension Hose Remove the extension wand from the hose, Twist the wand to the left and pull from the hose end.
Carpet edges. Guide either side or the front of the noz- For best cleaning results, keep the airflow passage clear. zle along a baseboard. The full length brushes help remove dirt at carpet edges. Stairs. Occasionally, check each of the areas indicated for Put handle in full upright position. Place the carpet/bare floor selector in the bare floor position. Use the crevice tool or fabric brush. Set the On/Off switch to ON. clogs. Unplug the cleaner from the outlet before checking.
DIRT SENSOR SOME MODELS The electronic dirt sensor is a feature Electrical Shock And Personal Injury Hazard which will detect particles as they pass through the vacuum cleaner. The dirt sensor indicator is located front of the switch cover. The red light indicates up by the cleaner. Disconnect electrical supply before servicing or cleaning the unit. Failure to do so could result in electrical shock or personal injury from cleaner suddenly starting.
Always follow all safety precautions cleaning and servicing the vacuum cleaner. ! when WARNING Electdcal Shock And Personal Injury Hazard Disconnect electrical supply before servicing or cleaning the unit. Failure to do so could result in aiectdcai shock or personal injuryfrom cleaner suddenly starting. ! Gather the cord and wrap it loosely around the upper and lower cord hooks.
TO REMOVE DUST BAG TO REPLACE DUST BAG ! Unfold the new dust bag. Fold the safety seal tab on the WARNING Always unplug power cord from electrical outlet before performing any service on vacuum. new dust bag away from the Dust Bag _[_._ Bag Cover bag cover release located _J NOTE: Tab _-'_/ See PARTS AND FEATURES for Bag number. near the top of the bag cover. Insert the dust bag onto the bag holder completely by holding the bag collar. Place the dust bag cellar into position.
Check motor safety filter frequently change when dirty. and WARNING Do not operate ' lect WARNING without exhaust filter. rical Shock Hazard EXHAUST FILTER Unplug power cord from electrical outlet. Do not operate the cleaner without the motor safety filter. Be sure the filter is dry and properly installed to prevent motor failure and/or electdcal shock. HEPA The exhaust filter cartridge must be replaced when dirty. It should be replaced regularly depending on use conditions.
! Depress tabs on rear of agitator cover and rotate forward to release from the nozzle WARNING Electrical Shock Or Personal Injury Hazard Disconnect electrical supply before servicing or cleaning the unit. Failure to do so could result in electrical shock or personal Injury from cleaner suddenly starting. body. Agitator Cover The light bulb socket assembly does not have to be removed. Lay the agitator cover over to the side out of the way.
TO CLEAN AGITATOR TO REPLACE BELT NOTE: In order to keep cleaning efficiency high and to prevent damage to your vacuum, the agitator must be cleaned every time the belt is changed. Make sure that the carpet/bare floor selector is in the carpet position. Loop the new belt on the motor shaft.
NOTE: See PARTS AND FEATURES for belt number. Lower the agitator cover to its original position. After positioning the agitator cover, push forward on the two (2) locking tabs in order to ensure that they are securely in place. Loop the other end of the belt on the belt pulley on the agitator. Insert the agitator by placing the rounded portion of the end cap down into the slot in the nozzle base.
Always follow all safety precautions cleaning and servicing the vacuum cleaner. when Re-insert the hose into the opening the lower body from which it was removed. Press firmly to assure connection. on Electrical Shock Or Personal Injury Hazard Disconnect electrical supply before servicing or cleaning the unit. Failure to do so could result in electrical shock or personal injuryfrom cleaner suddenly starting.
! Remove the light bulb by pushing the bulb in while WARNING Electdcal Shock Or Personal Injury Hazard turning counterclockwise to release from the Disconnect electdcal supply before servicing or cleaning the unit. Failure to do so could result in electrical shock or personal Injury from cleaner suddenly starting. slot.Then pull the light bulb straight out. I TO REMOVE LIGHT BULB Disconnect power cord from electrical outlet.
! TO REPLACE AGITATOR WARNING Remove the nozzle cover, agitator cover and agitator. See BELT CHANGING AND AGITATOR CLEANING. Eloctrical Shock Or Personal Injury Hazard Disconnect electdcal supply before servicing or cleaning the unit. Failure to do so could result in electrical shock or personal injury from cleaner suddenly starting. TO CHECK AGITATOR Remove covers. the end caps and bearing Replace the agitator with a new one. Replace caps.
Review this chart to find do-it-yourself solutions for minor performance problems. Any service needed, other than those described in this owner's manual, should be performed by an authorized service representative. Disconnect electrical supply before servicing or cleaning the unit. Failure to do so could result in electrical shock or personal injury. Cleaner won't run. 1. Unplugged at wall outlet. 2= Tripped circuit breaker/blown at household service panel. 3. On/off 1.
Antes de usarsu aspimdoranueva ....... 1 Garantiade la aspiradorade Kenmore..... 1 Instrucclonesimportantesde seguridad ............................. 2 Plazasy caracterfsticas ................. 3 Instruccionesde ensamblamiento ....... 4-5 Instrucciones de operaci6n............... Ajustey selecci6nde nivelde pelode la alfombra ............................ Selectorde pisoscon alfombray .......... sin alfombra Desprendimiento del mango .............. Interruptor de encendido/apagado ......... Accesorios ......
! ADVERTENCIA Su seguridades muy importante para nosotros. Para reducir el desgo de incendio,choqueel_trico, lesi6n corporal o dafios al utilizar su aspiradora, act_e de acuerdo con precaudenes bdsicas de seguridad, entre elias: Lea este manual antes de armar o utilizar su aspiradora. Use su aspiradora t_oicamenteen la forma descrita en este manual. Use Onicamentecon accesorios recomendados por Sears.
Esimportante concerlaspiezasy caracteristicas desuaspiradora paraasegurarsu usoadecuado y seguro.Examinelas antesdeusarsu aspiradora.
I rL ADVERTENCIA PeUgrode choqueel_ctrico Coloque el mango como seve en el diagrama abajo. AI mantener la manguera de manera que no interfera, mueva el mango a la abertura en la parle superior de la aspiradora. No conectela aspiradorahasta que termine de armada.De Io contrariopodrfacausar un choqueel_;_ctrico o lesi6ncorporal. AntAntes de armar la aspiradora, chequee la LISTA DE EMBALAJE en la cubierta separada de la Lista de Partes para Reparaci6n.
Aprieteel tornillo con Fije el cordon en posici6n, forz&ndolo en la ranura de bloqueo ubicada en el cuerpe del sujetador superior del cord6n, como se muestra. Esto ayuda a que el cord6n no se enrede debajo del agitador de la aspiradora. un destornillador. de f Cordbn Enrolle el cord6n electrico alrededor de los sujetadores superior y inferior y presione la ranura del enchufe sobre el cord6n. No apriete demasiado el tomillo. Si Io apfleta demasiado podrfa arruinar los orificios para el tomillo.
Para seleccionar un ajuste de nivel de pelo de la alfombra: Apague la aspiradora. Seleccione un nivel de ajuste inclinando la aspiradora hacia atras hast que las ruedas delanteras esten un poso despegadas del piso. Deslice la palanca de ajuste de nivel de pelo de la alfombra a la posici6n deseada.
Desprenda el mango pisando el pedal de liberacion y tiranda del mango hacia abajo con la mano. Pedal de Ilberaci6n del mango MONTADO EN EL MANGO ALGUNOS MODELOS Para arrancar la aspiradora, deslice el interruptor de encendido/apagado de la posici6n OFF a la posici6n ON. Para detenerla, coloque el interrupter en la posici6n OFE Cuando regrese hasta la selecci6n de pisos con alfombra, cuida que el selector puede moverse rdpidamente hasta la selecci6n a causa de la tensi6n de la correa.
Lamanguera incorporada gira Para obtener la maxima Iongitud con los acceso- Manguera. dOS,instale la herramienta para hendiduras en el extreme Deslizador del tubo. de control de Para hacerlo, introd0zcala en el tubo y gireta Tubo un telescbpic_ poco. Giratorla- para facilitar la Iimpieza en cualquier direcci6n. Para quitar la manguera, tire de la manguera del collar.
ALMACENAJE DE LOS ACCESORIOS MANGUERA DE EXTENSION ALGUNOS MODELOS Retire el cepillo para sacudir o el cepillo para combinaci6n. Col6quelos firmemenle en su lugarde almacenamiento correspondiente. Unos modelos incluyen una manguera auxiliar que conecta con la manguera de estirar en la aspiradora para una extension m_s larga para limpiar. Retire la herramienta para hendidurasdel tube girandola. P6ngala a un lade. Manguera Retire el tube de extensi6n de la manguera.
Para obtener los mejores resultados de limpieza, mantenga desbloqueados los conductos de flujo de aire. Orillas de alfombras. Guie uno de los costados o la parte anterior de la boquilla a Io largo del borde de la pared. Los cepillos largos ayudan a aspirar la tierra en las orillas de las alfombras. Escalones. Coloque el mango en la posici6n vertical. Mueva el selector de piso con alfombras y sin alfombras a la posici6n sin alfombras. Use la herramienta para hendiduras o el cepillo para telas.
INDICADOR ALGUNOS DE POLVO MODELOS El indicador de polvo y el indicador de sensibilidad estan Iocalizados en la parte delantera de la cubierta del indicador. Peligrode choque ek_'tdco o lesi6n corporal Desconecte la unidad antes de limpiarlao dade servicio.De Io contrado podrfaprodudrse un choque eldctricoo causar lesi6n corporal si la aspimdora arranca de manera imprevista. El indicador eleclrico de polvo mientras que pasa por la aspiradora. El luz roja indica que la aspiradora aspira el polvo.
Sigasiempretodaslasinstrucciones de segurided al limpiary darleservicioa su aspiradora. Peligro de choque el6ctrico o lesi6n corporal Desconecte la unidad antes de limpiarla o darle servicio. De Io contrariopodrfa producirse un choque eldctdcoo causer lesi6n corporal si la aspiradora arranca de manera imprevista. Recoja el cord6n y enrr611elo en los sujetadores superior e inferior, sin que quede muy apretado.
PARA QUITAFI LA BOLSA PAPA POLVO PARA CAMBIAR LA BOLSA Desdoble la bolsa para polvo nueva. Bolsa para LengiJetade Doble la leng_eta p_lvo seguridad de seguridad de la //1_'_ .=_/_"'_/ nueva bolsa para f v\ "_l__-_/ ADVERTENCIA Siempre desconecte el cord6n dlectdco antes de reparar alguna parte de la aspiradora. Tire hacia adelante de la liberaci6n situada eerea de la parte superior de la cubierta de bolsa.
Examine elfiltrodeseguridad delmotordevez encuandoycambiocuando est_sucio. CUIDADO No opere la aspiradora sin el filtro de escape. Peligro de choque el_ctrico Desenchufe el cordSn de la corriente eldctdca. No opere la aspiradora sin el illtro de seguridad del motor. Asegdurese de que el filtro est_ seco e instalado adecuadamente para impedir que el motor falle y/o que se produzca un choque el_ctdco. FILTRO DE ESCAPE HEPA Este cartucho del filtro escape se tiene que cambiar este sucio.
LengBetas Tire hacia abajo de las lengeetas en la parte atrasera del agitator y ruede hacia adelante para tiberar de ta unidad de boquilla. Peligro de choque eldctrico o lesi6n corporal Desconecte la unidad antes de limpiarla o darle servicio. De Io contrario podrfa producirse un choque el_ctdco o causar lesi6n corporal si la aspiradora arranca de manera imprevista. Cubierta Del agitador No es necesario quitar el ensamble de portal&mparas. Coloque al lado la cubierta del agitador.
NOTA: Paramantener unaaltaeficiencia de limpieza y evitar el dafio a la aspiradora, PARACAMBIARI_ACORREA limDiar ?! aaitador ¢_da vez que se cambi_ la correa. Asegurase que el selectorde pisoscon y sin alfombra este en la posiciSn de pisoscon alfombra. CoIoque la nueva correa alrededor del eje de transmisi6n dill motor. El agitador se debe limpiar despues de haberlo usado de 7 a 10 veces.
NOTA:ConsultelasPIEZASAND CARACTERiSTICAS paradeterminar el N_.de correa. Ensartela correanuevasobreel agitador. Inserteelagitadorporinsertarla parteredondadeia tapaenla ranuradelabasedela boquilla. Baje la cubierta del agitador a la posiciCn original. Despues de colocar la cubierta del agitador. Empuje hacia adelante en las dos (2) leng0etas de cierre para asegurar que esten en su colocaciCn apropiada.
Proceda siempre con precauciones de seguridad al limpiar y dar servicio la aspiradora. ! Inserte nuevamente la manguera en la abertura de la parte inferior de donde la retir6. Empuje con firmeza para asegurarse de que quede bien conectada. ADVERTENCIA Peligro de choque eldctdco o lesi6n corporal Desconecte la unidad antes de limpiarla o darle servicio. De Io contrario podrfa producirse un choque eldctdco o causar lesi6n corporal si la aspiradora arranca de manera imprevista.
Remueva la bombilla empujandola y valla dandola vuetta para la izquierda para sacaria de la abertura. Despu6s saque la bombilla para afuera. ADVERTENCIA Peligrode cheque el6ctdcoo lesi6n corporal Desconecte la unidadantes de limpiarlao darle servicio.De Io contrariopodrfa producirse un ehoque ek_'trico o causar lesi6n corporal si la aspiradora arranca de manera imprevista.
PAFIA QUITAR EL AGITADOR Quite la cubierta de la boquilla, la cubierta del agitador y el agitador. Vease CAMBIO DE LA CORREA Y LIMPIEZA DF:L AGITADOR. Peligro de choque el6ctrico o lesi6n corporal Quite las tapas del extreme y las cubiertas de los cojinetes. Desconecte la unidad antes de limpiarla o darle servicio. De Io contrario podrfa producirse un choque el_,ctdco o causar lesi6n corporal si la aspiradora arranca de manera imprevista.
Consulte estecuadroparaencontrar soluciones queustedmismopuederealizarcuandotengaproblemasmenores de rendimiento. Cualquier servicioquenecesiteapartedeotrosdescritos en este manualtienenqueserhechosporunrepresetante deservicioautorizado. podr/a producirse un choque eldctdco o causar lesibn corporal. La aspiradom no funciona. 1. Est,* desconectada. 1. Conecte bien, oprima selector de enGendido/apagado ala posicibn ON. 2. Cortacircuitos 2. Restablezca el cortacircuitos cambie el fusible.
Your Home For repair - in your home - of all major brand appliances, lawn and garden equipment, or heating and cooling systems, no matter who made it, no matter who sold it! For the replacement parts, accessories and owner's manuals that you need to do-it-yourself. For Sears professional installation of home appliances and items like garage door openers and water heaters. 1-800-4-MY-HOME ® Anytime, day or night (1-800-469-4663) (U.S.A. and Canada) www.sears.com www.sears.