Owner's Manual Manual Del Propietario Vacuum Cleaner Aspiradora Model, Modelo 116.33725 116.33726 / CAUTION: Read and follow all safety and operating instructionsbefore first use of this product. CUIDADO: Lea y sigue todas las instrucciones de operaciony seguridad antes del uso de este producto. Sears, Roebuck www.sears.com and Co., Hoffman Part No. CO1ZBVY1_UO_ Directions For Use It is a violation of Federal law to use this product in a manner inconsistent with its labeling.
Before Using Your New Vacuum ...... Kenmore Vacuum Cleaner Warranty... 2 Important Safety Instructions ......... Parts and Features .................. 3 4 Assembly Instructions ............. Vacuum Cleaner Care ............... 2 5-6 Operating Instructions ............... Pile Height Selection and Setting ........ Carpet/Bare Floor Selector ............ Releasing the Handle ................. ON/OFF Switch ..................... Attachments ..................... Attachment Use Chart ...............
Your safety is important to us. To reduce the risk of fire, electrical shock, injury to persons or damage when using your vacuum cleaner, follow basic safety precautions including the following: Read this manual before assembling using your vacuum cleaner. or Use your cleaner only as described in this manual. Use only with Sears recommended attachments. To reduce the risk of electrical shock Do not use outdoors or on wet surfaces. Disconnect electrical supply before any servicing or cleaning.
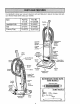
It is importantto knowyourvacuumcleaner'spartsandfeaturesto assureits properandsafe use.Reviewthesebeforeusingyourcleaner, Item Part No. In U.S. Part No. In Canada Headlight Bulb 20-5240 20-40600 Belt 20-5275 20-40096 Primary Filter 20-82720 20-82720C Hose Porforma nce Indicator (Some Models) Dust Bin Release Handle -Primary Filter (Inside) -Dust Bin Exhaust Height Adjustment Lever (Some Models) Hose Holder uick Release Cord Hook Power Cord.
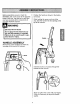
Position the handle as shown in the illustration below. Before assembling vacuum, check the PACKING LIST on the cover of the separate Repair Parts List. Use this list to verify that you have received all the components of your new Kenmore vacuum, Electrical While holding the power cord out of the way, slide the handle into the opening at the top of the vacuum, Shock Hazard Do not plug into the electrical supply until the assembly is complete. Failure to do so could result in electrical shock or injury.
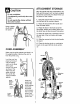
ATTACHMENT STORAGE CAUTION After the handle has been assembled body and the power cord has been wrapped around the cord hooks, the attachments can be placed in their holders. Do not overtighten. Overtightening holes. to the could strip the screw 1. Snap the suction inlet end of the hose into the back of the vacuum cleaner. Do not operate the cleaner without the screw in place. 2. Place the hose behind the handle and over the hose holder. Using a screwdriver, tighten the screw. 3.
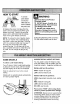
HOW TO START 1.Turn the CordHook quick release cord hook to Personal Injury and Product Damage Hazard either side and • DO NOT plug in if switch is in the ON position. Personal injury or damage could result. DO NOT use outlets above down to release the power cord. 2. Release the power cord plug from the power cord and pull the cord off the quick release cord hook. Check to be sure the Damage from cord to items in surrounding area could occur.
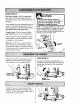
SOME ! MODELS Bare floor setting: Slide the carpet/bare floor selector all the way back and down toward the bottom of the nozzle until it locks Do not allow vacuum cleaner to remain in one spot for any length of time when the agitator is turning. Damage to carpet may occur. into place. in this position the brush assembly does not revolve. This setting should be used for NOTE: For longer belt life, turn vacuum off before moving selector.
•iiiiiiiiiiiiiiiii!iiiiiiiiii_ _ii_ _iiiiil ;iiiii!iii!ii_, !!iiiiiiii!i_ _!ilJ ii;i; iiiiiiiiiiiii _HM_N_ Personal Hazard When using attachments, be careful not to overextend the hose length when reaching. Trying to reach beyond the hose reach could cause the cleaner to tip over. Injury Hazard and Property DO NOT place hands or feet underneath the unit at any time. When using attachments, the agitator continues rotating.
FLOOR BRUSH AND WAND SOME MODELS Some models have an extra brush and When using the regular hose or with the extension hose attached, the cleaner should be on a solid surface on the same level or below the level of the user's feet. DO NOT use the hoses when the cleaner is above the level of the user's feet. wand for cleaning bare floors. Twist one end of the adaptor into the floor brush and the other end into the straight wand.
::::::_::::_:::::_::::_:_:::::_::::_:::::_:_:_;:::;_:_:::::::_:::::::: :::::::::::_:; ;; : :;;::::_;::::: _ ;::_::::: :::: _:;::::::;;::_;:::::::::._:::,: : :::_::;;:::_.;;; _;:: ;,_::;;;: _ ::_::__ _'" • ,,: .,.-.., _ ::::;_::::_, :;:_ :.... :::_: :::: .:., _.-.,:,.. ,...; :;; ::: :,,. _._::::_ • :::::::::::::::::;;: ,-,.,.•...
Always follow all safety precautions cleaning and servicing the vacuum cleaner. when Electrical Shock And Personal Injury Hazard Disconnect electrical supply before servicing or cleaning the unit. Failure to do so could result in electrical shock or personal injury from cleaner suddenly starting. _i_i_i_ii_iii_i_iiiiiiiiiiiiiiiiiiiiii ' iil i _i_ _i Gather the power cord and wrap it loosely around the quick release cord hook and lower cord retainer.
i iiiiiiiiiiiiiiiiiiiii!iiiiiii!iiiiiiiiiiiiiii ¸ii_i;_;_i _i_ _iii _iiiiii_i_ _i_i_ _ii ¸_i_ii_i_ _!i_i _iI _ii_i_i_ili!iiiii_i!i :i_i_i_i_i_i_iiiii_i_i !_i :i_i_i_ii :::::iiii_ Li!iiiiiiiii!iiiiiii iiiiiiiiiiiiiiiiiiiiiii iiiii!!ii!i!i!!iiiiiiili_ iiiiiiiii!_i_iii_iii_i_i_i_i_i_iiii!!_i_i_i!iii_i_ii_ii_i_i_iii_iiii!_;i_i_ ii_iiiililililiiiii_i!iiiiiililili!iiiiiiiiiiliiii!ili!ii_ii_iiiilili! i _ili iiill_ii iii ii i_i__iii il i ill TO EMPTY DUST BIN Always empty the dust bin when dirt level reaches the
TO REPLACE 7/ DUST BIN Turn This Direction To Close For Use Place dust bin back into vacuum cleaner by inserting the bottom first and tilt back with the dust bin handle raised. Open (For Emptying) Manija de soltar el cubo dela Cubode Push forward and lower the dust bin handle to lock dust bin in place. Closed (For Use) Place dust bin lid assembly back onto top of dust bin. Align lid marks with bin marks as shown above in Open (For Emptying).
EXHAUST FILTER ELECTROSTATIC Electrical Shock Hazard The exhaust filter must be replaced when dirty. It should be replaced regularly depending on use conditions. Unplug power cord from electrical outlet. Do not operate the cleaner without the primary or exhaust filters. Be sure the filters are properly installed to prevent motor failure and/or electrical shock. The filter CANNOT be washed lose its dust trapping as it will ability.
Carefully remove any residue that may exist in the belt area. Electrical Hazard Shock Or Personal Injury Disconnect electrical supply before servicing or cleaning the unit. Failure to do so could result in elec- Personal Injury Hazard Always unplug the vacuum cleaner before cleaning the brush area as agitator may suddenly restart, Failure to do so can result in personal injury. trical shock or personal injury from cleaner suddenly starting.
TO CLEAN AGITATOR TO REPLACE BELT NOTE: In order to keep cleaning efficiency high and to prevent damage to your vacuum, the agitator must be cleaned every time the belt is chanaed. Make sure that the carpet/bare floor selector is in the carpet position. Loop the new belt on the motor shaft. Loop new belt over belt pulley on agitator. The agitator must be cleaned according the following schedule: Motor Shaft to Belt \ V_quum HEAVY Use Clean Aaitator every week (used daily) MODERATE every month (
Make sure the nozzle cover retainers are in Pull right end of agitator forward and seat it into nozzle base the UNLOCK position. Hook the front of the nozzle cover on to the nozzle base and rotate downward. Once in place, rotate the nozzle cover retainers to the LOCK position. Nozzle Agitator Nozzle Base Nozzle Cover Retainers Press firmly, checking to see that each end is completely inserted.
Electrical Hazard Shock Or Personal Injury Hose Disconnect electrical supply before servicing or cleaning the unit. Failure to do so could result in elec- Tabs trical shock or personal injury from cleaner suddenly starting. Inlet Always follow all safety precautions when cleaning and servicing the vacuum cleaner. Motor Holder If the cleaner does not seem to have adequate suction, first check if the dust bin is full or if a filter is clogged. See DUST BIN CLEANING and FILTER CLEANING / CHANGING.
_i_i_iiiiii_i_i_!ii_!i_iii!ii_!_ii_iii_!i!ii!_!i_!_!i_i_i_!_ii_iiiiii_!_!i_i_i_iii_!i_;_ii_iiii_i_!_i!_!_i_i!_!i_!_i_!_i_i_i_!_!ii_ _ii_!_!_!_!i _ii_iQ!_!ii _i_ii_!ii_i_ii!iiiiii_ii!iiii!_i _ii'iiiii!iiii_il _ii_iiii SOME MODELS CAUTION Do not use a bulb rated over 130 V AC-15 W. During extended use, heat from the bulb could overheat Electrical Shock Or Personal Injury Hazard surrounding Disconnect electrical supply before servicing or cleaning the unit.
i_i_i_!ii_i_:_:_:i_:_:i_:_i_i_i_:_!_:_ii_i_i_:_:_i_i_i_ iiiii:_:,i _ _:_i_=i_ii_:_:_:i:_:_:_:_i_=_:ii_:_iii_:_i_:_:_i_=:_:_i_:_i_i_=_:_i_ li_iii_i_i_i_i_!ii_i_i_iii_i_i_iiiii;i_i_i_i_i_iiiii_i_i_i_i_iii_i_iiiii_i_i_ii_!_!_!_i_!i_i_iiii!!!_i_i_i_i_i_i_i_iiiii!_i_i_i_i_!_i_i_ii_iii; i_iiiii;i;ili!i! iiiiii_i_i_i_iiiii_;!i;!i!iiiiliiiiiiii ii_ii!iiii;ii_i;!!iil iiiliiiliiiiiii!i !i!!ililil iliiiiiiiiii!!iilliiiiiiii!!!ili il TO REPLACE AGITATOR Remove the nozzle cover and agitator, See BELT CHANGING AND AGITA
_i_iliiiliii!_iii_ iiiiiiiii 'iiiiiiil_iiiiii_iiii_iii i!iiiii_i_i ii_i_ iiiiii_i_ iiii_ !!ii_ iiiiiii_ ii!!iiliii_ !!i!! i_ iiiiii_ !_ !i_ i!iJi_ iiii_ illiii_ Review this chart to find do-it-yourself solutions for minor performance problems. Any service needed, other than those described in this owner's manual, should be performed at a Sears service center. ! Disconnect electrical supply before servmmg or cleaning the unit. Failure to do so could result in electrical shock or personal injury.
i i i i E i i%!iiiiii;iiiii zii;i iii!;iiii i;iiii@i i!!i i ;!ii!i!iiiiiii %iiiiiil i iiii i iiiiiiiiii!i i ;iiiiiiiiiiiiiiiii iii!i i!!!!iiiii i!!iiii iiii!i!i!i!i!i!ii I Antes de usar su aspiradora nueva ..... 1 Garantia de la aspiradora de Kenmore ... 1 Instrucciones importantes de seguridad ............................ Piezas y caracteristicas ................ Instrucciones de ensamblamiento ..... Instrucciones de operacibn ............ Ajuste y selecci6n de nivel de pelode la alfombra ...............
ADVERTENCIA guridad es muy importante para nosotros, Para reducir el riesgo de incendio, choque ico, lesibn corporal o daSos al utilizar su aspiradora, act_e de acuerdo con precauciones b_sicas de seguridad, entre elias: Lea eate manual antes de armar o utilizar su aspiradora. Use su aspiradora 0nicamente en la forma descdta en este manual. Use Onicamentecon accesorios recomendados per Sears. Para reducir el riesgo de choque electrico, no use su aspiradora al aire Iibre ni sobre superficies mojaclas.
:_:_;_;_:ii_:_:_:_:_:!:!:_:_:_:_31:_:_:_:_:i_3_:_:_:_:_:_:_:_i:_:_:_:_:_:_:_:_;_:_:_:_:_:_:_:_:!:!:_!:_:_i_¢_:_::I;::::_:_:_:;:::::_:::_:::::_:::i_:_i::::::_:::_:;:_3::_:_:_!_ "_::_:_ _:::_¢:_::i:_::::_::_:::_:_:_::::_:_:_::;:_:_::::_:_:_:_:_:_:_!:::::::_i_:_:_:_:_:_:_:_:_:_i_!i_!_!i_:_:_:_:_:_iii_:ii:_:_:_:_:_:_:_:_:_:_:_:!:iii:_: i:: ::::::::::::::::::::_::::::;_: :_::::::::::::::::::::;:::::::::::::,: ::::::: :::::::::::;::::::::::;;:::: :;:::::;;;:::: ::: ::+::;::::;_;;; :,_;::::: :::::::::;::::
Coloque el mango como se ve en el diagrama abajo. Antes de armar la aspiradora, chequee la LISTA DE EMBALAJE en la cubierta separada de la Lista de partes para Reparac[Sn. Use esta lista para verificar que ha recibido todas las componentes de su nueva aspiradora Kenmore. AI mantener la manguera de manera que no interfera, mueva e] mango a la abertura en la parte superior de la aspiradora.
COLOCACION DE LOS ACCESORIOS No apriete demasiado el tornillo. Si Io aprieta demasiado podria arruinar los orificios para el tornillo. No opere la aspiradora sin tener instalado el tornitlo. Apriete el tornil]ocon un destomillador. \ Una vez que haya colocado el mango en la unidad, y el cord6n haya side enrollado en los sujetadores, podra proceder a colocar los accesorios en sus respectivos receptaculos. 1. Cierre el fin para aspiraci6n de la manguera en la parte detrasera de la aspiradora. 2.
PARA COMENZAR ADVERTENCIA rde Ilberacl6n taplde del ¢ord6n 1. Gire el sujetador del cord6n de lado a ladoy hacia abajo para liberar el cordon el_ctrico. 2. Desprenda el enchufe del cord6n eDctrico y quite el cord6n del sujetador superior. Compruebe que el cord6n el6ctrice sigue fijado en la ranura de bloqueo del sujetador superior. ro de lesibn personal y dafio al producto • NO conecte la aspiradora si el interruptor est_ en la posicibn ON, Podria resultar en lesibn personal o daSo.
E ALGUNOS MODELOS CUIDADO Para de seccionar el ajuste de piso descubierto: Optima el bot6n de selecci6n hasta atras y debajo de la boquilla hasta que se sienta asegurado, No deje permanecer la aspiradora en un solo lugar durante ningt_ntiempo cuando el agitador est_ rotando. Se puede da_ar la alfombra. En esta posici0n el agitador no da vuiltas.Esta posici6n debe estar usada para limpiamiento de piso de madera y mosaico y cuando se usan algunos atachamientos (herramientas).
CUIDADO Peligro de choque electdco o lesibn corporal AI utilizar los accesorios para limpiar, tenga cuidado de no sobrepasar el alcance de la manguera. Si Io hace, podda ocasionar que la aspiradora se caiga. No ponga las manos o los pies debajo de la m_quina cuando a_ade la manguera. Mientras se usan los accesorios, la agitador empieza a girar. No deje que la aspiradora se quede en un sblo lugar por un periodo extendido, porque la agitador puede hacer daSo a la superficie del suelo.
CEPILLO PARA PISOS Y TUBO CUIDADO ALGUNOS MODELOS \ Cuando use la manguera en forma normal o con la manguera de extensi6n instalada, la aspiradora debe mantenerse sobre una superficie firme al mismo nivel o a un nivel inferior que los pies del usuario. NO use las mangueras cuando la aspiradora est_ a un nivel m_s alto que los pies del usuario. Unes modelos tienen un cepillo y un tube auxiliares para ]impiar los suelos sin alfombras.
I !iiiiii!iiiil i!iiiiiiiii iii!ii!!iiililiiii i !ii £ii i ii iiiiiiiiiiiiiiiiiiiiiiiiii;iiiiiiiii!iiiiil;iiiiiiiiiii I iiiiiiiiiiliiiiiiiiiiiiiiiiiii!!!!!iiiiiiiiiiiiiiiiiiiiii!ii!!i!iiill i iiiiiiiiiiiiiiiiiii i iiiiiiiiiiii ili iii iii i iii iiiiiiil Orillas de alfombras. Guie unode los costados o la parte anterior de la boquila a Io largo del borde de la pared. Los cepi]loslargos ayudan a aspirar la tierra atrapada en las orillas de las alfornbras.
Sigasiempre todaslasinstrucciones deseguridad allimpiar ydarleservicio a su aspiradora. Peligro de cheque el6ctrico o lesi6n corporal Desconecte la unidad antes de limpiarla o darle servicio. De Io contrario podria producirse un cheque el6ctrico o causar lesibn corporal si la aspiradora arranca de manera imprevista. Recoja el cord6n el_ctricoy p6ngalo sueltamente alrededor del soporte de liberaci6n rapida y alrededor del soporte inferior pars el cordon. s.j liberacibn rapide del cord6n.....
Siempre vacie el cube de la basura cuando el nivel de basura alcanza la linea "MAX FILL." PARAVACIAR EL CUBO DE LA BASURA Torne en esta Abierto direccibn ' vaclar (Para vaciar) PARA SACAR EL CUBO DE LA BASURA: ! ADVERTENCIA Siempre desconecte el cordbn _lectrico antes de reparar alguna parte de la aspiradora.
PAPA REEMPLAZAR EL CUBO DE LA BASURA Tome en esta direcci6n Ponga el cube de la basura de vuelta aden- Abierto (Pare vaciar) tro de la aspiradora insertando el rondo primero e inclinando atr_s con la manija del cube de la basura levantada. Manija de soltar el cube Cube de Baje la manija del cube de la basura para ajuetar el cube de la basura en su lugar Cerrado (Para usar) Coloque la tapa del canasto de basura sobre el canasto de basura. Alinee las marcas come se muestra bajo Abierto (Pare Vaciar).
::::: : _ ...... _::;ii_ : ::: :::::_:::: _::: _:_;i_:ki::: : : ::::::;._. ,_::._._.._.::......-..,::.,./,,..::_...:::-:...::-:.....+-:..,,_ t::_:: _!_:_!_ ,..:: "', ;:-,'::: ._ .._:.....,,-.,::...,:.....:::;: ;::::: ;:::;;::::::::::: :;;::::::::::::: :::::::: _,,___i_;_;_i_ FILTRO DE ESCAPE HEPA Este cartucho del filtro escape se tiene que cambiar est_ sucio. Debe cambiarse periSdicamentesegt_n las condiciones de use.
Cepille o quite cualquJerresiduo que est6 en al area de correas, Peligro de choque el_ctrico o lesibn corporal Desconecte la unidad antes de limpiarla o darle servicio. De Io contrario podria producirse un choque el_ctrico o causar lesibn corporal si la aspiradora arranca de manera imprevista. Peligro de lesibn personal Siempre desenchufe la aspiradora antes de limpiar el _rea del cepillo, ya que _ste podria empezar a funcionar repentinamente. No hacerlo podria resultar en una lesi6n personal.
NOTA: Paremantener unaaltaeficiencia de limpieza yevitareldafioala aspiradora, hay aue PARA CAMBIAR LA CORREA limoiar el aaitador cada vez eue se cambia ta Asegurase que el selectorde pisos con y sin alfombra este en la posicibn de pisos con alfombra. Coloque la nueva correa aErededordel eje de transmisibn del motor. Coloque la correa nueva sobre la polea del agitador. co,tea, El agitador se debe limpiar despu6s de haberlo usado de 7 a 10 veces.
Inserte el agitator por insertar la parte redonda de la tapa en la ranura de la base de la boquJlla. Asegurese de que los soportes de ]a cubierta de la boquilla esten en la posici6n UNLOCK• Conecle la parte delantera de cubierta de boquilla con la base de la boquilla y gire hacia abajo. Cuando este en su lugar apropiado, gire los soporles de la cubierta de la boquilla a la posici6n LOCK.
ADVERTENCIA Peligro de choque el_ctrico o lesion corporal Desconecte la unidad antes de limpiarla o dade servicio. De Io contrario podria producirse un choque el_ctrieo o eausar lesibn corporal si la aspiradora arranca de manera imprevlsta. aspiraci6n Proceda siempre con precauciones de seguridad al limpiar y dar servicio la aspiradora. Protector herramientas Si considera que la aspiradora no aspira bien aseg0rese primero de que la balsa no est_ Ilena y de que el filtrono est6 atascado.
ALGUNOS MODELOS CUIDADO No use una ampolleta de m_s de 130 V AC-15 W. Durante uso extendido, el calor de la ampolleta puede sobrecalentar las partes de pl_stico cercanas. Peligro de choque electrico o lesibn corporal Desconecte la unidad antes de limpiarla o darle servicio. De Io contrario podria producirse un choque el_ctrico o causar lesibn corporal si la aspiradora arranca de manera imprevista. \ Desenchufe la unidad de la corriente electrica.
PARA QUITAR EL AGITADOR Quite la cubierta de la boquilla y el agitador. Vease CAMBIO DE LA CORREA Y LIMPIEZA DEL AGITADOR. Peligrodechoqueeldctricoo lesibncorporal Desconecte launidadantesdelimpiarlao darleservicio.DeIocontrariopodriaproducirseunchoqueel_ctricoo causar lesi6ncorporalsi laaspiradora arrancade manera imprevista. Reemplazca el agitador con un nuevo. Rearme la correa, el agitador y ]a cubierta de la boquilla.
I" _: !iiiii!!iiii i i_i_i_i iiiiiiiiliiliii_i_ __i _ i_ i_i_ i_ ii'i__' __i _i_ ii:J!_ _!! ii!"_ _'1 iiii!i;iiiiii!!i_iiiiiii_i!_i iiiiiiiiiiiiiiiiiiiiiii!i!iii!iii!i!iiiiiii_i!iiiii!iiiiiiiilil iiiiii!i_iiiiiiiiiiiiiiiii iii!!i!ilI iiiii!iiiiiiiiiili_iiiiiiiiiiiii iiiiiiiiiiiiii!ii Consulte este cuadro para encontrar solucionesque usted mismo puede realizar cuando tenga problemas menores de rendimiento.
_ fiX_, _at y_r F_ rep_ - in y_" lawn _nd gar_ :home or_m! Your Home home - oi aB ma|or _r_ _ipmem, _ he_ing no matte_ who _ _Rpt_r_eso _nd Cooling systems. it. _o matter who s_ld It! Our Horl_ i_i_i_i_i i_ _nd e|_cl_r_ni<_, ce;ll o_r_o _qn-line,-_or th_ _neares_ Sea_ Pa_s a_d Repa_it C_rt,|_¢., i_I _ 1_800-827=6655 (u _.