Owner'sManual ManualDel Propietario VacuumCleaner Aspiradora Model, Modelo 116.34924 116.34925 CAUTION: Read and follow all safety and operating instructionsbefore first use of this product. CUIDADO: Lea y sigue todas las instrucciones de operaci6n y seguridad antes del uso de este producto. Sears, Roebuck and Co., Hoffman Estates, IL 60179 U.S.A. www.sears.com Part No.
AttachmentUse Chart ............... Before UsingYour New Vacuum Cleaner .................... 2 Kenmore Vacuum Cleaner Warranty ... 2 Important Safety Instructions ......... Upright Vacuum Cleaner Parts and Features ........................... 3 Assembly Instructions 4 ............. 5-6 Operating Instructions ............... Cord Release ....................... Releaseingthe Handle ................ TouchControl ...................... 6 7 7 7 Pile Height Selection and Setting ........
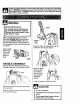
rvl WARNING: ,1 Your safety is important to us.To reduce the risk of fire, electrical shock, injury to persons or damage when using your vacuum cleaner, follow basic safety precautions including the following: Read all instructionsin this manual before assemblingor usingyour vacuum cleaner. Do not rest vacuum cleaner on steps. Do not put on chairs,tables, etc. Keep on floor. Use your vacuum cleaner only as described in this manual. Use only with Sears recommendedattachments.
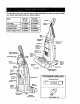
It is important to know your vacuum cleaner's parts and features to assure its proper and safe use. Review these before using your vacuum cleaner. Item Part No. In U.S. Part No. In Canada Dust Bag 20-50690 20-50690C Headlight Bulb 20-5248 20-5248 Exhaust Filter 20-86889 20-86889C Motor Safety Filter 20-86884 20-86884C Handle Control Sensor Beg Cover Release indicator Bag Cover Exhaust Rher Cover Release Exhaust Quick Release Height Power-Mate Jr.
_ Igiven. WARNING statements alert you to such dangers as fire, electricshock, burnsI IPlease pay special attentionto hazard alert alert you boxes, follow any instructions] I_d personal injury. CAUTIONthese statements to and such dangerous personall Ilnjuryand/or property damage. / Electrical Shock Hazard Do not plug into the electrical supply until the assembly is complete. Failure to do so could result in electrical shock or injury.
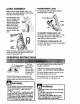
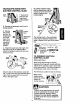
CORD ASSEMBLY POWER-MATE JR.® Make sure the quick release upper cord hook is in the uprightposition.Remove the wiretie from the power cord. For operation of Power-Mate separate Owner's Manual. Lock the power cord into the locking notch base by pressing it into the quick release upper cord hook as shown. This helps keep the power cord out from under the vacuum cleaner agitator. Jr.
Releasethe handleby pressingdownon the handlereleasepedalwithyourfootand pulling back and down on the handle with your hand. Note: The agitator does not rotate when the vacuum cleaner is in the upright position. Handle Release Pedal OFF - Turns OFF the vacuum cleaner (suction) motor. CARPET - Turns ON the vacuum cleaner motor to HIGH suction level and the agitator motor to HIGH speed level for cleaning of most carpets and rugs.
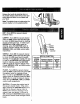
To select a pile height setting: Height Adjustment Lever \ Turn off vacuum cleaner. Select a pile height setting by tilting the cleaner back until front wheels are lifted slightly off the floor. Slide the adjustment lever to the correct setting. There are four (4) pile height settings on the vacuum cleaner. Use the LOW setting for most low-pile carpets and bare floor cleaning (with agitator OFF), and the HIGH setting for high-pile carpets like shag carpet, scatter rugs, etc.
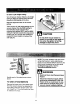
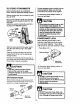
TELESCOPIC WAND WITH SUCTION CONTROL SLIDE To achieve maximum reach with the attachments, add the crevice tool to the end of the wand by inserting and twisting slightly. 1. Remove the hose from the Hose c_ hose clip by pulling straight out. sucaon m' I IU_II II controlN J-I I Ill II 2. Remove the telescopic wand from its storage position. Telesc°pic/// 3. Remove the crevice tool from its Crevice// --Crevice Tool storage position in the wand.
TO STORE ATTACHMENTS Connect extensionhose to stretchhose by pressingtogether,Make sure electrical connectionsare pressed firmly together. Remove dusting brush or combination brush, Snap into appropriate storage location. To disconnect press release button on hose and pull apart. Remove crevice tool from the wand by twisting. Lay aside. Remove the extension wand from the hose. Twist the wand to the left and pull from the hose end. Unlock the wand by turning the wand locking ring to the UNLOCK position.
CLEANING A'I-rACHMENT Furniture* DUSTING BRUSH it CREVICE TOOL tt COMBINATION BRUSH Between Cushions* Stairs v' v' i/ i/ = Applicable ,,t% Pivoting 0,/ v' *Alwaysclean attachments beforeusing on fabrics. Brushes Walls it i/ Power-Mate Jr._ AREA For ceanin Carpet edges Guide either side or the front of the noz- results, keep the airflow passage clear. zle along a baseboard. The pivoting brushes help remove dirt at carpet edges.
MOTOR PROTECTION SYSTEM AGITATOR MOTOR OVERLOAD PROTECTOR Motor Protector This vacuum cleaner has a motor The agitator motor has built-in protection against motor damage should the agitator jam. If the agitator slows down or stops, the agitator overload protector shuts off the agitator motor. The Agitator Overload vacuum cleaner motor Protector will continue to run.
DIRT SENSOR TO CLEAN The electronic dirt sensor is a feature The dirt sensor optics consist of two optic cells located inside the bag holder. Occasionally, it may become necessary to clean the two optic cells to assure maximum performance. It is recommended the optic cells be cleaned: which will detect particles as they pass through the vacuum cleaner. The dirt sensor indicators is located on the front of the switch cover. SENSOR OPTICS • When the red light stays on continuously.
VACUUM CLEANER CARE Alwaysfollow all safety precautionswhen performingmaintenanceto the vacuum cleaner. Electrical Shock And Personal Injury Hazard Disconnect electrical supply before performing maintenance to the unit. Failure to do so could result in electricel shock or personal injury from vacuum cleaner suddenly starting. Gather the cord and wrap it loosely around the upper and lower cord hooks.
TO REMOVE DUST BAG TO REPLACE DUST BAG ! 1. Unfold the new dust bag. Fold the safety seal tab on the WARNING Always unplug power cord from electrical outlet before performing any maintenance on the vacuum cleaner. new dust bag away from the opening that fits on the bag holder. 1. Pull out on the bag cover release located near the top of the bag cover. Dust Bag Seal Tab /, // / NOTE: See PARTS AND FEATURES for bag number. Bag //_'_ 2.
EXHAUST FILTER Check motor safety filter frequently and change when dirty. ! (HEPA) I.,3w,=,o WARNING Electrical Shock Hazard Do not operate without exhaust Unplug power cord from electrical outlet. Do not operate the vacuum cleaner without the motor safety filter. Be sure the filter is dry and properly installed to prevent motor failure and/or electrical shock. filter, Failure to due so may damage the vacuum cleaner The exhaust filter cartridge must be replaced when dirty.
3. Remove the light bulb by pulling straight out. To Release Electrical Shock Or Personal Injury Hazard Disconnect electrical supply before performing maintenance to the unit. Failure to do so could result in electrical shock or personal injury from the vacuum cleaner suddenly starting. To Replace TO REMOVE LIGHT BULB 1. Disconnect power cord from electrical outlet. \ 2. Pry light lens out at slot in rear as shown on both sides. Rotate lens 4.
Alwaysfollow all safety precautionswhen performingmaintenanceto the vacuum cleaner. Re-insert the hose into the opening on the lower body from which it was removed. Press firmly to assure connection. Stretch Hose Electrical Shock Or Personal Injury Hazard Hose Collar Disconnect electrical supply before performing maintenance to the unit. Failure to do so could result in electrical shock or personal injury from vacuum cleaner suddenly starting.
Review this table to find do-it-yourselfsolutionsfor minor performanceproblems.Any other service needed, should be performedby a Sears or other qualifiedservice agent. Vacuum cleaner won't rgn, 1. Unpluggedat wall outlet. 2. Trippedcircuitbreaker/blownfuse at householdservicepanel. 3. Thermal protectortripped. Poor Jobof dirt pick-up. 1. Fullor cloggedd_t bag. 2. Wrong pile heightsetting. 3. Worn agitator. 4. Cloggednozzleor bag holder. 5. Cloggedhose. 6. Hole in hose. 7. Hose notinsertedfully. i 9" .
Antes de usar su asplradora nueva ..... I 6 6 Sugerenciaspare aspirar ............... 10 Carecterfisticas de rendimiento/seguridad ............... 11-12 Culdado de la aspiradora .............. 13 Almacenamientode la aspiradora ........ 13 Limpieza del exteriory de los accesorios... 13 Camblode la bolsapare polvo........... 14 Cambiode filtros ..................... 15 Cambiode la bombilla ................. 16 Umpieza del ag_der .................. 16 C6mo eliminarlos residuosde basura en los conductos.....
Susegurldad esmuyImpodante paraneaotms. Para mmmmm poral0 dan_- al _bar su aspb-adora, acb_ede acuen:lo con precauclonesb_sloasde segurldad,entreeUas: Lea este manualantesde armar o utilizarsu aspiradora. Use su aspiradora_nicamente en la forma descdtaen este manual.Use Qnicamentecon accesoriosracornendadospor Sears. Para raducirel riesgode choqueel6ctdco,no use su aspiradoraal aira fibreni sabre superficies mojadas.
Es importante concerlaspiezasy caractedsticas de su aspiradorapara asegurarsu uso adecuadoy seguro, Examfnelasantesde usar su aspiradora.
informack_n le alertarddel peligrode fuego,choqueselectricos,quemadasy ]esiones.Culdado: Estefavor informacidn alertarade peligros comolesionesy Pot ponga eIs special atenci6n a 6stosrecuadros condaSosde alerta de propiedad. riesgo.Adverteucla:Este Coloqueel mangocomose ve en el diagrama abajo. ADVERTENCIA AI mantenerla manguera de manemque no interfsra, muevael mangoa la aberturaen la parte superiorde la aspiradora. Pellgro de cheque eldctrlco No conecte le asplradora hast= que termine de armada.
COLOCACI( N DEL CORDON POWER-MATE JR.@ Assgt_rese de que el sujetadorsuperiordel corddn de libemci6nrdpidase encuentreen posick_n vertical Quiteel alambreconel que est_atado el cord6n eldctrico. Para operar el Power-Mate ual dee dueSo separado. Asegureel cord6n el6ctricoen la ranurade la basepresion.-_ndoio en el ganchosuperiorde libsraci6nrdpidapara el cord6nel6ctricocomose muestra de liberaci6n del cord6n_ Jr.® ver man- Seguro de f_ Leng_eta r_pida PARA INSERTAR EL POWER-MATE JR.
Q Desprenda el mango pisando el pedal de liberaci6n y tirandadel mangohaciaabajocon la mano. Nota: El agitador no girar_si la aspirador_est,. en posici6nvertical. liberacl6n del mango SUCCI6N OFF - Apaga el motor de succi6n de la aspiradora. ALFOMBRA - Prende (ON) el motor de la aspiradora al nivel de ALTA succl6n y el motor agitador al nivel de ALTA velocidad para limpiar la mayorfa de las alfombras.
Paraseleccionar unaJuste denlveldepelodela alfombra: Apague laaspiradora. Seleccione unniveldeajuste inclinando laaspiradora haciaatrdshastaque las Height Adjustment Lever ruedasdelanterasest6nun pocodespegadasdel piso. Deslicela palancade ajustede nivelde pelode la alfombraa la posici6ndeseada. Hay cuatro(4) posicionesde ajustedo alturaen la aspiradora.
Lamanguera incorporada gira parafacilitar la Ilmpieza oncual- Paraobtenerla m_ima Iongitudcon los Manguera, accesorios,instale la herremientapara hendidurasen Desllzador de control de el extremedel tubo.Pare hacerlo, introd_zcala en el tubo Tubo y girela un poco. Giratorlaquierdirecci6n. Paraquitarla manguera,tirede Manguera la mangueradel del collar collar.
ALMACENAJE DE LOS ACCESORIOS Conectela manguera extraala manguera de extensl6napretdndolasjuntas. Est6 segum qua las conexionesaldctdcasest=tn apretadas firmemente. Retireel cepillopara sacudiro el cepillopara combinaci6n. Col6quelosflrmemente en sulugarde almacenamiento correspondiente. Para desconectar apriete el bot6n de soltar en la manguera y sepdrelos. Retire_sherramlentapare hendidurasdel tubo girdndola.P6ngalaa un lado. Retireel tubode extensi6nde la manguera.
AREA A LIMPIAR ACCESORIO Muebles* Entre cojlnes* Escalones Paredes CEPILLO SACUDIRPARA HERRAMIENTA PARA HENDIDURAS CEPILLO PARA COMBINACION Power-Mate t/ i/ <_ v' v' Jr.® • Siemprelimpielosaccesorios antesde usarsobmtelas. ..... _ Cepillos pivotes v' = Apiicable _] ....... - ff i/ i<_ll,,,iF r --!;lilili Paraobtenerlos mejores resultados de limpieza,mantengadesbloqueadoslos conductos de flujode aire.
SISTEMA DE PROTECTION DE MOTOR Protector PROTECTOR DE SOBRECARGA DEL AGITADOR de motor Esta aspiradora tiene una vdlvula de desviaci6n que sirve como protector de motor y se abre automaticamente para proveer un flujo de aire al motor cuando un bloqueo impida que cimule el aire al motor. Si se abre la vdlvula bypass para impedir que se recaliente el motor y que so daSe la aspiradora, se notara un cambio de sonido miantras el aire pasa por la abertura de la vdlvula.
INDICADOR DE POLVO PARA LIMPIAR I.AS CELDAS OPTICAS El indicadorde polvoy el indicadorde sensibilidad estdnIocalizadosen la partedelanterade la cubierta del indicador. Los 6pticosdel indicadorde polvoconsistsde dos celdas6pticasIocalizadasdentrodel compartimiento para Is bolsa. De vez en cuandoes necesario limpiarlasdos celdas6pticasparaque funcionen a su capacidadrndxima.
E'.f ADVERTENCIA Siga siempretodaslas instrucciones de seguridad antesde efectuarel mantenimientoa su aspiradora. Peligm de choque el(ctrico o lesi6n corporal Desconecte la unidad antes de efectuar el mantenlmlentoa su asplradora. De Io contrario podrfa producirss un choque el(c. trlco o causar lesldn corporal el la aspiradora arranca de manera imprevista. Recojael cord6ny enrrblleloen lossujetadoressuperiore inferior,sin que quede muy apretado.
1SARAQUITAR LA BOLSA PARA POLVO PARA CAMBIAR LA BOLSA Desdoblela bolsa para polvonueva. Doble la lengBeta de seguridadde la nuevabolsapara polvoen direcci6n contradaa la abertura que va en el sujetadorde la bolsa. ADVERTENClA Tire haciaadelantede la liberaci6nsituada cercade la parte superiorde la cubiertade bolsa. Liberaci6nde_ Cubierta de I/_'_ -Cavidadpara la bolsa - Filtro de seguridad del motor / Coloqueel collarde la bolsa en posici6n.
Examine elfiltmdeseguridad delmotor devezen cuando ycambielo cuando est6 sucio. FILTRO DE ESCAPE HEPA CUIDADO Pellgrode choquo eldctrico Daaenchuta el cord6n de la cordente e|6ctrica. No opere la asplradora sin el filtro de aegurldad del motor. Aseg_urese de que el firm eat6 aeco • [nstalado adecuadao manta para impedir qua el motor falle y/o qua sa produzca un choque e]6ctrico, No opera la aspiradora sin el filtro de escape. Este cartuchodel filtroescapese tieneque cambiar cuandoestdsucio.
Remueva la bombilla tirando derecho hacia afuera. |/"_1 //,:r Para reUrar Pellgmdechoque el6ctricoo lesi6ncorporal Desconecte launidadantesdeefectuar el mantenlmlento asuaeplradora. DeIocontrariopodr|aproducirse unchoque el6ctrlcoo causarlesl6ncorporal sl laasplradoraarranca demanera Imprevlsta. Para reemplazar la bombiUa cuidadosamente PARAQUITAR LA BOMBILLA Para remplacar \ Ranuras Abracon una palanca cuidadosamente el lentede luz por ta ranurade la parte posteriorcomose muestraen ambos lados.
Proceda siempre conprecauciones deseguridad antes deefectuar elmantenimiento a suaspiradora. Insertanuevamentela manguera an la aberturade la parteinferiorde dondela retir6.Empujeconfirmezapara asegurarsede que quedebienconectada. Pellgm de choque el6ctrico o lasl6n corporal - Manguera expansible Deaconectela unldad antes de efectuar el mantenlmiento a su aspiradora. De Io contrarlo podrfa produclrse un choque el6ctrico o causar fesi6n corporal si la aspiradora arranca de manera Imprevlsta.
Revise esterecuadro paraencontmr soluciones a problemas que puedecorregirustedmismo.Cualquierotro serviciodebe ser realizadoper SEARS u otroagentede serviciocalificado. La asplradora no encbnde 1. Esld desconectada. 2. Cortacircuitos botedoo fusible quemadoen el tablerode servk;io de la residencia. 3. Protectortermalactlvade. 1. Conectebien,seleccionela fusion deseada en el controlmanual. 2. Restablezcael €ortacircuitos o cambieel fusible. 3.
19
Your Home For repair - in your home - of all major brand appliances, lawn and garden equipment, or heating and cooling systems, no matter who made it, no matter who sold it! i iii _ _ii For the replacement parts, accessones and owner's manuals that you need _o do-it-yourself. ilii _ For Sears professional installation of home appliances and items like garage door openers and water heaters. 1-800-4-MY-HOME ® (1-800-469-4663) Anytime,day or nJgtlt {U.S.A.andCanada] www.sears.com www,sears.