Owner's Manual Manual Del Propietario Vacuum Cleaner Aspiradora Model, Modelo 116.34924 116.34925 CAUTION: Read and follow all safety and operating instructions before first use of this producL CUlDADO: Lea y sigue todas las instrucciones de operaci6n y seguridad antes del uso de este productoo Sears, Roebuck www.sears.com and Co.,,Hoffman Estates, IL 60179 U.S.A.
Before Using "Your New _-. :_:::_Vacuum Cleaner-_.. Kenmore Vacuum Cleaner Warranty Important Safety Instructions ......... ..._ 2 3: Upright Vacuum Cleaner Parts and Features ................ Assembly Instructions Attachment Use Chart ....... ::_::"Wacuuming Tips ................. Performance/Safety Features ..... ....... ........... ' r- =_, 11 11 12_13 1 Vac_uum Cleaner Care .......... 14 vacuum Cleaner Storage .......... Cleaning Exterior and Attachments 4 5-6 Filter Replacement .....
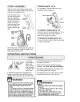
J A D V V_"&I_ _.l _ • l_ %;_. Your safety is important to us.To reduce the risk of fire, electrical shock, injury to persons or damage when using your vacuum cleaner, follow basic safety precautions including the following: Read all instructions in this manual before assembling or using your vacuum cleaner Do not rest vacuum cleaner on steps.. Do not put on chairs, tables, etc, Keep on floor.
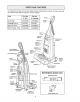
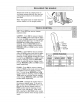
It is importantto knowyourvacuumcleaner'spartsandfeaturesto assureits properandsafe use,Reviewthesebeforeusingyourvacuumcleaner. Item Part No. In U,S. Part No. in Canada Dust Bag 20-50690 20-50690C ,,H,ead!ight Bulb 20-5248 ii 20-524.8 ...... Exhaust 20-86889 I 20-86889C Mo{oi Filter Safety Filter: Handle_ T_%_rho_ /_ // 20}86884 ............ 20-86884c .... i// Dirt _ L / t} oo.o, ,°,°°.
Please pay special attention to these hazard alert boxes, and follow any instructions given. WARNING statements alert you to such dangers as fire, electric shock, burns and personal injury CAUTION statements alert you to such dangerous personal injury andtor property damage. ................... WARNING Electrical ::::::::::::::::::::::::::::::: ..........
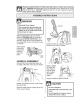
CORD ASSEMBLY POWER-MATE For operation of Power-Mate separate Owner's Manual. Make sure the quick release upper cord hook is in the upright position Remove the wire tie from the power cord,, Lock the power cord into the locking notch base by pressing it into the quick release upper cord hook as shown,. This helps keep the power cord out from under the vacuum cleaner agitator. J R.® Jr,,® see \ Lockh_ Power-Mate Jr,®_, !_/_/, Latch Power TO INSERT Quick Upper Cord Hook POWER-MATE JR _' Place the
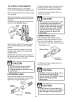
Releasethe handleby pressingdownon the handlereleasepedalwithyourfootand pullingbackanddownon the handlewith yourhand Note:The agitatordoesnotrotatewhenthe vacuumcleaneris in the uprightposition Handle Release Pedal OFF - Turns OFF the vacuum cleaner (suction) motor. CARPET -Turns ON the vacuum _!j:; cleaner motor to HIGH suction level and the agitator motor to HIGH speed level for cleaning of most carpets and rugs. in order to get MEDIUM and LOW suction levels for OFF \ cleaning, press the SUCTIO
Height Adjustment Turn off vacuum cleaner° Select a pile height setting by tilting the cleaner back until front wheels are lifted slightly off the floor. Slide the adjustment setting. Lever lever to the correct There are four (4) pile height settings on the vacuum cleaner.
TELESCOPIC WAND WITH SUCTION CONTROL SLIDE Hose _mL'_]l I_-_\ltll_& I I To achieve maximum reach with the attachments, add the crevice tool to the end of the wand by inserting and twisting slightly. : I, Remove the hose clip by :1 " Clip __)_ Con trol hose the pullingfrom out straight Telescopic Wand, 2, Remove the telescopic wand from its storage position 3. Remove the crevice toot from its storage position in the wand.. Turn the locking ring to the UNLOCK Crevice Tool 1111 tt1\c,-ovioo Telesco
TO STORE ATTACHMENTS Connect extension hose to stretch hose by pressing together, Make sure electrical connections are pressed firmly together, Remove dusting brush or combination brush Snap into appropriate storage location. To disconnect Remove crevice tool from the wand by twistingo Lay aside_ M_ ... ,v_...,. Unlock the wand by turning the wand locking ring to the UNLOCK position 2°° " ,_ff I : ...........................
CLEANING AREA ATTACHMENT DUSTING BRUSH ............ <_ CREVICE TOOL COMBINATION Power-Mate ¢;_ BRUSH & Jro® *Always clean attachments before using on fabrics ,/' = Applicable For best cleaning results, keep the airflow passage clear. Carpet edges Guide either side or the front of the nozzle along a baseboard The pivoting brushes help remove dirt at car- Pivoting Brushes Occasionally, check each of the areas indicated for clogs, pet edges.
Motor Protector This vacuum cleaner AGITATOR MOTOR OVERLOAD PROTECTOR has a motor protector by-pass valve which automatically opens to provide cooting air to the vacuum cleaner motor when a clog prevents the normal flow of air to the motor If the by-pass valve opens to prevent motor overheating and possible damage to the vacuum cleaner, you will notice a change of sound as air rushes through the valve open_ng_ Agitator Overload Protector Reset Button To correct problem: See the TROUBLESHOOTING table and
DIRT SENSOR The electronic TO CLEAN dirt sensor DIRT SENSOR The dirt sensor optics consist is a feature OPTICS of two optic I cells located inside the bag holder which will detect particles as they pass through the vacuum cleaner.
VACUUM CLEANER CARE Always bllow all safety precautions when performing maintenance to the vacuum cleaner. WARNING Electrical Hazard Shock And Personal Injury Disconnect electrical supply before performing maintenance to the unit. Failure to do so could result in electrical shock or personal injury from vacuum cleaner suddenly starting. Gather the cord and wrap it loosely around the upper and lower cord hooks.
TO REMOVE DUST BAG TO REPLACE DUST BAG 1, Unfold the: new dust bag. WARNING Always unplug power cord from electrical outlet before performing any maintenance on the vacuum cleaner_ 1_ Pull out on the bag cover release located near the top of the bag cover. Bag Cover Release-- oust Bag Fold the safety seal tab on the .I_ // away from the opening that newdustbag fits on the bag holder,, /// S-ealTab /_ --_ NOTE: See PARTS AND FEATURES for bag number. ii!! {il Bag Cover.
Check motor safety filter frequently change when dirty, Electrical Shock and EXHAUST (HEPA) Hazard Unplug power cord from electrical outlet. Do not operate the vacuum cleaner without the motor safety filterm Be sure the filter is dry and properly installed to prevent motor failure andtor electrical shock. The exhaust filter cartridge must be replaced when dirty. It should be replaced regularly depending on use conditions. The filter CANNOT be washed as it will lose its dust trapping ability.
WARNiNG 3. Remove the light bulb by pulling straight out,. ...................... To Release Electrical Hazard Shock Or Personal Injury Disconnect electrical supply before performing maintenance to the unit. Failure to do so could result in electrical shock or personal injury from the vacuum cleaner suddenly starting. To Replace TO RE&lOVE LIGHT BULB 1. Disconnect outlet power cord from electrical \ 2o Pry light lens out at slot in rear as shown on both sides Rotate lens Note: See PARTS AND FEATU
Always follow all safety precautions when .............. :::........... performing maintenance to the vacuum cleaner. : lower body from which it was removed. Press firmly to assure connection. .... .......... ..................... Electrical Hazard Shock Or Personal Injury Disconnect electrical supply before performing maintenance to the unit, Failure to do so could result in electrical shock or personal injury from vacuum cleaner suddenly starting.
• _!i,i:i_i:i!!f i:,i _il::ii_! _i: !:iii!:!_ ii:i_i,_i:i ,_:!: iiii!i:! _i::i_ i_i _;:i!i_i i::i ,!!!i:i Review this table to find do-it-yourself solutions for minor performance problems Any other service needed, should be performed by a Sears or other qualified service agent., i:,J Vacuum cleaner won't run, 1, Unplugged al wall outlet Plug in firmly, select the desired settingon the touchcontrol 2_ Reset circuit breaker or replace fuse 1.
Antes de usar su aspiradora nueva Garantia de ia aspiradora de Kenmore Instrucciones importantes de seguridad ................. Piezas y caracteristicas vertical .................... Instrucciones de aspiradora de ensamblamiento tnstrucciones de operaci6n .......... Liberaci6ndel cordon el_ctrico .......... Desprendimientodel Mango ......... Pulsador de Control .............. Ajuste y setecci6n de nivel de pelo de la alfombra ..................... Accesorios ...... Cuadro de uso de los accesorios 1 ..
ADVERTENCnA Su seguridad es muy importante pare nosotros. Para reducir el riesgo de incendio, choque el_ctrico, lesi6n corporal o daSosal utilizar su aspiraclora,actue de acuerdo con precaucionesb_sicas de seguridad, entre elias: Lea este manual antes de armar o utilizer su aspiradora Use su aspiradora unicamente en la forma descrita en este manual.
Esimportante concer laspiezas y caracteristicas desuaspiradora paraasegurar suusoadecuado yseguro Examinelas antesdeusarsuaspiradora, Objeto Pieza No en EUA Pieza No en Canad& Man i Bolsa para potvo 20-50690 20-50690C Bombilla de farol 20-5248 20-5248 Filtro de escape 20-86889 20-86889C Filtro de segufidad del motor 20-86884 20-86884C de Control Indicador de Seguro de la cubierta de Cubierta la bolsa lndicador de rendtmlente de la cubierta de! r_ Sujetador superio de/iberaci6n r#pida d
Par favor ponga especial atenciSn a 6stos recuadros con aferta de riesgo Advertencia: Este informaci6n le alertar& del peligro de fuego, cheques electricos, quemadas y lesiones,, Cuidado: Este informacbn Ie alertarade peligros come tesienes y daSosde propiedad Coloque el mango come se ve en et diagrama abajo A1mantener la manguera de maneraque no interfera, mueva el mango a la abertura en ta parte superior de la aspiradora, Peligro de cheque el6ctrico No conecte ta aspiradora hasta que termine de armada°
COLOCACl0N DEL CORDON POWER-MATE Asegurese de queef sujetador superior dei cordon de liberaciOnr&pida se encuentre en posiciOnvertical Quite el alambre con el que est& atado el cord6n eiOctrico Para operar el Power-Mate uaI del due5o separado, Asegure el cordon electrico en la ranura de la base presion_,ndoloen el gancho superior de liberaciOnr_pida para et cord6n el_clrico come se muestra \ JR.@ Jr.
Desprenda etmango pisando elpedaldeliberaci6n ytiranda delmango haciaabajocontamano \ Nota: El agitador no girar& si la aspiradora esta en posici6n vertical Pedal de liberaci6n del mango :i_::i!:'i:!_ii i :: ............................ OFF- Apaga aspiradora et motor de succi6n SUCClON de la BAJO, el nivet de succi6n dei motor de la aspiradora.
Paraseleccionar unajustedeniveldepelodela alfombra: Apague laaspiradora Seleccione unniveldeajuste inclinando laaspiradora haciaatr,fis basra quelas ruedas detanleras est6nunpocodespegadas det piso, Deslice lapalanca deaiuste deniveldepelodela alfombra a laposici6n deseada.
La rnanguera incorporada gira para facilitar la lirnpiezaen cuaIquiet direcci6n Para qui[ar la rnanguera,tire de la rnangueradeI collar.. Para obtener ta rn&xima tongitud con los Manguera. accesorios, instafela herrarnientapara hendidurasen Deslizador de control de el extremo det aspiraclon--.
ALIVlACENAJE DE LOS ACCESORIOS Conecte la manguera extra a la manguera de extensi6n apret&ndotas juntas Est_ seguro que las conexiones electricas est&n apretadas firmemente Retire el cepi{topara sacudir o el cepiflo para combinaci6n Col6quefosfirmemente en su lugar de almacenamientocorrespondiente Para desconectar apriete el bot6n de soltar en la manguera y sep,_retos, Retire la herramienta para hendiduras det tube gir&ndola P6ngala a un lade Retire el tube de extensi6n de fa manguera Gire el tube hacia
AREA A LIMPIAR ACCESORIO Muebles* Entre cojines* _ '/" Cortinas* Escalones Parades CEPILLO PARA SACUDIR HERRAMtENTA HENDIDURAS PARA _ CEPILLO PAISA COMBINAClON ._,. Power-Mate ......................... ._ Jr.® v ,/ "/ ,/ _ ./ ................................ • Siemprelimpielos accesoriosantes de usersobretelas Cepfllos ''"_ ......
PROTECTOR DE SOBRECARGA DEL AGITADOR DE MMOTOR Protector de motor E!motor del agilador tiene una protecciSn incorporsda contra dar_odel mob.oren Esta aspiradora [iene una v&Ivuta de desviaci6n que sirve como protector de motor y se abre automaticamente para proveer un flujo de aire al motor cuando un bloqueo impida que circule el aire al motor.
INDICADOR DE POLVO PARA LIMPIAR LAS CELDAS OPTICAS El indicador de polvo y et indicador de sensibilidad est_n tecalizadosen la parle delantera de la cubier_ la del indicador Los 6prices det indicador de potvo consiste de dos celdas 6pticas Iocalizadasdentro del compartimiem to para la bofsa. De vez en cuando es necesario ....
Sigasiempre todastasinstrucciones deseguridad antesdeefectuar elmantenimiento a suaspiradora Petigro dechoqueel6ctrico o lesi6ncorporal Desconecte launidadantesdeefectuar el mantenimiento asuaspiradora. DeIoconIrariopodriaproducirse unchoqueel6ctricoo causarlesi6ncorporalsi laasptradoraarranca de manera imprevista. t Recoja el cord6n y enrr61leloen los sujeladores superior e inferior, sin que quede muy apretado XDVE RTE ......
PARA QUITAR LA BOLSA PAPA POLVO Tire hacia adelante de la liberaci6n situada cerca de fa parte superior de la cubierta de bolsa.
Examine etfiltrodeseguridad delmotordevezen cuando y cambieto cuando est6sucio F1LTRO DE ESCAPE HEPA _ ! ADVERTENCIA Petigro de choque el6ctrico Desenchufe el cord6n de la corriente et6c. trice+ No opere la aspiradora sin el fittro de seguridad del motor.
, ADvERTENciA .................. Remueva la bombilla tirando derecho hacia afuera Peligrode choque el_ctrico o tesi6n corporal Desconecte la unidad antes de efectuar el mantenlmiento a su aspiradora. De Io contrario podria producirse un choque el6ctrico o causar lesi6n corporal si la aspiradora arranca de manera imprevista,.
Proceda siempre conprecauciones deseguridad antes deefectuar elmantenimiento asuaspiradora,, lnserte nuevamentela manguera en la aberlura de ta parte inferior de donde la retir5 Empuje con firmeza para asegurarse de que quede bien coneclada " ................. Peligrode choque el6ctrico o lesi6n corporal - Manguera expansible Desconecte la unidad antes de efectuar el mantenimiento a su aspiradora_ De Io contrario podria producirse un choque el6c.
Revise esterecuadro paraencontrar sotuciones a problemas quepuede corregir ustedmismo, Cualquier afro servicio debeserrealizado perSEARS u ottoagente deservicio calificado, ADVERTENCIA Desconecte la aspiradora Peligro de cheque elOctrtco antes de efectuar e! mantenimiento a su aspiridora.
19
Your Home For repair - in your home - of all major brand appliances, lawn and garden equipment, or heating and cooling systems, no matter who made it, no matter who sold it7 For the replacement parts, accessories and owner's manuals that you need to do-it-yourself. For Sears professional installation of home appliances and items like garage door openers and water heaters, 1-800-4-MY-HOME ® Anytime, day or night (1-800-469-4663) (U SA and Canada) www°sears.com www.