Owner's Manual Vacuum Cleaner Model 116.20812 116.20813 116.21813 116,21875 CAUTION: Read and follow all safety and operating instructions before first use of this product. Sears, Roebuck and Co., Hoffman Estates, IL 60179 U.S.A. www.sears.com Part No. C_1ZBAK4_UOO-8175060 Printed in U.S,A.
Before Using Your New Vacuum Kenmore Vacuum Cleaner Warranty Important Safety Instructions Parts and Features ................. Assembly Use _ _, Instructions ........... ........ ,... 2 ......... ...... , _. ,, 6-7 _ _ _., ... 14 14 Bag Changing ..................... Cleaning Exterior and Attachments ..... Motor Safety Filter Changing ................ Exhaust Filter Changing ............... 3 4-5 .............. How to Start .......................... How Your Vacuum Works ............
Your safety is important to us.To reduce the risk of fire, electrical shock, injury to persons or damage when using your vacuum cleaner, follow basic safety precautions including the following: Read this manual before assembling or using your vacuum cleaner. Use your cleaner only as described in this manual Use only with Sears recommended attachments. To reduce the risk of electrical shock - Do not use outdoors or on wet surfaces, Disconnect electrical supply before servicing or cleaning out brush area.
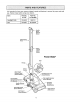
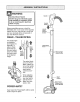
it is importantto knowyourvacuumcleaner'spartsandfeaturestoensureits properandsafe use.Reviewthesebeforeusingyourcleaner, Item Part No. In U.S. Headlight Bulb Belt Part No. In Canada 20-5240 59618 I 20-5201 20-40979 Handle Quick Release Button Telescoping Wand Wand Length Adjust Button Power-iVlatee Belt Flange Wand Swivel Wand Quick Release Pedal \.. Headlight and Lens (Some Models) He_lht Power.
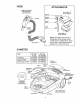
HOSE ATTACHMENTS 3.Way On!Off Switch Off/Floor!Carpet (Some Models) Power*Mate I (Some Crevice Tool Jr. _ Models) Dusting Brush Handle Fabric Brush Floor Brush Hand#Mate Jr. _ (Some Models) NOTE: All models have one set of attachments in the canister, Some models have an additional set, which can be kept in the accessory bag for garage use or other dirty areas, Hose Swivel CANISTER Item Part No. In U.S. Dust Bag Exhaust .............
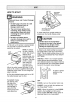
E Electrical Shock Hazard DO NOT plug into electrical supply until assembly is complete. Failure to do so could result in electrical shock or injury, Before assembling vacuum, check the PACKING LIST on the cover of the separate Repair Parts List. Use this list to verify that you have received all the components of your new Kenmore vacuum.
CANISTER HOSE 1. Open the canister hood. 1. Line up the hose latch tab and notch in canister hood and insert hose into canister until it 2. Check to see that the dust bag is properly installed, See BAG CHANGING for instructions, 3. Check to see that the motor safety filter is properly installed, See MOTOR SAFETY FILTER CLEANING for instructions.
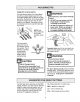
HOW TO START • Personal Hazard Pile Height Indicator ING .............................................. I Injury and Product Damage • DO NOT plug in if switch is in ON position. Personal injury or damage could result. • The cord moves rapidly when rewinding. Keep children away and provide a clear path when rewinding the cord to prevent personal injury. = DO NOT use outlets above counters. Damage from cord to items in surrounding area could occur. 1. Pull cord out of canister to desired length.
Suggested sweeping pattern, • wARNiNG.............. For best cleaning action, the Power-Mate ® should be pushed straight away from you and pulled straight back° At the end of each pull stroke, the direction of the Power-Mate ® should be changed to point into the next section to be cleaned. This pattern should be continued across the rug with slow, gliding motions. Personal Injury Hazard and Product Damage DO NOT run over power cord with Power-Mate ®.
SOME MODELS TO CLEAN THE LENSES The dirt sensor light system is mounted on the Power-Mate s nozzle near the reset button. It consists of a series of three red lights and one green light. The lights give you an indication of the amount of dirt 1. Remove the wands by pressing the quick release pedal and lifting up on the wands. particles that are passing Dirt Sensor (Some Models) thru the sensor on its way to the dust bag° Cross Section View f INITIAL START UP Approx.
E, ATTACHMENTS ON WANDS CAUT'0N SOME DO NOT attach or remove handle or wands while cleaner is ON. This wands from could cause sparking and damage the electrical contacts. , o e ovo Power-Mate ° , lock wands in ATTACHMENTS ON HANDLE Handle Lock Button --*_ MODELS straight-up NOTE: If the Power-Mate _ is attached, turn cleaner off before remov- position, ing handle from wands. m Telescoping Wand u I Wand m 1.
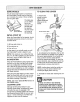
CLEANING Be_een Furniture* Cushions* ATTACHMENT Dusting Brush _ Crevice Tool X X Fabric Brush _ Drapes" Stairs AREA Bare Floors Carpeted FloorgRugsi X Walls X X X X Floot Brush X X X (So,me Models) X** Power'Mate® ' X x (Some Models)"* Power-Mate Jr2 X x *Always clean attachments before using on fabrics° ** 3_way O_Off switch should be in FLOOR position, *** Handi-Mate Jr,= and Power-Mate Jr.
ELECTRONIC BAG/HOSE CHECK INDICATOR SOME To reset: Turn off and unplug the vacuum from the outlet to allow the vacuum to cool. Check for and remove any clogs. Also check and replace any clogged filters, Wait approximately 50 minutes and plug the vacuum in and turn back on to see if MODELS Electronic Bag/Hose The light comes on whenever the airflow becomes the thermal protector has reset. In some cases, the unit may suddenly restart. DO NOT leave unattended.
The vacuum cleaner creates suction that picks up dirL Rapidly moving air carries the dirt to the dust bag through the airflow passages. The dust bag lets the air pass through, while it traps the dirt. For best cleaning results, keep the airflow passage open. Check the starred areas occasionally for clogs. Unplug from outlet before checking,, Motor Safety Filter BAG CHANGING 7, The red bag mount will flip forward after removing bag. This will prevent the lid from closing until a new bag is installed.
! 1. Unplug cord from wall outlet. DO NOT drip water on cleaner. 2, Clean exterior using a clean, soft cloth that has been dipped in a solution of mild liquid detergent and water, then wrung dry. Wipe dry after cleaning° .............. cAUTIoN Do not use attachments if they are wet. Attachments used in dirty areas, such as under a refrigerator, should not be used on other 3. To reduce static electricity and dust buildup, wipe outer surface of cleaner and attachments.
2. Slightly push the exhaust filter wARr, JiNG....................... Exhaust cartridge to the side, as shown in the illustration, and pull up to remove. Fire andlor Electrical Shock Hazard Do not operate with a clogged exhaust filter or without the exhaust filter or exhaust filter cover installed. i l,il I I I,I!l',,L',g., r, ....... ,;,...... EXHAUST FILTER 3.
l. TO REMOVE BELT CAuTioN .................. 1, Turn Power- Mate _ upside down, When you remove the end caps, a small metal washer on each end may come off.DO NOT two metal washers. 2. Unscrew the lose these two (2) PowerMate ® cover screws, TO CLEAN AGITATOR: NOTE: In order to keep cleaning efficiency high and to prevent damage to your vacuum, the agitator must be cleaned every time the belt is changed. 3. PJrn PowerMate ® right side up. Press handle release pedal and lower the swivel.
TO REPLACE 5. Line up front of cover and base. Rest cover on BELT 1. Slide washers and end caps onto agitator assembly. front edge of base as shown. Cover 2. install new belt over motor drive, then over brush Base J Top View sprocket. NOTE: Use belt #20-5201. In Canada, #20-4097& .ko, Agitator 3. Place agitator assembly back into Power-Mate _ . 6. NOTE: On dirt sensor models be sure that the board is upright and the wires are tucked back as shown. 4.
I wAR.m.G Electrical Hazard 1. Remove Power-Mate ® cover, agitator Shock Or Personal Injury cover, belt and agitator assembly. See "To Remove Belt" in BELT CHANGING AND AGITATOR CLEANINGo Disconnect electrical supply before servicing or cleaning the unit. Failure to do so could result in elec- 2. Remove end caps, washers, screws, end brush, and brush sprocket pieces from ends of old agitator assembly trical shock or personal injury from cleaner suddenly starting. ,,, .........
Review this table to find do-it-yourself solutions for minor performance problems. Any service needed, other than those described in this owner's manual, should be performed by an authorized Sears service representative, WARNING ....| ............ Electrical Shock Hazard Disconnect electrical supply before servicing or cleaning the unit, Failure to do so could result in electrical shock or personal injury. Cleanerwon't start. 1. Unpluggedat wallou!let, 2.
For repair of major brand appliances in your own home no matter who made it, no matter who sold it! 1-800-4-MY-HOME r :• • ® ... Anytime, day or night (t-800-469-4663) (U.S.A. and Canada) www, sears.com www,sears.ca - rx % For repair of carry-in products like vacuums, lawn equipment, and electronics, call for the nearest Sears Parts and Repair Center. 1-800-488-1222 Anytime, day or night (U S A. only) www,sears.
Sears, Roebuck and Co., Hoffman Estates, I160179 U.S.A. Part Noo CO1ZBAK40U(_O-8175060 Printed in U.S.A.
Manual Del Propietario Aspiradora Modelo 116,20812 116.20813 116.21813 116.21875 CUIDADO: Lea y sigue todas las instrucciones de operaci6n y seguridad antes del uso de este producto. Sears, Roebuck and Co., Hoffman Estates, IL 60179 U.S.A. www.sears.
Antes de usar su aspiradora nueva ..... 2 Garantia de la aspiradora de Kenmore ,_ 2 Instrucciones importantes de seguridad ............................... Piezas y caracterfsticas ................ Instrucciones de ensamblamiento ............... Uso ............................... Para cornenzar ............................... Sugerencias para aspirar ............... Sugerencias sobre el ajuste de nivel de polo de la alfombra ....................... Indicador de polvo ...................... Accesorios ....
ADVERTE ClA Su seguridad es muy Importante para nosotros, Pare reducir et riesgo de incendio, cheque eldctrico, lesi6n corporal o daSos at utilizar su aspiradora, actL_ede acuerdo con precauctones b_sicas de seguridad, entre ellas: Lea este manual antes de arrnar o utilizar su aspira+ dora.
Es importante conocer las piezas y caractefisticas de su aspiradora para asegurar su uso adecuado y seguro. Examfnelas antes de usar su aspiradora, Objeto Pieza N_.
MANGUERA ACCESORIOS tnterruptor de encendido/ apagado de tres posiciones (Apagado/Piso/Alfombra) (Algunos modelos) Power*Mate Herramienta I para h endidura s----_Cepillo para Mango sacudir .............. (Algunos Jr__" modelos) ___.7 ..JTF_ _ ___ _ para telas Ceplllo Cepillo para pisos (Algunos modelos)--_,- {.
Mango Peligro de choque el_ctrico --_o_ ........ No conecte la aspiradora hasta que termine de armada, De io contrario podrfa causar un choque et_ctrico o lesi6n corporal, del mango...... Antes de armar la aspiradora, chequee ta L1STA DE EMBALAjE en la cubierta separada de la Lista de Partes para Reparaci6n. Use esta listapara verificar que ha recibido todas las componentes de su nueva aspiradora Kenmore. .
MANNGUERA RECEPT/ CULO 1, Abra la tapa del recept_culo. 1. Alinee la pestaSa de sujeci6n de la manguera y la ranura de ia cubierta del recephiculo e introduzca fa manguera en el recept_culo hasta que quede fija en posici6n. 2, Examine la bofsa para polvo este instalado correctamanteoConsultelas instrucciones de instataci6n en la CAMBIO DE LA BOLSA 3. Examine el _tro de seguridad del motor este instalado correctamante.
lndfcadorde nivet de pe/o de/a a/fombra PARA COMENZAR ADVERTENOIA ............. Petigro de lesion personal y dafio at producto , NO enchufe la aspiradora si el interruptor est_ en la posiciOn ON, Podr/a causar lesion personal o da5o al producto.
Paraobtener lamejoracci6n deiirnpieza serecomienda empujar laPower-Mate ®endirecci6n directamente opuesta austedyjalarlaenIfnearecta. AI finaldecadapasada deregreso, carnbie ladirecci6ndelaPower-Mate ahacialasiguiente secci6n a lirnpiar, ContinL_e asfatrav6sdetodalaatfombra de unarnanera tentay deslizante. NOTA: laspasadas r_pidas y jalonadas no logran una lirnpieza completa_ El dispositivo giratorio de la manguera permiteque _sta gire sin necesidad de mover el recept,_culo.
ALGUNOS MODELOS PARA LIMPIAR LAS LENTES El sistema indicador del detector de tierra est_ rnontado en la boquilla de la Power-Mate_, cerca del bot6n de restablecimiento. Consiste en una sefie de tres indicadoresluminososrojos y uno verde.. tndlcador de polvo (Algunos modelos) 1. Retire los tubos opfimiendo el pedal de liberaci6n r_pida y levantando los tubos. Las luces indican la cantidad de partfculas de tierra que est_n pasando a trav_s del detector al ser transportadas hacia la bolsa para polvo.
E ACCESORIOS DEL TUBO ALGUNOS ÷ NO instale ni retire el mango ni los tubos cuando la aspiradora est_ encendida. Esto podria causer chispas y dafter los contactos eldctricos. 1. Para retirar Eos tubosde fa Power-Mates, col6quelosen la posici6n vertical de bloqueoo ACCESORIOS DEL MANGO NOTA, Si tiene instalada la Power-Matee, apague ta aspiredora antes de quitar ef mango de los tubos,, Bot6n de cierre --_, ma _ Tubo teles_._P'_v I f MODELOS de Pedal de liberacl6n ' r_pida del tubo 'I.
Ptsos Plsos descublertos alfombradosl Paredes Alfombras X X X X** X X Handt-MsteJr2 (Algunosmodelos)'" Power:Mate jr. _ (Algunos modelos)"' Slempre[imptelos accesoflos antes de usar sobreteIas, " El interrupterde 3 postciones debeestaren la posici6nFLOOR (plso descubierto). "'* La Handi-MateJr" y _aPower-Male,Jr_ incluyensus propias instrucciones para use de accesofios, NOTA: Cuando separe los tubes, optima comp!etarnente el boto:nde bloqueo antes de s.epa_rlos per compfeto.
ININDICADOR ELECTRONICO PARA LA BOLSNMANGUERA ALGUNOS MODELOS Indicador electr6ntco para la bolsa /_ ! 1| Para restablecer: Apague la aspiradora y desenchufe e! cord6n del tomacorriente para permitir que la aspiradora se enfrfe. Busque y saque las obstrucciones, st es necesario. Examine tambi_n y reemplace cualquler ftitro obstruido, Espere aproxtmadamente 50 minutes y enchufe la aspiradora y volt,eta para vet si el protector de! motor se ha reajustado.
La aspiradora crea succi6n o aspiraci6n que levanta la tierra, La tierra es impulsada a tray, s de las vfas de flujo aire basra ]a bolsa por una r&pida corriente de aire, La bolsa para polvo permite el llujo de aire, pero atrapa la tierra, Para lograr los mejores resultados de limpieza, mantenga abiertas las v[as de aire, Examine peri6* dicamente las _reas indicadas con asteriscos para asegurarse de que no est_n bloqueadas. Desconecte del recept_culo de revisarto.
! 1. Desconecteel cord6n el_ctrico de la clavija de ta pared_NO choree agua sobre la asptradora° 2. Limpie et exterior con un trapo suave y limpio, que ha side exprimiclodespu_s de remoiar en una soluci6n de agua y detergente Ifquido ligero, Seque el exterior con un trapo seco despu_s de limpiar, No use los accesortos si estdn mojados. Los accesorios que se utilicen en ;ireas sucias, debajo del refrigerador, no deben usarse en otras superficies sin antes ser lavados. Podrfan dejar marcas. 3.
2. Empuje el cartucho def filtro filtro escape con cuidado hacia a un lado como se ve en el diagrama y tire hacia arriba para sacarlo. Peligrodechoque el_ctrico No opere con un filtro de escape btoqueado o sin el filtro de escape o la cubierta del illtro de escape tnstalados. FILTRO DE ESCAPE HEPA Este cartucho det fittro escape tiene que cambiar est_ sucio.
! . cu,DAoo...................................... I PARA RETIRAR LA CORREA 1. Co_oquela PowerMate_ con la parte inferior hacia arribao Puede que al retlrar los soportes del ceplllo se desprenda una peque_a arandela de metal de cada extremo. NO plerda estas arandelas, 2, Quite los dos (2) tornillosen la cubierta de la Power-Mate®, NOTA; Para mantener una alia eficiencia de limpieza y evttar el daSo a ta aspiradora, h_.a.
5. Alinee la parte frontal de la cubierta con la base, Coloque la cubierta sobre el horde delantero de la base come se rnuestrao PARA RETIRAR LA CORREA 1, Reinstale las arandelas y los tapas del extrerno en el ensamble. 2. lnstale una correa nueva sobre el irnpulsor del motor y fuego sobre la rueda dentada de! cepilloo Cubierta Base Vista superior _-/ _ \ dentadada Tapa del \ de/cept/Io extrerno Agitador NOTA: Use correa #20-5201. En el Canadfi, #2040979. 6.
i ._ADVERTENCiA PARA CAMBIAR LA UNIDAD .....................DEL AGITADOR 1, Quite la cubierta de la Power-Mate® , la cubierta del agitador, la correa y la unidad del agitador. V_ase "Para cambiar la correa" en la secci6n de CAMBtO DE LA CORREAY LIMPIEZA DEL AGITADORo Peligro de choque el_ctrico o lesiSn corporal Desconecte la unidad antes de timptarla o darle servlcio. De Io contrario podria producirse un choque el_ctrico o causar lesi6n corporal si la asplradora arranca de manera imprevista. 2.
Consulte estecuadro paraencontrar soluciones queustedmismo puede realizar cuando tonga problemas menores derendimiento. Cualquier servicio quenecesite apartedearrasdescfitos enestemanual tienenque sethechos perunrepresetante deservicio deSears .... ql .......... i ............ T ADVERTENCHA T TTT TT L L L L decheque el ctrico Desconecte la asptradora antes de darle servicio o limpiarla. De Io contrarlo podrfa producirse un cheque el_ctrico o causer lest6n corporal.
For repair of major brand appliances in your own home ... no matter who made it, no matter who sold it! ! 1-800-4-MY-HOME ® (1-800-469-4663) Anytime, day or night (US.A. and Canada) www.sears.com .... : www_sears.ca For repair of carry-in products like vacuums, lawn equipment, and electronics, call for the nearest Sears Parts and Repair Center. 1-800-488-1222 ! Anytime, day or night (U S A only) www.sears.
Sears, Roebuck and Co.