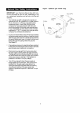
Owner's Manual Liquid Propane Gas Grill Model 141.153373 Natural Gas Grill Model 141.173373 A WARNING: Read this Owner's Manual carefully and be sure your gas grill is properly assembled, installed and maintained. Failure to follow these instructions could result in serious bodily injury and/or property damage. This gas grill is intended for outdoor use only and is not intended to be installed in or on recreational vehicles or boats.
Warranty Safety ..................................................... Instructions .................................... Diagram Assembly Lighting and Instructions Cleaning Frequently 10 ............................. 13 ................................. 24 and Maintenance Asked Instructions Cooking Guide and /_WARNING Failure to comply with these instructions could result in a fire or explosion that could cause serious bodily injury, death, or property damage. Instructions...
Correct LP Gas Tank Use LP gas grill models are designed for use with a standard 20 lb. Liquid Propane Gas (LP gas) tank, not included in grill box. Never connect your gas grill to an LP gas tank that exceeds this capacity. A tank of approximately 12 inches in diameter by 18-1/2 inches high is the maximum size LP gas tank to use. You must use an "OPD" gas tank which offers a listed Overfill Prevention Device.
Figure 1 (Natural gas model only) IMPORTANT: your Kenmore Natural Gas Grill cannot be converted to use LP Gas. Attempting to do so is extremely hazardous and will also void the grill warranty. GAS WALL OUTSIDE WALL Your natural gas grill is designed to operate on natural gas only, at a pressure of 7" water column (W.C.) (1/4 psi or 1.75 kpa), regulated at the residential meter. Check with your gas utility company for local gas pressure and with your local municipality for building code requirements.
CAUTION:Spidersandsmall insectsoccasionallyspinwebsor makenestsin the grill BurnerTubesduringtransitand warehousing. Thesewebscan lead to a gas flow obstruction whichcouldresultin a fire in and aroundthe BurnerTubes.This type of fire is knownas a "FLASHBACK" and can cause seriousdamageto your grill and createan unsafeoperatingconditionfor the user. To reduce the chance of "FLASHBACK" (see CAUTION at right) clean the Burner Tubes and Burners before fully assembling your grill.
The following table illustrates a breakdown in the various stages of assembly. Ref. of the hardware Component Qty. pack.
LP GAS MODEL ONLY Size and Quantity Wheel of each Hardware Bolt 3/8"x3-3/8" Spring Washer 3/8" Qty. 2 Ref. # $431M08152 Qty. 2 Ref. # $211G06352 Pattern Heed Screw Pattern 1/4"x2" Qty. Ref. Qty. 12 Ref. # $132G04322 Pattern Head Partly-Threaded Screw 1/4"x5/8" Qty. 4 Ref. # S135G04101 Door Piece: Head Screw 1/4"x3/4" Pattern 8 # S132G04122 Qty. Ref. Handle Wrench/No.17 Customized Pattern Qty. Ref. Heed Qty. 1 Ref. # Screw M4x8mm 3 # $132M04082 Knob J Qty. Ref.
The followingtable illustratesa breakdownof the hardwarepack.It highlights what components are used in the various stages of assembly. Ref. Component Qty.
NATURAL GAS MODEL ONLY Size and Quantity Wheel Qty. Ref. Pattern Heed Hardware Bolt 3/8"x3-3/8" Screw Piece: Spring Washer 3/8" Qty. 2 Ref. # $431M08152 2 # $211G06352 Pattern 1/4"x2" Head Screw 1/4"x3/4" Pattern Qty. 8 Ref. # $132G04122 Qty. 12 Ref. # $132G04322 Pattern Screw of each Heed Partly*Threeded 1/4"x5/8" Customized Pattern Heed Screw Qty. 3 Ref. # $132M04082 Knob Qty. Ref. M4x8mm Pattern Heed Screw M4x5mm Qty. 4 Ref.
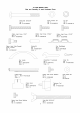
LPG = Liquid Propane Gas NG = Natural Gas 10_ 61 \ 23 6O 41 37 2O 19 / 17 12 30(LPG only) 31(NG only) 11o 23_(NG only)_ 26\ \ 22 32\ 64 / 62 (NO (LP6 18 3b lb / (LPC 47 only) 4b \ (LPG _Sb(LPG only) only) "53 b4 69(LPG only) j70(LPG 46 _480(NG _71(NG \ only) only) lO only)
REF# DESCRIPTION PART# Plate QTY 1. Lid P00117336A 1 2. Lid Side Panel, Left P00105227P 1 3. Lid Side Panel, P00106227P 1 4. 5. Temperature Lid Handle P00607153A 1 P00205030B 1 6. Lid P06801002A 2 7. Name P00410037C 1 8. Cooking P01508026E 1 P01615027E P01705016E 3 3 P02001006C 6 P05524060C 6 Right Gauge Handle Heat-Insulating Rack/Secondary 9. 10. Cooking Grid Flame TamedSteel 11. Burner/Main 11a. Spacer Plate Burner Air ShuttedMain 12. Burner 13.
REF# DESCRIPTION PART# 44, Cart Leg, Left P00901001C 1 45, 46, Cart Leg, Right Cart Rear Panel P00902030C PO7702009B 1 47, Door Bracket PO3301016D 1 48a, Door, Left P04302010A 1 48b, Door, Right (LPG only) P04301010A 1 48c, 49, Door, Right (NG only) Door Handle P04303014A PO0215019H 2 1 1 50, Door Stop/Magnet 51, Tank Pull-Out 52, 53, Fuel Gauge Display (LPG Wheel 54, 55, Weel Hub Cap Caster, 3 in,, with Brake P05111018A P05114019A 2 56, Wrench/No,17 PO5515101L 1 5
Figure 1 CAUTION: Whileitis possible foronepersonto CART LEG BRACKET_ assemble this grill, obtain assistance from another person when handling some of the larger, heavier pieces, especially the grill head. 1. During unpacking and assembly always wear work gloves and eye protection. 2. Open Lid of shipping carton and remove top sheet of cardboard. Lay cardboard sheet on floor and use as a work surface to protect floor and grill parts from scratches. 3.
7. Install the Door Bracket to the inside of front Cart Legs. Align the threaded holes on the Door Bracket with the holes on Cart Legs. Tighten securely using 4 of the 1/4"x2" Pattern Head Screws provided. (See Figure 3 on page 13) Upper door bolt holes (at ends of bracket) must face outward. Figure 4a (LP gas model only) DOOR _ BRACKET [] Installing The Cabinet Doors DOORSTOP _ Found in Hardware Pack For LP Gas grills: 1. Install the Door Stops to the Cart Bottom Shelf and the Door Bracket.
[] Installing The Cabinet Doors For Natural Gas grills: 1. Install the Door Stops to the Cart Bottom Shelf and the Door Bracket. See Figure 5a. 2, Align the holes on the Door Stops with the threaded holes on the top of the Cart Bottom Shelf and bottom side of Door Bracket. Tighten securely using 4 of the 1/4"xl/2" Pattern Head Screws provided. See Figure 5a.
_llnstalling Figure 6a (LP gas model only) The Grill Head 1. Now that you've assembled the grill cart you can install the pre-assembled Grill Head. See Figure 6a or 6b. If you haven't already done so, we suggest you open the Grill Lid and remove the packed components. Even with the components removed, this next step requires 2 people. BE CAREFUL NOT TO PINCH FINGERS WHEN LOWERING HEAD ONTO CART GRILL HEAD BOWL SIDE PANEL ELECTRIC FROM WIRE GRILL HEAD CARTLEG BRACKET WiRE FASTENER 2.
[] Figure 8a Installing Side Shelf, Side Burner and Tool Holder Kit SIDE SHELF Remove Side Burner from Side Burner Kit before installing. GRILL HEAD Enlisting the aid of an assistant, attach Side Burner Frame to right side of grill. Attach Side Shelf to left side of grill as shown in Figure 8a. Align the 4 holes on Side Shelf and Side Burner Frame with the threaded holes on left and right Bowl Support Brackets. Tighten securely using 4 of the 1/4"x3/4" Pattern Head Screws provided. 1.
Figure 8d (Natural 6. For Natural Gas grills: Connect the Electric Wire terminal from Side Burner with the other from Grill Head. See Figure 8d. Bind the connected Electric Wires, and Connection Tube together using the supplied Fastening Band. 7. The gap between the Side Burner the Side Burner Port should be 1/8"~3/16". See Figure 8e. If the 3/16", use a pair of long nose bend the Electrode Tip toward Gas model only) SIDE BURNER POT SUPPORT \\\\\ Electrode Tip and approximately gap is wider than plie
[] Ignitor Battery Installation - See Fig. 9 [] Electrode Check - Requires an Assistant Before placing the cooking components into your grill, ensure that the Spark Electrode Tip is properly positioned within each Gas Collector Box ( a 3-1/4" wide stainless mechanism found at the front between each set of Burners.) The easiest way to ensure this is to perform this Electrode Check: 1. Remove the Ignitor Caps on the grill Control Panel. 2. Place the manufacturer supplied AA battery into Ignitor Slot.
[] Installing Cooking Figure 11 Components Important: Before cooking on your grill the first time, wash the Cooking Grids and Cooking Rack with warm, soapy water. Rinse and dry thoroughly. Season with cooking oil regularly. After cooking is completed, tum grill to HIGH setting three to five minutes to burn off excess grease or food residue. SECONDARY COOKING COOKING STEELFLAME RACK GRID TAMER 1. Place the three Steel Flame Tamers on the lower ledge above Bumers. See Figure 11. 2.
[] Figure 12a Fuel Gauge Display Installation. Open the front Doors of Cabinet. Pull out the LPG Tank Pull-Out Tray. Connect the Wire Plug "A" from Fuel Gauge Display with the Wire Plug "B" from rear of Tank Pull-Out Tray. Unscrew 1/4" x 1/2" Pattern Head Screw(Lower) from Cart Rear Panel and fix Wire Plug "A" into Wire Fastener. Install Wire Fastener to Cart Rear Panel. Tighten securely using the same screw. See Figure 12a. RIGHT CART LEG CART REAR PANEL\ \\\\ WiRE FASTENER Battery Replacement: 1.
[] Connecting A Liquid --Tank To Your Grill Figure Propane Gas (LPGas) 13a (LP Gas model only) 1. Open the Doors of cabinet. Pull out the LPG Tank Pull-Out Tray. Place a 20 Ib tank with foot ring into the hole in the tray. See Figure 13a. Make sure the tank valve is in the OFF positon. GRILL HEAD 2. Align the tank so the Tank Valve faces the rear right corner of cabinet. Use the 5/16"x3-1/2" Wing Bolt to secure gas tank from rear of tray. See Figure 13a. DOOR '\ 3.
[] Install Grease Tray Kit Z WARNING If you smell gas: 1. Place Heat Shield into Grease Draining Tray. The Heat Shield must be present and centered for your safety. From the back side of Grill Head, install the Grease Draining Tray with its drain hole to left, which is the side opposite from the Tank Pull-Out Tray. See Figure 14. Shut off gas supply to the gas grill. Turn the Control Knobs to OFF position. Extinguish any open flame such as candle, cigarette, lighter, etc.
LP Tank Exchange • Many retailers that sell grills offer you the option of replacing your empty LP tank through an exchange service. Use only those reputable exchange companies that inspect, precision fill, test and certify their cylinders. Exchange your tank only for an OPD safety feature-equipped tank as described in the LP Tank section of this manual. • Always upright Basic Lighting Machine oils used in the manufacturing process of stainless steel can cause stainless steel to turn a tan color.
Immediately press the left Electric Ignitor for 3-4 seconds to light the Burner. 7. _'\, PRESS Open the Grill Lid. Failure to do so can result in fire or explosion. See WARNING below. 4. LEFTELECTRIC Z WARNING IGNITOR . Failure to open Grill Lid during the lighting procedures could result in a fire or explosion that could cause serious bodily injury, death, or property damage. If the Burner does not light, turn the Control Knob to OFF, wait 5 minutes for gas to clear, then retry.
Manually Misalignment of Ignitor on Burner Correction: Check for proper position of the Electrode Tip as shown in Figures 8e and 10. The gap between the Spark Electrode Tip and Burneror S_ark Receiver should be approximately 3/16', adjust if necessary. With thegas supply closed and all Control Knobs set to OFF press the Electric Iqnitor Cap and check for the presence of a spark at the Electrode.
8. Check each Spark Electrode, adjusting as needed. The space between the Spark Electrode Tip and Spark Receiver should be approximately 3/16". CAUTION: BesureyourgrillisOFFandcoolbeforecleaning. Takecarenottochiporscratchthepaintedsurfaces. 9. Replace the Burners and adjust the Gas Collector Box. The edge of the collector box should be overlapping the Burner Port. Aswithallappliances, propercareandmaintenance willkeepyourgrillintopoperating conditionand prolongitslife.
Cleaning The Burner Tubes and Burner Ports Regardless of which Burner cleaning procedure you use, we recommend you also complete the following steps to help prolong Burner life. To reduce the chance of FLASHBACK the procedure below should be followed at least once a month in late summer or early fall when spiders are most active or when your grill has not been used for a period of time. 1. Turn all Burner Valves to the full OFF position. 1.
Question: What is the best way to protect my new Kenmore gas grill from the weather? Answer: A good quality grill cover should be used to protect your grill when not in use. Sears offers a cover that is made to fit this particular grill model. Also, follow the cleaning and maintenance instructions in this Owner's Manual on a timely basis, and your new grill will give you years of enjoyment.
Indirect Cooking The indirect cooking method can also be used with the supplied Cooking Grids. To cook indirectly, the food should be placed on the left or right side of your grill with the Burner lit on the opposite side. Or place your food on the Secondary Cooking Rack mounted inside your grill bowl and light the 2 outer grill Burners. Either way, indirect cooking must be done with the Lid down. Z WARNING Your grill will get very hot. Always wear a flame retardant BBQ Mitt when cooking on your grill.
Grilling Steak and Ribs Cut of Meat Approximate Cooking Times Turn the grill Burners on HIGH, close the Lid and preheat your grill 3 to 5 minutes.Open Lid and place the meat on the Cooking Grid directly above the lit Burners. Cook the meat on both sides until seared. Reduce the heat to MEDIUM and cook meat until done. Grilling times will vary according to meat thickness.
Whole Fish and Whole Fillets Cut of Meat Approximate Cooking Times Preheat your grill on HIGH for 2-3 minutes with the Lid down. Raise lid and turn Burners to MEDIUM heat. Place fish (skin down) on grill and cook over direct heat until done. Use cooking time as a guide or until fish is opaque but still moist.
An Important Note About Heat Settings Food preparation The suggested heat settings shown are approximate. There are many factors such as outside temperature, wind conditions and grill location that affect your grill performance. We offer these cooking times as a convenience, but suggest you watch the grill thermometer and adjust the heat accordingly. Trim meat of excess fat. Truss meat and poultry with cooking string to retain shape if desired.
Rotisserie Cooking A Kenmore Rotisserie Kit is made to fit this panticular model. Rotisserie cooking produces foods that are moist, flavorful and attractive. The optional rotisserie system is most commonly used for cooking meat or poultry and is designed to cook food from the Back Burner using infrared heat. The location of the Burner allows the placement of a cooking pan beneath the food to collect j uices for basti ng and gravy.
Preparing to Smoke Smoking gives food a distinctive, delicious flavor. You will find a variety of wood chips or pellets available for use in smoking grilled foods. Pre-soaking of wood chips may be required so read and follow the manufacturers instructions for preparation of smoking chips prior to filling the Smoker Drawer. Using The Smoker Drawer Start your grill and allow it to reach the desired cooking temperature for the food you are grilling.
STIR-FRYING TECHNIQUES DEEP-FRYING TECHNIQUES This method of cooking is popular around the world and can be easily accomplished outdoors on your Kenmore gas grill. It's a quick and healthful way of preparing a complete meal using meat, poultry or seafood in infinite combinations with other interesting ingredients like vegetables, rice or noodles. A wide variety of foods can be deep-fried outdoors on your grill, from potatoes, to seafood and chicken.
1/4 1 1/2 2 1/3 1/4 ONIONBURGERS A honey and mustard sauce glazes the onion slices as they cook alongside these delicious burgers. For optimal sweetness, select Vidalia or Walla Walla onions. Makes 4 open face burgers. Preparing the Salsa Combine tomato, green pepper, onion, jalapeno peppers, garlic, cilantro and salt in a bowl. Set aside 2 tablespoons of salsa. Cover and chill remaining salsa until serving time.
RIB EYE STEAKS WITH GRILLED GARLIC Preparation As they cook, the garlic cloves mellow in flavor, making a delicious sauce for any grilled meat. And for an appetizer, spread the softened cloves over toasted slices of french bread! Makes 4 servings. Combine ketchup, pepper, rosemary, basil and garlic powder. Coat both sides of steak with mixture. Grill steak with lid up, directly over medium heat for 6 minutes. Turn steak and grill for 8 to 12 minutes more or until cooked as desired.
MARINATED TUNA STEAK Preparation Experiment with unique dishes, like this tuna steak recipe boasting a delicious wine marinade! Makes 4 servings. Combine thawed fish, margarine or butter, lemon juice, mustard and basil into a cooking pan or aluminum foil rectangle, and cook directly over low flame until butter is melted. Brush mixture over both sides of halibut fish steaks. Pour balance of mixture into small bowl. Ingredients 4 6-ounce fresh or frozen tuna steaks cut 1 inch thick. Thaw fish if frozen.
SOUTHWEST CHICKEN BREASTS BARBECUED This popular recipe can also be a grilled chicken salad! Slice chicken into small strips and place them on top of shredded lettuce with avocado dressing and top with cheese! Makes 6 servings. CHICKEN Another backyard favorite, this recipe includes an easy to make sweet and spicy sauce. Makes 4 servings.
TRADITIONAL PIZZA ON THE GRILL HOLIDAY TURKEY You may never want to call out for pizza again! Follow this pizza dough recipe, or purchase readymade pizza dough found in your grocers refrigerated section ext to the biscuits. Slice and serve directly from the grill.
FRESH VEGETABLE GRILLED POTATO SKINS STIR-FRY Serve these crispy potatoes as a snack or side dish. We've included microwave instructionsfor a timesaving short cut. Makes 12 servings. Take a trip to the Orient with this easy, and healthy vegetable recipe. Makes 4- 6 servings.
To purchase a protec_on agreement (U.S.