OPERATOR'S MANUAL Liquid Propane Gas (LPG) Grill Model 141.16322 Model 141.16324 Call us first if you have any problem with this product. We can help you with questions about assembly and grill operation or if there are damaged or missing parts when you unpack this unit from the shipping box. Please call before returning to the store. 1-888-317-7642 8am-8pm CST, Monday throuqh Friday • NOTE TO ASSEMBLER/INSTALLER: Leave this manual with the consumer.
Primary Safety Warnings ........................... 1-3 Warranty Terms and Conditions .................. 2 Pre-Assembly Instructions .............................. 3 Part Diagrams and Lists .......................... 4-9 Assembly Instructions ............................. 10-16 LP Gas Tank Installation ...................... 17-19 Use & Care Instructions: • Lighting Instructions ................................. 20 • Troubleshooting .......................................... 21 Cleaning and Maintenance .
Failure to comply with these instructions could result in a fire or explosion that could cause serious bodily injury, death or property damage. LPG grill models must be used with Liquid Propane Gas and the regulator assembly supplied. Natural Gas models must be used with Natural Gas only. Any attempt to convert the grill from one fuel type to another is extremely hazardous and will void the warranty.
PART # PART DESCRIPTION P06O01041B Hardware QTY Pack for141.16322 PO600io40B i4i i6324 Pattern H ad Screw, 1/4 x2-3/41 PartThreaded S135G04332 $132G04082 Pattern 1/4"xl/2" Pattern $135G04332 $211G06352 1/4"x2 Head Screw Head Screw 3/4" Wheel 1 .....
Wheel Bolt 3/8"x3-3/8" Pattern Head 1/4"x2-3/4" Screw, Part Threaded Pattern Wrench/No.17 M4x8mm Head Screw 1/4"x3/4" Qty. 10 Part. # $132G04122 Qty. 14 Part # $135G04332 Pattern Head Screw Qty. 3 Part # $132M04082 Lock Spring Washer 3/8" Qty. 2 Part # S431G0610A Qty. 2 Part # $211G06352 Plain Washer M4 Qty. 2 Part # S411M04122 Customized Door Bolt 1/4"x3/8" Qty. 2 Part # S225G0406A Lighting Stick Qty. 1 Part # P05313023B Scale 1:2 Qty.
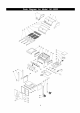
1 2 6 5 4 10 11 13 12 28 37 2O 14 22 19 38 17_ 18 25 24 23 26 45 _27 43 42 46 44 39 36
1 2 4 11 10 12 13 28 37 20 14 22 19 18 41 4O 26 45 23 27 43 42 46 39
KEY 1 PIN 16322 DESCRIPTION :: PIN 16324 Lid Plate P0014604EA P0014702EA Lid Side Panel, Right P0010607DJ P0010607DJ :: QTY 16322 QTY 16324 1 1 ................................................................................................................................................................................................................................. 4 Lid Trim Plate ........................... ........................ .......................... .............................
KEY DESCRIPTION PIN 16322 39 Door 40 Cart Leg, Left-Front Bracket Caster Side .............................. ................................ 42 Cart PIN 16324 : QTY 16322 QTY 16324 P03305025D P03305024D 1 1 P00910008C P00910008C 1 1 ................................................................................. .................................................. ............................................................... i.........................................
Install Legs Cart [] Remove cooking [] Place the Grill Head on the surface with the control panel the Cart Legs to Bowl Support screws components from Grill Head. cardboard work facing up. install Bracket. Tighten securely. Pattern Head Screw, Part Threaded 1/4"x2-3/4" Qty. 4 Part # S135G04332 Caster Pattern Head Screw Cart Legs 1/4"xl/2" Qty. 4 Part # S132G04082 Install [] Wheel Cart install the Bottom Cart Shelf Bottom Shelf between Legs. Tighten screws securely.
Install Casters and Wheels [] install the 2 Casters onto the Caster Seats. [] install the Wheel on the Cart Legs. Do not overtighten or wheel will not turn freely. Then snap the Wheel Hub Cap onto the wheel. Wheel Bolt 3/8"x3-3/8" Qty. 2 Part # $211G06352 Spring Washer 3/8" Qty. 2 Part # S431G0610A Lock Nut 3/8" Wheel Hub Qty. 2 Part # S372G0611A Cap Wrench/No.17 Customized Qty. 1 Part # P05515019F Scale 1:2 [] IMPORTANT: lift the Lock assembled both casters, with an assistant grill.
Install [] Cart Side Panels install the left and right Cart Side Panel between side Cart Legs. Tighten screws securely. Pattern Head Screw Qty. 8 Part # $132G04082 1/4"xl/2" Install Door Bracket, Magnetic Door Stops and Door Stop Plate. [] install the Door Bracket (P03305025D for 16322, P03305024D for 16324), in the up position between front Cart Legs. [] From left and right side of front Cart Legs, securely using 2 screws S135G04332.
Install [] [] Handles Door Head Qty. 4 Part # Screw S132G04121 the Bolts $132G04121 (Stainless Steel). Be careful scratch the Door surfaces. Repeat for Left within Door. to Door screws not to Door. insert Door Bolt hole of the Front Handle and the Pattern Door Door install Right Door the lower door Tighten screws using screw securely. 1/4"x3/4" (Stainless Steel) Bolt 1/4"x3/8" Qty.
Install Lighting Stick and Grease Draining Tray [] Attach the Lighting Stick to the Left Bowl Support Bracket using screw $132M04082. [] From the back, slide the assembled Tray side tabs (with Draining hole postion to the right) over side rails underneath the Grill Bowl. [] install the Grease Draining Tray from Receptacle under the back of grill. Grease Lighting Stick Qty. 1 Part # P05313023B Pattern Head Screw Grease M4x8mm Receptacle Grease Draining Tray Qty.
Install Side Burner Kit [] Insert the Side burner Gas Valve Assembly into Side Burner Tube (See Figure 1). Be sure the orifice is inside the Burner Tube properly (see warning on Page 3), or lighting the burner may cause explosion and/or fire. [] Insert the Side Burner Gas Valve Assembly through the Side Burner Gas Valve Hole on the Side Burner Frame. Align the 2 holes on the Side Burner Frame with the threaded holes on the Side Burner Gas Valve Bracket.
Install Ignitor [] [] [] Battery Unscrew the ignitor Cap from Control Panel. Place supplied AA battery into the Ignitor Slot with positive pole facing you. Position the Cap and Spring over the AA battery and tighten onto Control Panel. Main Burners Electrode Check Perform this Electrode Check with the assistance AA BATTERY IGNITOR CAP_ j_ ---.<. of another person. This test will ensure that the Spark Electrode Tips are properly positioned so your grill lights easily and properly.
CORRECT [] LP GAS TANK USE [] Use of alcohol assemble and [] Keep fire extinguisher readily accessible. In the event of a oil/grease fire, do not attempt to extinguish with water. Use type B extinguisher or smother with dirt, sand or baking soda. [] In the event of rain, the burner and gas [] Use your grill area clear of on a level, combustible in accordance with the Specifications for LP-Gas Cylinders of the U.S. Department of Transportation (D.O.T.
NOTE • about LP Gas Tank Exchange Programs To Many retailers that sell grills offer you the option of replacing your empty LP Gas tank through an exchange service. Use only those reputable exchange companies that inspect, precision fill, test and certify their tanks. Exchange your tank only for an OPD safety feature-equipped tank as described in the LP Gas tank section of this manual. • Always keep new and exchanged LP Gas tanks in an upright position during use, transit or storage.
LP Gas Connect [] [] [] [] only: Regulator with Check all connections for Model Hose to your LP Gas Tank LP Gas Leaks Never test for leaks with a flame. Prior to first use, at the beginning of each season, or every time your LP Gas tank is changed, you must check for gas leaks. Follow these three steps: Turn all Burner Valves to the OFF position. Inspect the valve connection port and regulator assembly for damage or debris. Remove any debris. Never use damaged or plugged equipment.
Grill 1. 2. Lighting Side Instructions lighting yourself in this 2. Open gas supply Open connections. Tube or property is properly ignitor Knob on Side for 3-4 seconds Burner to light the the LP Gas tank Gas_ _- 7. Push and turn the Left Control HIGH Knob to HIGH. MED HOLE OFF _ LOW LIGHTING 8. Immediately press the Electric Ignitor for 3-4 seconds to light the Burner.
Troubleshooting If the grill fails To to light : 1. Turn gas off at source and turn Control Knobs to OFF. Wait at least 5 minutes for gas to clear, then retry. 2. 3. If your grill still fails and connections. to light, check gas Misalignment Correction: of Burner Reposition [] Obstruction in gas line Correction: Remove fuel smoke! Open gas supply any obstruction from fuel at source and reconnect Tubes over Orifices Burner Tubes over Orifices. line from grill.
10. Replace Proper care and maintenance operating condition and cleaning procedures on stay clean and operate CAUTION: Be sure your Cleaning [] The Grids The Grease them the Inside Grill bowl. by model) Steel during the Surfaces: your grill. Follow these steps 2. Remove dirt or grease using a soft cloth and polish stainless surfaces. Wipe with a soft cloth. 3.
To reduce the chance of FLASHBACK FIRE you must clean the Burner Tubes as follows at least once a month Regardless of which use, we recommend steps to help prolong in summer and fall or whenever spiders are active in your area, and if your grill has not been used for an extended period of time. 1. Turn all Burner 2. Turn the LP Gas tank valve to the full OFF to the full OFF position. Remove the Cooking Grids, Savor Plates ® and Grease Trays from your grill.
Burn-Off Indirect [] [] Before cooking on your gas grill for the first time, you should "burn off" the grill to eliminate any odor or foreign matter. Ignite the burners, lower the Lid, and operate grill on HIGH setting for 3 to 5 minutes. CAUTION: Operating your grill on the HIGH setting for longer than five minutes may damage certain parts of your grill. Do not leave your grill unattended when The indirect cooking method can also be used with the supplied Cooking Grids.
Rotisserie cooking produces foods that are moist and flavorful because the slowly rotated food self-bastes to seal in meat's natural juices. A rotisserie can be used to slow Anything you enjoy cooking indoors can be prepared outdoors accessories as well. These optional cook back make it easy to use your new foods using the indirect cooking method or an infrared burner, a feature available on select models. Kenmore Premium or Kenmore Elite grill as an outdoor kitchen.
Question: Can I convert my grill from one fuel type to another in other words from LPG to NG or vice versa? Question: Sometimes I hear a humming sound coming from my regulator. What causes this? And- My grill has a low flame and sometimes will not light. Why? Answer: No, your gas grill and is certified for (Natural Gas) use are not available, parts or information attempt to convert Answer: is manufactured to exact specifications LPG (Liquid Propane Gas) or NG only.
Question: The Regulator and Hose supplied with my gas grill does not fit the older LP Gas tank I've used for years. Why not? Question: Some stainless steel grills specify 304 grade construction while others do not mention a grade all? What is the difference? at Answer: Answer: The U.S. Government regulates gas appliances and LP Gas tanks. When regulations are changed the LP Gas tank fittings are altered to insure compliance.
Your Home For repair-in your home-of aH majo_ brand appliances, lawn and garden equipment or heating and c_lmg systems_ no ma/tter who made it, no ma_er who sold it_ Fo_ the replacement parts, accessories and owner's manuals that you; need to do-it-yourself. For SeaB professional installation d home appliances and items like garage door openers and water heaters. t -8004-MY-HOME Ca/anytime_ day or _i_t _w,sears.c_ '_ (U.SA, a:nd Canada) www.