Owner's Manual E L I T E Liquid Propane Gas Grill Model141,168600 Natural Gas Grill Model141.178600 L_ WARNING: Read this Owner's Manual carefully and be sure your gas grill is properly assembled, installed and maintained. Failure to follow these instructions could result in serious bodily injury and/or property damage. This gas grin is intended for outdoor use only and is not intended to be installed in or on recreational vehicles or boats.
Warranty Safety ..................................................... Instructions Pre-Assembly Hardware, Lighting .................................... Instructions Parts Assembly Instructions Asked Cooking Instructions Cooking Guide Lists....5 ................................. Z_WARNING 19 ................ ............................... and 9 17 Instructions.
PrOlmr Placement and Clearance of Grill Nevw use your gas grill in a garage, porch, shed, b_way or any other enclosed area. Your gas grill is to I_used outdoors only, at least 24 inches from the back and side of any combustible surface. Your gasgrill should not be placed under any surface that will bum. Do not obstruct the flow of ventilation air mound the gas grill housing. gas grill. Call Sears at 1-800-4-MY-HOME for a Sears authorized replacement hose.
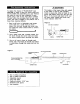
/ WARNING The location of the burner tube with respect to the orifice is vital for safe operation. Check to ensure the orifice is inside of the burner tube before using your gas grill. See Fig. 2. If the burner tube does not fit over the valve orifice, lighting the burner may cause explosion and/or fire. To reducethe chanceof "FLASH-BACK" (see CAUTIONon page3) clean the burnertubesand burnersbefore fully assembling your grill.
The following table illustrates a breakdown in the various stages of assembly. Ref. Component of the hardware Qty. to Use pack.
Actual Size and Quantity of Each Hardware 3/8" Wheel Bolt Spring Washer Qty. 2 Ref, # H002 Qty. 2 Ref. # HO01 Piece: 3/8" Nut Qty. 2 Ref. # H003 M6 Phillips Head Screw Qty. 2 Ref. # H015(packed with Toot Hotder) G© 1/4"x3/4" Phillips Head Screw Qty. 8 Ref. # H0O4 1/4"xl/2" Phillips Head Screw Qty. 28 (4 for LPG) Ref. # HO05 Door Handle Part # PO239A Qty. 2 Scale M18x1.8 Nut Qty. 1 (for LPG) Ref. # H013(attached to Pressure Cylinder) Magnetic Qty. 2 1:2 M8xl.
Remove all components from the packing carton and place within easy reach. Do not throw the shipping carton away; instead use it as an elevated assembly surface. 2 LPG = Liquid Propane Gas NG = Natural Gas 5 6 10 25a_ (NG only)64,_ 14-- 11 12 13 16 15 25a 21 44 27 53 \ 46 (LPGonly)-_ 47 (LPGonly) 36 35 37 31 54 55 (for LPG) 38 (LPG only) 7 60 61 63 (NGonly) 30b (forNG)
REF# DESCRIPTION PART# QTY 1 43. Tank Guide (LPG only) P4033B 1 1 44. AA Battery P8080A 1 P0144B 1 45. Heat-Insulating P0615D 1 46. Fuel Gauge Assembly P0459A 1 47. Fixing Ring (LPG only) P0237C 1 48. Tool Holder P55B6B 1 Stainless Steel Cooking Rack P1521C 1 49. Screw Cover P55B6C 2 8. Stainless Steel Cooking Grid P1645C 3 50. Tool Hook P55B6D 5 9. Stainless Steel Tamer P1733A 3 51. Rain Shield P8OD5A 6 P2207C 1 52.
Figure I )RAWER CHANNEL / Before assembling your gas gdll, use the parts list to check that all necesean/ parts are included. Inspect all parts for damage as you proceed. Do not assemble or operate your grill if it appears damaged. If you have questions dudng the assembly process, call 8am - 8pro CST, Monday through Friday, 1-888-317-7642 Remove the white PVC protective film from stainless steel surfaces before assembty.
Assembling The Cabinet Figure 4 Doors 1. tnstall Door Stops to Bottom Shelf and Top Panel of Cabinet. See Fig. 4. Secure firmly using 4 of the 1/4"x1/2" Phillips head screws and nuts. TOP OF 2, If you haven't already done so, remove the white protective film fi'om the stainless steel Doors. Attach a Door Handle to each Front Door using 2 of the M4x6mm Phillips head screws provided. See Fig. 5. Be careful not to scratch the door surfaces. OF CART LEGS 3.
Assembling The LP Gas Tank Hook Figure 6 Attach Ihe Pressure Cylinder Holder and Tank Guide to the Cart Legs-Wheal Side of grill as shown in Fig. 6. Align the tapped holes of both parts v4h the holes on Side Panel, Secure firmly using 4 of the 1/4"xl/2" Phillips head screws and nuts provided, Assembling The Grill Drawer PRESSURE 1. Install 2 of the 1/4"xl/2" Phillips head screws to the rear of the Drawer Track. Without these screws the drawer will not stop properly. 2.
Installing Side Burner and Side Shelf Figure 9 1. Remove and discard the protective rubber boots from the Side Shelf and Side Bumer braces. 2. Enlisting the aid of an assistant, attach Side Bumer to the wheel side of gdll. Align the 4 holes on the Side Burner Frame with those holes on the Cart Legs. Tighten securely using 4 of the 1/4"x3/4" phillips head screws provided. Remove the fastening strip frome bumer befor use. Attach the Side Shelf to the opposite side of side burner.
Installing Ice Bucket and Insulation Bucket (Cooler Body Assembly) to left Side Shelf Figure 9d 1. Place the stainless steel Ice Bucket into the left Side Shelf. _._STOPPER 2. From underneath the left side shelf, install the Insulation Bucket to the bottom of ice Bucket. See Fig 9d. _'STRAINER I 3, Install the Strainer Body through the hole on the bottom of the Cooler Body Assembly. Fix firmly from below using the rubber washer and Shank Nut. BODY BUCKET r 4.
Installing LP Gas Fuel Gauge Assembly 1. Unscrew the M18xl.5 and M8x1.25 nuts from the Pressure Cylinder. 2. Unscrew and remove the Fixing Ring from the Dial. See Fig. 10a. 3. Insert the end with Pressure Cylinder through the notched hole on right Side Shelf. See Fig. 10b. Turn the Dial until it matches the notched hole, and push it into the hole. 4. Screw the Fixing Ring back to the Dial from the Pressure Cylinder side. See Fig. 10c. 5.
Ignitor Battery Installation - See Fig. 12 1. Unscrew the Ignitor Cap located on the grill Control Panel and remove the Contact and Spring from the Ignitor Slot. 2. Place the manufacturer supplied AA battery into the Ignitor Slot. Be sure to place the positive pole facing toward you. 3. Place the Spring over the AA battery, then place the Contact on top of the Spring. Screw the Ignitor Cap back onto the grill Control Panel.
Installing Cooking Components Figure 14 Important: Before cooking on your griU the first time, wash the cooking grids and cooking rack with warm, soapy water. Rinse and dry thoroughly. Season with cooking oil regularly. After cooking is completed, turn grill to HIGH setting for about five minutes to burn off excess grease or food residue. STAINLESS STEEL COOKING RACK 1. Place the 3 Stainless Steel Flame Tamers on the lower ledge above burners. See Fig. 14. They should meet in the center.
i WARNING WARNING Failure to open Grill or Side Burner Lid during the lighting procedures could result in a fire or explosion that could cause serious bodily injury, death, or property damage. A strong gas smell, or the h'issing sound of gas indicates a serious problem with your gas grill or Ihe LP gas tank. Failure to immediately fallow the steps listed below could result in a fire or explosion that could cause serious boddy injury, death, or property damage.
If the grill fails to light property: If the grill still does not light you may need to purge air from the gas line or reset the regulator excess gas flow device. Note: This procedure should be done every time a new LP gas tank is connected to your grill. 4. 1. Turn gas off at source and turn the control knob to OFF. Wait at least five minutes for gas to clear, then retry. 2. Check gas supply and connections. 3.
8. Check each spark electrode, adjusting as needed. The space between the Spark Electrode Tip and Spark Receiver should be approximately 3116". As with all appliances, proper care and maintenance will keep your grill in top operating condition and prolong its life. By following these cleaning procedures on a timely basis, your grill will stay clean and work properly with minimum effort. 9. Replace the burners and adjust the gas collector boa(.
Cleaning The Bumer Tubes and Burner Ports To reduce the chance of "FLASH-BACK" the procedure below should be followed at least once a month in late summer or eady fall when spiders are most active or when your gdll has not been used for a period of time. Regardless of which burner cleaning procedure you use, we recommend you also complete the following steps to help prolong burner life. 1. Use a wire brush to clean the entire outer surface of each burner until free of food residue and dirt. 2.
Question: How do I season cast-iron? Answer:. Before and after each cookout, apply a thin layer of cookingoil, spray or vegetable shorteningto any optionalcast iron cooking accessories you may have purchased. Be sure to coatthe entire surface including edges and any areas with chipped porcelain. Insert the cooking grids into yourwarm grillfor 2 to 3 minutes.
Indirect Cooking / WARNING Your grill will get very hot. Never lean over the cooking area while using your grill. Do not touch cooking surfaces, grill housing, grill lid or any other grill parts while the grill is in operation, or until the grill has cooled down after use. The indirect cooking method can also be used with the supplied cooking grids, optional griddle, or cooking pan.
Grilling Steak and Ribs Cut of Meat Approximate Cooking Times Turn the grill burners on high, close the lid and preheat your grill 3 to 5 minutes. Open lid and place the meat on the cooking grid directly above the lit burners. Cook the meat on both sides until seared. Reduce the heat to medium and cook meat until done. Gdlling times will vary according to meat thickness.
Whole Fish and Whole Fillets Cut of Meat Approximate Cooking Times Preheat your grill on HIGH for 2-3 minutes with the lid down. Raise lid and turn burners to medium heat. Place fish (skin down) on grill and cook over direct heat until done. Use cooking time as a guide or until fish is opaque but still moist. Whole fish Whole fish fillets 10 - 12 minutes per pound or until fish is opaque Smaller Fish Fillets and Cubes Follow the directions from above, using approximate cooking times shown at right.
An Important Note About Heat Settings Food preparation The suggested heat settings shown are approximate. There are many factors such as outside temperature, wind conditions and grill location that affect your grill performance. We offer these cooking times as a convenience, but suggest you watch the grill thermometer and adjust the heat accordingly. Trim meat of excess fat. Truss meat and poultry with cooking stdng to retain shape if desired.
STIR-FRYING TECHNIQUES DEEP-FRYING TECHNIQUES This method of cooking is popular around the world and can be easily accomplished outdoors on your Kenmore Elite gas grill. It's a quick and healthful way of preparing a complete meal using meat, poultry or seafood in infinite combinations with other interesting ingredients like vegetables, rice or noodles. A wide variety of foods can be deep-fried outdoors on your grill, from potatoes, to seafood and chicken.
ROTIISSERIE TECHNIQUES SMOKING TECHNIQUES Ratisse_e cooking produces foods that are moist, flavorful and attractive. Although the rotisserie is most commonly used for cooking meat or poultry, nearly anythingcan be used if prepared properly. Smoking gives food a distinctive, delicious flavor. This surprisingly quick and versatile cooking method expands the creative chefs menu with endless new and innovative ways to prepare popular barbecue dishes. .
ONIONBURGERS A honey and mustard sauce glazes the onion slices as they cook alongside these delicious burgers. For optimal sweetness, select Vidalia or Walla Walla onions. Makes 4 open face burgers. teaspoon salt 1 1/2 2 pounds lean ground beef cups shredded lettuce 1/3 1/4 cup finely shredded cheddar cheese cup dairy sour cream and/or guacamole Preparing the Salsa Combine tomato, green pepper, onion, jalapeno peppers, garlic, cilantro and salt in a bowl. Set aside 2 tablespoons of salsa.
RIB EYE STEAKS WITH GRILLED GARLIC As they cook, the garlic cloves mellow in flavor, making a delicious sauce for any grilled meat. And for an appetizer, spread the softened cloves over toasted slices of french bread! Makes 4 servings. Ingredients 1 2 1 Preparation Combine ketchup, pepper, rosemary, basil and garlic powder. Coat both sides of steak with mixture. Grill steak with hood up, directly over medium heat for 6 minutes. Turn steak and gdll for 8 to 12 minutes more or until cooked as desired.
MARINATED TUNA STEAK Preparation Experiment with unique dishes, like this tuna steak recipe boasting a delicious wine marinad!! Makes 4 servings. Combine thawed fish, margarine or butter, lemon juice, mustard and basil into a cooking pan or aluminum foil rectangle, and cook directly over low flame until melted. Brush mixture over both sides of halibut fish steaks. Pour balance of mixture into small bowl. IngredientS 4 6-ounce fresh or frozen tuna steaks cut 1 inch thick.
SOUTHWEST CHICKEN BARBECUED BREASTS CHICKEN Another backyard favorite, this recipe includes an easy to make, sweet and spicy sauce. Makes 4 servings. This popular recipe can also be a grilled chicken salad! Slice chicken into small strips and place them on top of shredded lettuce with avocado dressing and top with cheese! Makes 6 servings.
TRADITIONALHOLIDAYTURKEY PIZZAONTHEGRILL Imagineeveryone's surprisewhenyouserveyour You may never want to call out for pizza again! Follow this pizza dough recipe, or purchase readymade pizza dough found in your grocers refrigerated section ext to the biscuits. Slice and serve directly from the grill.
FRESH VEGETABLE GRILLED STIR-FRY POTATO SKINS Serve these crispy potatoes as a snack or side dish. We've included microwave instructions for a timesaving short cut. Makes !2 servings. Take a trip to the Orient with this easy, and healthy vegetable recipe. Makes 4- 6 servings.
Get it fixed, at your home or ours! For repair of major brand appliances in your own home... no matter who made it, no matter who sold itt 1-800-4-MY-HOME sMAnytime, day or night (1-800-469-4663) www.sears,com To bring in products such as vacuums, lawn equipment and electronics for repair, call for the location of your nearest Sears Parts & Repair Center. 1-800-488-1222 Anytime, day or night www.sears.