
Manual

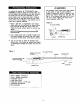


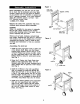

To reduce the chance of "FLASH-BACK" (see
CAUTION on page 3) clean the burner tubes and
burners before fully assembling your gdll. Remove
the cotter pin from the rear underside of each
burner using a pair of long nose pliers. Carefully
lift each burner up and away from the gas valve
odfice, then refer to Figure 1 and perform one of
these three cleaning methods:
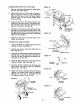
1. Bend a stiff wire, (a lightweight coat hanger
works well) into a small hook as shown below.
Run the hook through the burner tube and
inside the burner several times to remove any
debds.
{ '1)
2. Use a bottle brush with a flexible handle. Run
the brush through the burner tube and inside
the burner several times, removing any debris.
3. Use an air hose to force air through each
burner tube. The forced air should pass debris
or obstructions through the burner and out the
pods.
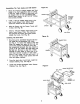
Z WARNING
The location of the burner tube with respect
to the orifice is vital for safe operation.
Check to ensure the edfice is inside of the
burner tube before using your gas gdll. See
Fig. 2. If the burner tube does not fit over
the valve Ddfice, lighting the burner may
cause explosion and/or fire.
Figure 2
GAS VALVE ASSEMBLY
ORIFICE
BURNER TUBE
Figure 1
TO CLEAN BURNER TUBE,
INSERT HOOK HERE
SPARK ELECTRODE
ASSEMBLY
/
BURNER TUBE
GAS COLLECTOR BOX
¢o.......i? ;iiooi ;iio oll
COTTER PIN
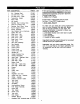
• Size 2 phillips screwdriver
• Size 4 phillips screwdriver
• Adjustable wrench
• Long nose pliers
• Open-end wrench, 11116" size
• Protective work gloves
• Eye protection
4