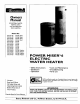
Owners Manual FOR POTABLE WATER HEATING ONLY NOT SUITABLE FOR SPACEHEATING Model 153.316152 153.316153 153.316252 153.316253 153.316354 153.316355 153.316454 153.316455 I$3.316554 153.316555 153.316654 153.316655 153.316754 153.316755 No. 30 GaL Short 30 Gal. Short 40 Gal. Short 40 Gal. Short 30 Gal. 30 Gal. 40 Gal. 40 Gal. 50 Gal. 50 Gal. SOGal. Medium 50 Gal. Medium 40 Gal. Medium 40 Gal.
Safety Precautions •,WARNING I Improperinstallation,ad_ alteration,serviceor mainte- I nance can causeDEATH, SERIOUS BODILY INJURY,OR PROPERTYDAMAGE Refer to this manualfor assistance or consultyourlocalSearsServiceCont_ for further nformation.
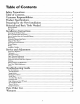
Table of Contents cc_.__oa_w Precautions ............................................................................................... 2 Table of Contents ..................................................................................................... 3 Customer Responsibilities ...................................................................................... 4 Product Specifications .............................................................................................
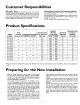
Customer Responsibilities Abbreviations Thank You for purchasing a Sears water heater. Properly installed and maintained, it should give you years of trouble free service. If you should decide that you want the new water heater professionally installed, contact the local Sears Service Center or any Sears store. They will arrange for prompt, quality installation by Sears authorized contractors. Found In This Instruction Manual U.L.-Underwriters Laboratories, 333 Pfingsten Rd.
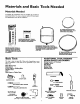
Materials and Basic Tools Needed Materials Needed To simplify the installation Sears has available the installation parts shown below. You may or may not need all of these materials, depending on your type of installation. 20" DIAMETER DRAIN PAN FOR WATER HEATERS 18" IN DIAMETER AND UNDER i ...... IB WATER HEATER HEAT TRAPS HELP REDUCE HEAT LOSS DUE TO THERMAL SYPHONING .......
Installation Instructions Removing the Old Water Heater G Q Qa. Turn "OFF" electrical supply to the water heater. Turn "OFF" the water supply to the water heater at the water shutoffvalve or water meter. Q Q If you have copper piping to the water heater, the two copper water pipes can be cut with a hacksaw approximately 4" away from where they connect to the water heater. This will avoid cutting off the pipes too short. Additional cuts can be made later if necessary.
Installation Instructions (cont'd) Facts to Consider About the Location Facts to Consider About the Convertible Lower Element You should carefully choose an indoor location for the new water heater, because the placement is a very important consideration for the safety of the occupants in the building and for the most economical use of the appliance. This water heater is not intended for outdoor installation.
Installation Water Instructions (cont'd) Piping _,WARNING HOTTER WATER CAN SCALD: Water heaters are intended to produce hot water. Water heated to a tem)erature which will satisfy space heating, clothes washing, dish washing, and other sanitizing needs can scald and permanently injure you upon contact. Some people are more likely to be permanently injured by hot water than others. These include the elderly, children, the infirm, or physically/mentally handicapped.
Installation Instructions Temperature-Pressure Relief Valve _,WARNING At the time of manufacture this water heater was provided with a combination temperature-pressures relief valve certified by a nationally recognized testing laboratory that maintains periodic inspection of production of listed equipment or materials, as meeting the requirements for Relief Valves and Automatic Gas Shutoff Devices for Hot Water Supply Systems, and the latest edition of ANSI Z21.22 and the code requirements of ASHE.
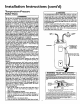
Installation Filling the Water Instructions (cont'd) Heater To fill the water heater with water: Close the water heater drain valve by turning the handle to the right (clockwise). The drain valve is on the lower front of the water heater. • Open the cold water supply valve to the water heater. NOTE: The cold water supply valve must be left open when the water heater is in use. To insure complete filling of the tank, allow air to exit by opening the nearest hot water faucet.
Installation Instructions (cont'd) Converting the Lower Element (cont'd) 2. The convertible element is located behind the lower access panel of the water heater. Remove the two screws securing the access panel, and remove panel. 3. Remove the insulation 5. Remove the screws from terminal the looped end of the wire aside. 2 of the element, and move 6. The buss bar is labeled 5500 W. Place the buss bar over terminals 2 and 3 with the 5500 W visible. Install the extra screw provided into terminal 3.
Installation Instructions (cont'd) Converting the Lower Element (cont'd) 9. Replace terminal cover on thermostat making sure that the locking tabs on the terminal cover are in place. 12. Complete wiring to the water heater, or if completed, turn "ON" electric power to the water heater after filling the tank with water. _E,WARNING Make sure the thermostat is flush against the tank, the terminal cover is in place, and the insulation _sreplaced.
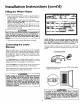
Installation Wiring Instructions (cont'd) TO ELECTRIC POWER SUPPLY Diagrams BLACK, STANDARD WIRING FOR 2 WIRE LEAD WATER HEATERS NON-SIMULTANEOUS OPERATION 240 VOLT DOUBLE ELEMENT ' RED JUNCTION BOX UPPER THERMOSTAT UPPER HEATING ELEMENT \ BLACK J RED FOR SSO0 WATTS FOR 3800 WAT'I LOWER ELEMENT WIRING FOR 3 WIRE LEAD WATER HEATERS NON-SIMULTANEOUS OPERATION 240 VOLT DOUBLE ELEMENT UPPER HEATING OF FIELD CONNECTIONS THREE TYPES YOU MAY HAVE TIME CLOCK OPERATES BOTTOM SWITCH ELEMENT ONLY
Installation Instructions (cont'd) Wiring C. Flexible metal conduit or flexible metallic tubing shall be permitted for grounding if all the following conditions are met: _CAUTION Never use this water heater unlessit is completely full of water. To prevent damage to the tank and heating element, the tank must be filled with water. Water must flow from the hot water faucet before turn ng on power. 1. The length in any ground return path does not exceed 6 feet. 2.
Installation Installation Instructions (cont'd) Checklist COLD HOT • Whether or not the element conversion is made, the model raring plate must be marked• Using a hard point ink pen, check the appropriate block within the model rating plate, which is located adjacent to the lower access panel.
Service and Adjustment Temperature Regulation The lower thermostat is factory set at its lowest position which approximates 120°F (Hot) and is adjustable if a different water temperature is desired. Read all warnings in this manual and on the water heater before proceeding. AWARNING HOTTER WATER CAN SCALD: Water heaters are intended to produce hot water.
Service Adjustment (cont'd) Lower Thermostat Adjustment Failure to install and maintain a new properly listed temperature-pressure relief valve will release the manufacturer from any claim which might result from excessive temperature or pressure. The lower thermostat is adjustable if a different water temperature is desired. Read all warnings in the "TemperatureRegulation" section before proceeding.
Service and Adjustment (cont'd) Element Cleaning/ Replacement NOTE: These instructions are written for element cleaning and dement replacement for the lower dement. If it is necessary to clean or replace the upper element, then repeat these instructions. To remove replace it: the element 1. Before beginning water heater. from your tank in order to clean 4. Remove the two screws securing the access panel, and remove panel. or turn "OFF" the electric power supply to the ] 5.
Service and Adjustment (cont'd) 10. A new gasket should be used in all cases to prevent a possible water leak. (See Element Gasket in the Parts Order List Chart). Place the new element gasket on the thread side of the cleaned or new element and screw into tank, securing tightly using an element wrench. TERMINAL COVER ON UPPER THERMOSTAT 11. Close the water heater drain valve by turning the handle to the right (clockwise). The drain valve is on the lower front of the water heater. 7.
Service Element and Adjustment Drain Valve Washer Replacement Cleaning/ Replacement (cont'd) NOTE: For replacement, use a *_2" x ,3/,, x ¼" thick washer available at your nearest hardware store. For ordering a replacement washer, refer to the "Parts Order List" section. 16. Replace terminal cover on thermostat making sure that the locking tabs on the terminal cover are in place. 17. Replace the insulation block the thermostat and element.
Troubleshooting Guide Start Up Conditions THERMAL EXPANSION NOT COLD Water supply systems may, because of such events as high line pressure, frequent cut-offs, the effects of water hammer among others, have installed devices such as pressure reducing valves, check valves, back flowpreventers, erc...to control these types of problems. When these devices are not equipped with an internal by-pass, and no other measures are taken, the devices cause the water system to be closed.
Troubleshooting Operational SMELLY Guide Conditions RUMBLING WATER In each water heater there is installed at least one anode rod (see parts section) for corrosion protection of the tank. Certain water conditions will cause a reaction between this rod and the water. The most common complaint associated with the anode rod is one of a "rotten egg smell". This odor is derived from hydrogen sulfide gas dissolved in the water.
Troubleshooting HIGH TEMPERATURE SHUT OFF Guide (cont'd) NOT SYSTEM (cont'd) Remove the insulation • Reset the high limit by pushing "RESET". block to expose the opening. in the red button OR NO HOT WATER In a new installation, the water heater may not be properly connected. Make sure the cold water supply valve is open. Review and check piping installation.
Troubleshooting Guide (cont'd) Leakage Checkpoints Use this guide to check a "Leaking" water heater. Many suspected "Leakers" are not leaking tanks. Often the source of the water can be found and corrected. A, CAUTION Read this manual first, then before checking the water heater make sure the electric supply has been turned "OFF", and never turn the electric supply "ON" before the tank is completely full of water.
Notes 25
Parts Order List KENMORE POWER MISER TM 6 ELECTRIC WATER HEATERS MODEL NUMBERS: 153.316152 153.316153 153.316252 153.316253 30Gal. 30Gal. 40Gal. 40 GM. Short Short Short Sho_ NOTE: UPPER ELEMENT: These water heaters are equipped with 3800 watt elements. LOWER ELEMENT: These water heaters are equipped with _actory installed convertible elements, which can be operated at 3800 watts or 5500 watts. Convertible elements are not offered as replacement parts.
Parts Order KENMORE POWER MISER MODEL NUMBERS: 153.316152 153.316153 153.316252 153.316253 TM List (cont'd) 6 ELECTRIC WATER HEATERS 30 G_.Sho_ 30 GM. Sho_ 40Gal. Sho_ 40 G_.ShoR MODEL 153.316152 KEY PART NO. DESCRIPTION 1. 2. 3. 4. 5. 6. 7. Temperature-Pressure Relief Valve Dip Tube Primary Anode Rod Drain Valve Drain Valve Washer (1_2" x lye,, x 7;' thick)** Element Gasket Lower Element* (See NOTE on page 26) 8. 9. 10. 11. 12. 13. 14.
Parts Order List KENMORE POWER MISER TM 6 ELECTRIC WATER HEATERS MODEL NUMBERS: 153.316354 153.316355 153.316454 153.316455 153.316554 153.316555 30Gal. 30G_. 40Gal. 40Gal. 50Gal. 50Gal. NOTE: UPPER ELEMENT: These water heaters are equipped with 3800 watt elements. LOWER ELEMENT: These water heaters are equipped with factory installed convertible elements, which can be operated at 3800 watts or 5500 watts. Convertible elements are not offered as replacement parts.
Parts Order KENMORE POWER MISER MODEL NUMBERS: 153.316354 153.316355 153.316454 153.316455 153.316554 153.316555 TM List (cont'd) 6 ELECTRIC WATER HEATERS 30G_. 30G_, 40 G_. 40 G_. 50G_. 50G_. MODEL KEY NO. PART 153.316354!153.316355 DESCRIPTION 1. 2. 3. 4. 5. 6. 7. Temperature-Pressure Relief Valve Dip Tube Primary Anode Rod Drain Valve Drain Valve Washer (*%;' x 'Yd' x X" thick)** Element Gasket Lower Element* (See NOTE on page 28) 8. 9. 10. 11. 12. 13. 14.
Parts Order KENMORE POWER MISER MODEL NUMBERS: 153.316654 153.316655 153.316754 153.316755 50 50 40 40 Gal. Gal. Gal. Gal. TM List (cont'd) 6 ELECTRIC WATER HEATERS Medium Medium Medium Medium NOTE: UPPER ELEMENT: These water heaters are equipped with 3800 watt elements. LOWER ELEMENT: These water heaters are equipped with factory installed convertible elements, which can be operated at 3800 watts or 5500 watts. Convertible dements are not offered as replacement parts.
Parts Order KENMORE POWER MISER MODEL NUMBERS: 153.316654 153.316655 153.316754 153.316755 50 50 40 40 Gal. Gal. Gal. Gal, TM List (cont'd) 6 ELECTRIC WATER HEATERS Medium Medium Medium Medium MODEL KEY NO. PART DESCRIPTION 1. 2. 3. 4. 5. 6. 7. Temperature-Pressure Relief Valve Dip Tube Primary Anode Rod Drain Valve Drain Valve Washer (_;' x 'YJ' x V," thick)** Element Gasket Lower Element* (See NOTE on page 30) 8. 9. 10. 11. 12. 13. 14. 15. 16. 17. 18.
Warranty About Your Warranty THE PRICE OF YOUR WATER HEATER DOES NOT INCLUDE A FREE CHECKUP SERVICE CALL. On Water Heater Installations Arranged By Seats, Sears warrants the installation. ON INSTALLATIONS NOT MADE BY SEARS AUTHORIZED CONTRACTORS: 1. Your Sears warranty applies to the product only. 2. Sears does not warrant the installation. 3. A charge will be made on service calls due to poor or incomplete installation. These include: a. Adjusting thermostat. b. Leaks in pipes or fittings.