
Manual


1.
4.
O_ Oo O_
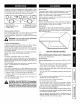
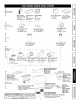
Using a Phillips #2 or a Robertson #2 screwdriver,
unscrew the hood from the bottom of crate. Refer to figure
to the right to locate all 4 screws. Discard these screws
and remove hood from wood pallet.
0,
.1
HR0002
2 •
o o
I OPTION I
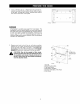
A Backsplash is available (see page 5 for more details). This
backsplash must be installed before the hood shell because
the hood shell covers the backsplash top mounting screws.
In order to be able to install the backsplash, make sure you
have at least 18" (457 mm) clearance between bottom of
hood and range control panel or cooktop. (Refer to instructions
included with backsplash.)
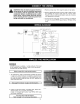
2. Measure and mark a level line on wall above cooktop
location for the wood mounting strip (see illustrations
to the right and under step 2 on page 7). Use #10-2" flat
head screws (included in the parts bag) to secure the mount-
to the drywall. Make sure to hit the wall studs.
CAUTION: Due to the weight of this hood,
ensure that the wood strip is attached to all of
the available wall studs (2 studs minimum for
the 30" hood, more as hood width increases);
not into drywall alone.
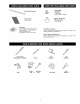
t3" (330 ram) or
19" (483 ram) from
ceiling see page 7
(38 mm)
HD0068A
1. Drywall
2. Wood Mounting Strip
3. Flat Head Screw
4. Wall Anchor Location
5. Outline of the Back of the Hood
6. Wall Studs