E L I T E Range Hood Use & Care /Installation Manual Campana de cocina Manual de uso y cuidado /instalaci6n Models Modelos 233.55012000 233,55013000 233.55014000 233.55017000 233,55019000 (3o" wide - White) (30" wide- Stainless) (30" wide- Biscuit) (30" wide- Almond) (30" wide- Black) 233.55112000 233,55113000 233.55114000 233.55117000 233.55119000 (36" wide (36" wide(36" wide (36" wide(36" wide- White) Stainless) Biscuit) Almond) m Black) 63 Z r233.55212000 233,55213000 233.55214000 233.
SECTION ...................................................................... PAGE Warranty .............................................................................. 2 Safety Instructions ............................................................... Operation ............................................................................. 2 3 Cleaning ............................................................................... Parts lncluded With Hood ..........................................
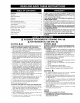
electric WARNING: shock, To reduce disconnect the risk from of power supply before cleaning, Fan and Lights Aluminum mesh filters 3 push button switches for each. Push any button to select one of 3 fan speeds or one of 3 light levels. Push the same button to turn fan or light off. Press another button to change fan speed or light level. A light above each fan button indicates the fan speed. Clean frequently using hot water and a miJd detergent or in your dishwasher.
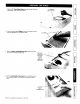
Light Bulb (2 per hood) Sears Part No, 57853 7-inch Round Duct Adapter OPTIONAL 31/4"x 10" Damper/Duct Connector PARTS (purchase separately) Clean Cooking Filters (Non-ducted hoods only) (2 per hood) Sears Part Nos. 50191 (30") 50192 (36") 50193 (42") Aluminum Grease Filter (2 per hood) 7-inch Round Damper (For use with 7-inch Round Duct) Sears Part No. 59183 Parts Bag (4 hood mounting screws inside) Splashplate Sears Part Nos.
Kenmore rangehoods are designed to perform efficiently when attached to long runs of duct. As a point of reference, this hood will function at approximately 80% of its rated air flow when 200 equivalent feet of 7" round ductwork is attached. Use this chart to calculate the equivalent duct length of your system. Broan Model 428 3_,4-in.x 10-in, Right-angle Elbow Equivalent tength Broan Model 401 Straight Duct 3¼-in. x 10-in, x 2-ft. long Equivalent length 2ft. (_ 8.5 ft. "t 6-in.
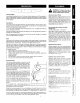
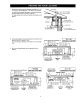
1. Determine whether hood will discharge vertically (31A"x 10" or 7" Round), horizontally (3¼" x 10" only) or non-ducted. For vertical or horizontal discharge, run ductwork between the hood location and a roof cap or wall cap. For best results, use a minimum number of transitions and elbows. ROOFCAP 3¼" X 10" or 7" ROUND For vertical discharge) SOFFIT HOUSE WfRING orBack of hood) CAP t 24" - 30" ABOVE COOKING SURFACE 3Y4" X 10" DUCT (For horizontal 2.
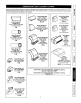
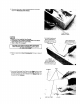
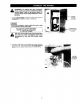
" ROUND DUCT PLATE 1. Remove 7" Round Duct Plate from top of hood. Set duct plate aside - with mounting screws. ,---q ii_i!::_;_i_!!i!!_iii__iii_i!ii_ii_!i_i_._._,,,_ _.....,. 2, Remove tape holding Filter_____e8 in place. Pull down on filter tabs and lift filters out. Set fi_ters aside. 3. Remove Teflon-_-coated bottom cover from hood. Set cover and mounting screws aside, FILTERS TEFLON _*- !•_i• _• _i!•i!i! %1• i,ii•_• ••i•/ • • BOTTOM COVER (Held in place with 2 screws) x 4.
5, Remove either top or back wiring knockout and install approved Electrical Cable Clamp+, ELECTRICAL CABLE CLAMP If hood is to be installed Non-Ducted: • Purchase a set of Clean Cooking Filters and attach them to the aluminum mesh filters. • Skip to Step 10 on page 9+ TOP RECTANGULAR DUCT KNOCKOUT (Remove for3_'x t0" Vertical & for 7" Round Discharge) _" _ .
8.3¼"x 10"Ducted Discharge Only:Remove Ta_.from damperflapandattachDamper/Duct Connector over UPTO 1" SIDE-TO-SIDE ADJUSTMENT knockout opening with screws removed in Step 4 under "PREPARE THE HOOD". Make sure damper Pivot is nearest to Top/Back Edqe of hood, TAPE TOP/BACK EDGE 9. 7" Round Ducted Discharge Only: Re-install 7" Round Duct Plate removed in Step #1 under "PREPARE THE HOOD". Install a 7" round damper (purchase separately).
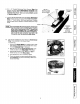
WARNING: To reduce the risk of electric shock, make sure power is switched off at the service panel. Lock or tag service panel to prevent power from being switched on accidentally. 1. Connect _ (120 VAC) to hood. Use a piece of Cardboard to protect the cooktop, if necessary. I OPTION HOUSE WIRING (t20 VAC) i A Cord Kit is available - which enables the hood to plug into a standard 120 VAC wall outtet. I I Cord Kit available by calling Sears See page 4 for Cord Kit information.
I. Hanghoodfrom(4)Mounting Screws. Slide hood towards walt until mounting screws are engaged in narrow end of (4) _. Tighten mounting screws securely. A long screwdriver works best. 2. Replace bottom cover. KEYHOLE (4) MOUNTING SCREW (4) 3. Connect ductwork to hood. Use Duct TaPe to make joints secure and air tight. DUCT TAPE 2 O ::3 w ¢3 4. Install (2) PAR20, 50 W Maximum Halogen Bulbs or (2) R16, 40 W Maximum Incandescent Bulbs. Purchase bulbs separately.
KEY NO, PARTNO.
SECCION ................................................................. PAGINA Garantia ............................................................................. 13 lnstrucciones de seguridad ............................................... Operaci6n .......................................................................... 13 14 Limpieza ............................................................................ Piezas incluidas con la campana ......................................
_ Ventiiador y luces 3 conmutadoresde pulsadores pars cada uno.Presionecualquierpulsadorpars seieccionar una de las tresve!oddadesdeI ventiLador o unade las tresintensidadesde tuz.Presioneet mismo pulsadorpars apagar el ventiladoro la luz. Presioneottopuisador para cambiar La velocidaddel ventilador o laintensidadde latuz. Una luzverde quese encuentra sobre cada pulsador indicala velocidad dei ventilador.
_b Ib Adaptador de conducto redondo de 17.8 cm (7 pulgadas) (2 por campana) Bombilla de No. luz 57853 Pieza Sears PIEZAS OPTATIVAS Conector de regulador de tiro/ conducto 8.3 cm x 25.4 cm (31/4"x 10") (compra separada) Filtros limpios para cocina (solo campanas sin conducto) (2 por campana) Piezas Sears Nos. 50191 (30") 50192 (36") 50193 (42") Filtrode grasa dealumin|o (2 por campana) Regulador de tiro redondo de 17.8 cm (7 pulgadas) (Para uso con conducto redondo de 17.
Lascampanas decocina Kenmore fueron disefiadas para su desempe5o eficiente cuando se tas sujeta a largos recorridos de conducto. Come punto de referencia, esta campana funcionar,_ a aproximadamente el 80% de su flujo de aire nominal cuando se Ie sujeta 6t m (200 pies) equivalentes de conducto redondo de 17.8 cm (7"). Utilice esta cuadro para calcular e! largo equivalente de conducto de su sistema. Broan Modelo 428 3_i4-pulg.x 10-pulg.
Determine si la descarga de la campana ser& vertical (83 cm x 25.4 cm o 17.8 cm redondo [3¼" x 10" o 7" redondo]), horizontal (8.3 cm x 25,4 cm [31/4"x I0"] solamente) o sin conducto. TAPA Ill DE TECHO CONDUCTO DE 8.3 cm x 25.4 cm O REDONDO DE 17.8 cm "(para descarga vertical) En el caso de descarga vertical u horizontal, tienda los conductos entre el tugar donde se instalar_l la campana y et tapon de techo o et tapon de pared. Para obtener los mejores resultados, minima de transiciones y codos.
Quite la _onducto la superior de la campana. tornillos de montaje. 2, 3. PLACA DEL CONDUCTO REOONDO DE 17.8 CM (7") redondo dL17,8 om (7") de Ool6quela aparte, con los Quite la cinta que sujeta los _ en su lugar. Tire hacia abajo de las lengQetas del filtro y s_,quelos levant&ndolos. Coloque los filtros a un lado. Quite la Cubierta inferior recubi_n__ campana. Coloque a un iado la cubierta montaje. FILTROS de la y los tornillos de Cubierta ,_:: in[erior _ _: recubierta. de Teflon ® (Se 4.
Quite el agujero ciego para los cables electricos, ya sea el superior o el posterior, e instale una ragr..a=p_._para cable electrico aprobada. 5. GRAPA Si se instalard la campana en un sistema sin conductos: • Compre un filtro de cocina limp|o y sujdtelo al filtro de malla de aluminio. • Pase al paso nttmero 10 de la p_gina 20. I Vea la pzigina 15 para informacion sobre el flltro de cocina limpio. El filtro de cocina limpio esta disponible Itamando a Sears al 1-800-4-MY-HOME ® 6.
8. S61epara descargas con conductos de 8.3 cmx 25.4 cm (3 !4" × 10"): Quite la cinta de ta ateta del regulador de tiro y cotoqueel regulador de tiro/conector del conducto sobre la abertura del agujero ciego, con los tomillosque quit6 en el paso 4 bajo "PREPARACION DE LA CAMPANA". Aseg0rese de que el I_ivote del regulador de tiro quede to mas cerca posible del borde superior/posterior de la campana, 9.
ADVERTENCIA: Para reducir el riesgo de descargas eldctricas, asegOrese de apagar el interruptor de alimentacibn electrica en el panel de servicio. Bloquee o rotule el panel de servicio para evitar que alguien conecte accidentalmente la energia eldctrica. 1. Conecte el cableado de la casa (120 VCA) a la campana. fuera necesario, use un pedazo de cart6nn para proteger superficie de la estufa. CABLEADO DOM#_STICO (I20 VCA) Si la I OPC 6N 1 CARTON (Para proteger la superficie de la estufa.
1, Cuelgue la campana de los (4) tomillos de montaje (que se encuentran en la bolsa de piezas), Deslice la campana hacia la pared hasta que los tomillos de montaje queden conectados en el extremo angosto de los (4) orificios tiDo bocallave, Apriete fijamente los tornillos de montaje. Un destornillador largo funciona mejor. 2. Vuelva a colocar ta cubierta inferior. ORIFICIO 3. Conecte el sistema de conductos en la campana. Use tin Iz_ra conducto.__Sspara fijar y seltar Jas uniones.
....... cLAVE N, ° PIEZA N. a R680508 2 R740013 3 R602017 4 R334755 5 6 R50t031 R627502 R627567 R627542 R627543 R169005 7 R169006 R169007 R169008 8 R601535 9 R602534 10 11 R602533 R680505 12 13 R680507 Rl11670 14 15 R401670 R602058 16 R601536 t7 18 R651973 R!69009 19 2O R520118 R53t068 21 22 23 24 R607215 Rl11630 R169016 R680519 R680526 R680531 25 99010302 99010303 99O10304 26 R730-flt 27 28 R50!033 R607660 R564074 DESCRIPCI(_N Ptaca de conducto redondo de 7" (17.
Your Home For repair-in your home-of all major brand appliances, lawn and garden equipment, or heating and cooling systems, no matter who made it, no matter who sold it! ii:ii!iii!il For the replacement parts, accessories and owner's manuals that you need to do-it-yourself. For Sears professional installation of home appliances and items like garage door openers and water heaters. L_L_ii!; 1-800-4-MY-HOME Call anytime, ® (1-800-469-4663) day or night (U.S.A. and Canada) _::i 7_ ::::i=_ www.sears.