E L ! T E _ Freezer Use & Care Guide Congelador Gufa para su uso y cuidado Cong_lateur Guide d'utilisation et d'entretien ! 2 ,,0 m Sears, Roebuck and Co., Hoffman Estates, IL 60179 U.S.A. Sears Canada, inc., Toronto, Ontario, Canada IVl5B 2B8 www.
Record Serial/Model Numbers ............ 2 Important Safety Instructions .............. Kenmore Appliance Warranty .............. Protection Agreements ........................ First Steps ........................................... Energy Saving Tips ............................. 2-3 3 4 5-6 6 Setting the Temperature Control ......... Freezer Optional Features .................. Care and Cleaning .............................. Power Failure / Freezer Failure ............
ELECTRICAL iNFORMATiON These guidelines must be followed to ensure that safety mechanisms in the design of this freezer will operate properly. • Refer to the serial plate for correct electrical rating. The power cord of the appliance is equipped with a three-prong grounding plug for your protection against shock hazards. It must be plugged directly into a properly grounded three-prong receptacle, protected with a 15 amp time delay fuse or circuit breaker.
In the U.S.A. In Canada Master Protection Agreements Maintenance Agreements Congratulations on making a smart purchase. Your new Kenmore Elite ®product is designed and manufactured for years of dependable operation. But like all products, it may require preventive maintenance or repair from time to time. That's when having a Master Protection Agreement can save you money and aggravation. Your purchase has added value because you can depend on Sears HomeCentral ®for service.
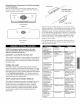
This Owner's Guide provides specific operating instructions for your model. Use the freezer only as instructed in this Owner's Guide. Before starting the freezer, follow these important first steps. iNSTALLATiON Lower • Choose a place that is neara grounded electrical outlet. Do Not use an extension cord or an adapter plug. • Plastic Leveling Feet Crating Screw For the most efficient operation, the freezer should be located where surrounding temperatures will not exceed t t0°F (43°C).
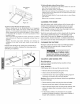
DOOR REMOVAL (UPRIGHT MODELS) If door must be removed: 1. Gently lay freezer on its back, on a rug or blanket. 2. Remove two base screws and base panel. Remove wire from clips on bottom of cabinet, if required. 3. Unplug connector, if required, by holding the cabinet connector in place, and pulling door connector out. 4. Remove bottom hinge screws. 5. Remove plastic top hinge cover. 6. Remove screws from top hinge. 7. Remove top hinge from cabinet. 8. Remove doorand bottom hinge from cabinet. 9.
Delu×eElectronicTemperature Control (Some Upright Frost Free Models) Refer to the Electronics Control Guide supplied when you purchase a deluxe electronic upright model. See Figure 3 for deluxe electronics control panel.
HIGH=TEMP ALARM SWITCH (SOME MODELS) An audible alarm will sound if the freezer temperature reaches unsafe levels. The alarm operates on household electricity. If the power fails, the alarm will not perform. An ON/OFF switch allows the high temperature alarm to be deactivated if desired. NOTE: You must open the freezer door to view the alarm switch. The freezer is shipped with the switch in the OFF position.
PIZZA SHELF (SOME UPRIGHT MODELS) Here is the place to store up to four extra-large boxes of frozen pizza without ever having to dig them out from beneath a pile of other stored goods. To change the location of the pizza shelf: support the bottom center of the shelf with one hand and use your other hand to gently ease each support tab outward until they have all dropped between the edge of the shelf and the liner wall.
To Defrost Models without Defrost Drain: Place towels or newspapers on the freezer bottom to catch the frost. The frost will loosen and fall. Remove the towels and/or newspapers. If the frost is soft, remove it by using a plastic scraper. If the frost is glazed and hard, fill deep pans with hot water and place them on the freezer bottom. Close the freezer door/lid. Frost should soften in about fifteen (15) minutes. U09 Models Only Drain Pan J Repeat this procedure is necessary.
NOTE: Do not open freezer door unnecessarily if freezer is off for several hours. If a power failure occurs, frozen foods will stay frozen for at least 24 hours if the freezer is kept closed. If the power failure continues, pack seven or eight pounds of dry ice into the freezer every 24 hours. Look in the Yellow Pages under Dry Ice, Dairies, or Ice Cream Manufacturers for local dry ice suppliers. Always wear gloves and use caution when handling dry ice.
TROUBLESHOOTING GUIDE PROBLEM FREEZER Before calling for service, review this list. It may save you time and expense. This list includes common occurences that are not the result of defective workmanship or materials in this appliance. CAUSE CORRECTION DOES NOT RUN Freezer does not run. Freezer runs too much or too ,, Freezer is plugged into a circuit that has a ground fault interrupt. ,, Temperature control is in the OFF position. ,, Freezer may not be plugged in, or plug may be loose.
PROBLEM SOUND AND NOISE l CAUSE 1 CORRECTION (Cont.) Popping or cracking sound when compressor comes on. ,, Metal parts undergo expansion and contraction, as in hot water pipes. ,, This is normal. Sound will level off or disappear as freezer continues to run. Bubbling or gurgling like water boiling, ,, Refrigerant (used to cool freezer) is circulating throughout the system. ,, This is normal. ,, Freezer is not level. It rocks on the floor when it is moved slightly. ,, Floor is uneven or weak.
"We Service What We Sell" is our assurance you can depend on Sears for service ...and Sears service is nationwide. Your freezer has added value when you consider that Sears has service units nationwide, staffed with professional technicians specifically trained on Sears appliances and having parts, tools and equipment to ensure that we meet our pledge to you..."We Service What We Sell.