® Freezer Use & Care Guide Congelador Guia para su uso y cuidado Cong_lateur Guide d'utilisation et d'entretien r I Sears, Roebuck and Co., Hoffman Estates, IL 60179 U.S.A. Sears Canada, Inc.,Toronto, Ontario, Canada M5B 2B8 WWW.S(_aI'S.
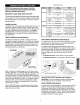
Record Serial/Model Numbers ......... Safety .................................................. Warranty .............................................. Canada - Limited Warranty ................. First Steps ........................................... Energy Saving Tips ............................. Setting the Temperature Control ......... 2 2-3 3 4 5-6 6 6 Freezer Optional Features .................. 7-8 Care and Cleaning .............................. 9-10 Power Failure / Freezer Failure ...........
ELECTRICAL INFORMATION These guidelines must be followed to ensure that safety mechanisms in the design of this freezer will operate properly. • Refer to the serial pfete for correct electrical rating. The power cord of the appliance is equipped with a three-prong grounding p{ug for your protection against shock hazards. It must be plugged directly into a properly grounded three-prong receptacle, protected with a t 5 amp time delay fuse or circuit breaker.
CANADA --- LIMITED WARRANTY ® Freezers Sears Canada Inc., warrants every new Kenmore freezer to be free from defects in material or workmanship.
ThisOwner'sGuideprovidesspecificoperating instructions foryourmodel.Usethefreezeronlyas instructed inthis Owner'sGuide,Before starting the freezer, follow these important first steps. INSTALLATION • Choose a place that is near a grounded electrical outlet. Do Not use an extension cord or an adapter plug. • For the most efficient operation, the freezer should be located where surrounding temperatures will not exceed 110°F (43°C).Temperatures of 32°F (0°C) and below will NOT affect freezer operation.
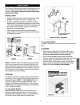
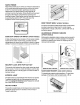
DOOR REMOVAL (UPRIGHT MODELS) If door must be removed: t. Gently lay freezer on its back, on a rug or blanket. 2. Remove two base screws and base panel. Remove wire from clips on bottom of cabinet. (Figure 1) 3. Unplug connector by holding the cabinet connector in place, and pulling door connector out. (Figure 1) 4. Remove bottom hinge screws. (Figure 1) 5. Remove plastic top hinge cover. 6. Remove screws from top hinge. 7. Remove top hinge from cabinet. 8. Remove door and bottom hinge from cabinet. 9.
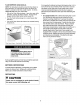
Atarm NOTE:Your freezer may have some, or all of the features listed below. Become familiar with these features, and their use and care. YeEE_w _ E LOCK WITH POP=OUT _D Non.a[ [._ Of_ KEY Table O_Ta_on N_ne / N _ _t _em Replace wlth i_ew 9 w_t ba_y No _a_l_ condition Fl_h_ng This security lock fastens the door snugly, ensuring stored food is secure. To lock or unlock the freezer, push the key into the lock and turn. The key pops out of the lock after it has been turned.
RAPID FREEZE Rapid freeze allows you to !ower your freezer's temperature to the lowest possible temperature by pushing the switch to ON. For maximum benefit, rapid freeze should be selected 24 hours before placing a large quantity of unfrozen food into the freezer. Food should then be spread throughout the freezer compartment to speed up the freezing process. Rapid freeze must be manually turned off by pushing the switch to OFE (This will return the ompressor to the normal operating mode.
FLASH DEFROST (SOME MODELS) NOTE: The Temp Alarm shouid be turned off when freezer is being defrosted. The Fl_sh Defrost feature will defrost the freezer in a fraction of the time usualiy required. To defrost, remove all food, and follow these steps: • Putl out the Flash Defrost plunger. Leave door open while defrosting. (Closing the freezer tid/door will push in the plunger, and the Flash Defrost witl be turned off.) • Push the Flash Defrost plunger in to restart freezer after defrosting.
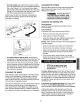
• On chest models with a defrost drain, p{ace a shallow pan or the Divider/Drain Pan (some models) beneath the drain outlet (Figure 2). A Y2inch garden hose adapter can be used to drain the freezer directly into a floor drain (Figure 3). Pull out the drain plug inside the freezer, and pull off the outside defrost drain plug (Figure 4). CLEANING THE OUTSIDE Wash the cabinet with warm water and mild liquid detergent. Rinse well and wipe dry with a clean soft cloth. Replace parts and food.
TROUBLESHOOTING Beforecallingfor service,reviewthis list.It maysaveyoutime andexpense.This list includes common occurences materials in this appl{ance. GUIDE PROBLEM FREEZER that are not the resu{t of defective CAUSE I or CORRECTION DOES NOT RUN FPaezer does not run. FP_ezer tuns too much or too _ong. • Freezer is plugged into a circuit that has a ground fault interrupt, • Temperature control is in the OFF position. • Freezer may not be p_ugged in, or plug may be loose.
PROBLEM SOUND AND NOISE [ CAUSE [ CORRECTION (Cont.) Popping or cracking sound when compressor comes on. • Meta_ parts undergo expansion and contraction, as in hot water pipes. • This is normal. Sound will _evel oft or disappear as freezer continues to run. Bubbling or gurgling sound, like water boiling, • Refrigerant (used to cool freezer) is circulating throughout the system. * This is normal. Vibrating or rattling noise. • Freezer is not level.
"We Service What We Sell" is our assurance you can depend on Sears for service ...and Sears service is nationwide. Your freezer has added value when you consider that Sears has service units nationwide, staffed with professional technicians specifically trained on Sears appliances and having parts, tools and equipment to ensure that we meet our pledge to you.-"We Service What We Sell." Dear Customer: In manufacturing this product, many steps have been taken to provide you with the highest quality.