Use & Care Guide Manual de Uso y Cuidado English/Español Kenmore 36’’ Tower Fan ® 3 Speeds, Oscillation Switch Ventilador Tipo Torre de 36 pulgadas 3 Velocidades, Oscilación Interruptor Model/Modelo: 405.34036310 Customer Assistance /Asistencia al Cliente 1-855-438-7899 Sears Brands Management Corporation Hoffman Estates, IL 60179 U.S.A. www.kenmore.com www.sears.com www.kmart.
READ AND SAVE THESE INSTRUCTIONS CAUTION Read and follow all instructions before operating fan. Do not use fan if any part are damaged or missing. WARNING 1. To reduce the risk of fire or electrical shock, do not use this fan with any solid-state speed control device. 2. If the supply cord is damaged, it must be replaced by the manufacturer or its service agent or other qualified person in order to avoid a hazard. 3. This appliance has a polarized plug (one blade is wider than the other).
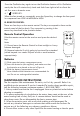
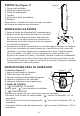
PARTS (see Figure 1) 1. Fan Body 2. Rear Base Half 3. Power cord 4. Screws 5. Front Base Half 6. Receiver Remark: Rear base half and front base half are same. Figure 1 6 PARTS ASSEMBLY 1 1. Pull power cord (3) all the way out. 2. Attach rear base half (2) and front base half (5) together by inserting the two posts on front half into the two holes on rear half and insert the two posts on rear half into the two holes on front half. 5 3. Insert the power cord through the center hole in the base assembly.
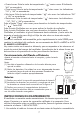
Press the Oscillation key again to turn the Oscillation feature off. In Oscillation mode, the fan will rotate slowly back and forth from right to left to direct the air flow over a broader area. 4. “ ” SPEED KEY. When the fan turned on, repeatedly press the Speed key to change the fan speed in a sequence from LOW to MEDIUM to HIGH. III. REMOTE CONTROL There are four keys on the remote control. The keys correspond to those on the control panel of the fan body.
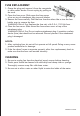
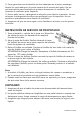
FUSE REPLACEMENT 1. Grasp the plug and remove it from the receptacle or other outlet device. Do not unplug by pulling on the cord. 2. Open the fuse cover. Slide open the fuse access cover on top of attachment plug towards blades. 3. Remove the fuse carefully. Push the fuse from the other side or turn the fuse holder over to remove the fuse. WARNING: Risk of fire. Replace the fuse only with 2.5 A, 125 Volt fuse. 4. Close the fuse cover. Slide closed the fuse access cover on top of the attachment plug.
LEA Y GUARDE ESTAS INSTRUCCIONES ADVERTENCIA Lea cuidadosamente y guarde estas instrucciones. PRECAUCION 1. Para reducir el riesgo de descarga eléctrica, no use este ventilador junto con un dispositivo de control de velocidad. 2. Si el cable de alimentación está dañado, el fabricante, su agente de servicio u otra persona calificada deben reemplazarlo para evitar que se convierta en un riesgo. 3. Este aparato hace uso de un enchufe polarizado (una pata es más ancha que la otra).
PARTES (Ver Figura 1) Figura 1 1. Cuerpo del ventilador 2. Mitad de la base de atrás 3. Cable de alimentación 4. Tornillos 5. Mitad de la base de adelante 6. Receptor Observación: la mitad de la base de atrás y la mitad de la base de adelante son las mismas. MONTAJE DE LAS PARTES 6 1 5 1. Saque el cable de alimentación(3) completamente. 2.
• Cuatro horas: Pulse la tecla de temporizador “ ” cuatro veces. El indicador “4H” se encenderá • Cinco horas: Pulse la tecla de temporizador “ ” cinco veces. Los indicadores “1H” y “4H” se encenderán. • Seis horas: Pulse la tecla de temporizador “ ” seis veces. Los indicadores “2H” y “4H” se encenderán. • Siete horas: Pulse la tecla de temporizador “ ” siete veces. Los indicadores “1H”, “2H” y “4H”se encenderán. Pulse el botón “Timer” ocho veces para desactivar la función de temporizador. 3.
2. Para garantizar una circulación de aire adecuada en el motor, mantenga limpios los respiraderos en la parte trasera de la carcasa del motor. No use una aspiradora para limpiarlos sin primero desconectar el ventilador. No desarme el ventilador para limpiarlo. 3. Use un paño suave y detergente no abrasivo para limpiar el exterior. No use solventes o detergentes abrasivos que pudieran rayar la superficie. No use gasolina o quitapinturas para limpiar el ventilador. 4.
Kenmore One Year Limited Warranty When installed, operated and maintained according to all supplied instructions, if this appliance fails due to a defect in material and workmanship within one year from the date of purchase, return it with proof of purchase to any Sears store, Parts & Repair Service Center or other Kenmore outlet in the United States for free repair or replacement if repair is unavailable. This warranty covers ONLY defects in material and workmanship, and will NOT pay for: 1.