Microwave Hood Combination Use & Care Guide Combinaci6n Microondas Compana Guia de uso Y cuidado Models/Modelos 401.80082 401.80083 401.80084 401.80086 401.80089 II I 000 000 _0 000 000 \ I I I iiII III I III i i Part No. DE68-O3143Q Sears, Roebuck and Co., Hoffman Estates, IL 60179 i u ,jN, www.sears.
Table of Contents Microwave Hood Combination Warranty Microwave Hood Combination Warranty ......... Sears Service ................................ 2 3 Master Protection Agreements ................. IMPORTANT SAFETY INSTRUCTIONS ........... Getting the Best cooking results ................ Testing your dinnerware or cookware ............ Featu res .................................... 3 5 8 8 9 Oven Specifications ......................... Features .................................
Sears Service Master Protection Agreements Congratulations on making a smart purchase. Your new Kenmore® product is designed and manufactured for years of dependable But like all products, it may require preventive or repair from time to time. maintenance operation. That's when having a Master Protection Agreement can save you money and aggravation. The Master Protection Agreement also helps extend the life of your new product.
i¸ill ii!i!i i!i!iii_iiii! fill ii!ill !iiil !i! iiiii ll¸ i!i i!iiiiill !_!_!_! _iiii_iii ii!ii!i 'iiiiiiiiiiill iiii ii!_i_i;i_i !i!i! i!_i_i _iiii iiiili iii ilili iii! i!i¸ iili iilii_ ii_ iii iiiiii!i iilil i!_i ;!_i_ii iii iiiiii'!_! _!_! ii! !!!i_i iii ii!_!!! _ili!i! iiiiiii iiiiii i_ii!ii iiili! ilil i_i ii_il;i i_! _ii _!:! !!!!i i!_! _!!!iiii i!iiiii !_!_ !!iil 'ili iii!i i!i !i!i!iiiiiiiii_ i_i _i_ilil _ii_i!! !iii!iiiiil i¸¸iili!il i!i!i i_iiiiill iiii! _!'! iiiiii! i_iiiiiii ii!iiiiiii!!iill ¸
IIMPORTANT SAFETY NSTRUCTIONS WHAT YOU NEED TO KNOW ABOUT SAFETY INSTRUCTIONS Warning and Important Safety Instructions appearing in this Use & Care Guide are not meant to cover all possible conditions and situations that may occur. Common sense, caution, and care must be exercised when installing, maintaining, or operating microwave. Always contact your dealer, distributor, service agent, or manufacturer about problems or conditions you do not understand.
i¸ill ii!i!i i!i!iii_iiii! fill ii!ill !iiil !i! iiiii ll¸ i!i i!iiiiill !_!_!_! _iiii_iii ii!ii!i 'iiiiiiiiiiill iiii ii!_i_i;i_i !i!i! i!_i_i _iiii iiiili iii ilili iii! i!i¸ iili iilii_ ii_ iii iiiiii!i iilil i!_i ;!_i_ii iii iiiiii'!_! _!_! ii! !!!i_i iii ii!_!!! _ili!i! iiiiiii iiiiii i_ii!ii iiili! ilil i_i ii_il;i i_! _ii _!:! !!!!i i!_! _!!!iiii i!iiiii !_!_ !!iil' ili iii!i i!i !i!i!iiiiiiiii_ i_i _i_ilil _ii_i!! !iii!iiiiil i¸¸iili!il i!i!i i_iiiiill iiii! _!'! iiiiii! i_iiiiiii ii!iiiiiii!!iill ¸
USA-MHC4 DE68-03143Q.
Getting the Best cooking results Testing your dinnerware or cookware Test dinnerware or cookware before using. To test a dish for safe use, put it into oven with a cup of water beside it. Cook at 100% cook power for one minute. If the dish gets hot, do not use it. Some dishes (melamine, some ceramic dinnerware, etc.) absorb microwave energy, becoming too hot to handle and slowing cooking times.
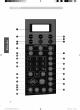
Features Door Handle Window with Metal Shield Cooking Guide Wire Rack o-- B Door Safety Lock System Model and Serial Number Plate Glass Turntable ] Oven Control Panel Oven Specifications Input Power 1,650W Frequency 2,450 MHz Outer Dimensions 29 7/8 (W) Net Weight 53.4 Ibs. X 16 13/16(H) x 16 (D) The wire rack gives you extra space when cooking in more than one container at the same time. ! use r:a k 1. Place rack securely in the four plastic supports.
iiiiiill ii!i!ii!i!iii!iiii! ii!iii!ii!i ii!i!iiiiiiii iii iiiiiiiiiili! iii iiili i!!ii i!iiii !!iiii!! !!i !!iiiiiiii iii! i!!!ii!i!iiiiiii_iiiiiiiii!i! iiiiiii!!!!!!!iiiiii!ii iii_iiiii!ii!iill i'!ii!i!i!iiiii_i!iii!! !iii ii! !!!ii! i!iiiiii illi!iiiii!iii! !!!iiiiii i!i!iiii!!ii i!ii iiiiiliii!i!iiiii!!i! ilili !!i!i!i!i iiiiiiiii!iiiiiiiii ii!i!iiiii!!i! ilili !!i!i!i!i iiiiiiiii!iiiiiiiii ii!i!iiiii!!i! ilili !!i!i!i!i iiiiiiiii!iiiiiiiii ii!i!iiiii!!i! ilili !!i!i!i!i iiiiiiiii!iiiiiiiii ii!i!iiiii!
Features 18. KITCHEN TIMER: Touch this pad to set the kitchen timer. 1. DISPLAY: The Display includes a clock and indicators to tell you time of day, cooking time settings and cooking functions selected. 2. POPCORN: Touch this pad when popping popcorn in your microwave oven. The oven's sensor will tell the oven how long to cook depending on the amount of humidity it detects from the popcorn. 19. ADD 30 SEC: Touch this pad to set and start cooking quickly at 100% power level. 20.
Operating instructions Learn about your microwave oven This section introduces you to the basics you need to know to operate your microwave oven. Please read this information before use. Kitchen Timer You can use your microwave oven as a timer. Use the Kitchen Timer for timing up to 99 minutes, 99 seconds. Example: To set for 8 minutes. 1. Touch KITCHEN TIMER pad. 2. Enter the time by using the number pads. 3. Touch ENTER/START pad. When the time is over, you will hear beeps and END will display.
Turntable On/Off Delay Off For best cooking results, leave the turntable on. It can be turned off for large dishes. Example:To turn off fan after 30 minutesfor Level4. 1. TouchON/OFF pad. 1. Touch TURNTABLE ON/OFF pad to turn the turntable on or off. 2. Touch 5 SPEED pad until Level 4 appears in the display. NOTES: • This option is not available in sensor cook, auto cook and defrost modes. • Sometimes the turntable can become hot to touch. Be careful touching the turntable during and after cooking.
i¸fill ii!i!ii!i!iii_iiii! ii_ ii!iii!ii!i ii!!iiiiiill iiiiii!_i!i! _iii i!! ii!ilii !iiiiiiil i!i_iiiiiiiiiii!iill iii i_iiii!!i _!iiii i_iiii!iii!ii iii iii! iii!_!! ¸!iiiiiiiii! _'_ _i! !iii_ ii; i_iiii!il !iiiii_ i!i;i _iii_!!!'iii_i! !iii_i _i_ _i! 'i_ !!_"_ _i_iiii!_!ii!i!iii!_iiii!i!_!_ !!ii!ii! _i_ !_i!i_i_i _i' !!!!!i iii_i iii iii'_ ilil iiii_iii'il ii!ii_ii! !_i!i!iiiiill ¸__i_!i_i_! _i_i_i iii !i_iii!ili_i_i!ii!_iiiiiii'_iiiiiiiliiiiil i!iii _i;_ii ii!ii ¸¸'_' i!i;;_ !iiii! _!ili!i i_i_i_i _i i
Custom Program Cooking at high power levels CUSTOM PROGRAM lets you recall one cooking instruction previously placed in memory and begin cooking immediately. Example: To cook food for 8 minutes 30 seconds at 100% power. 1. Enter the cook time. Example: To cook for 2 minutes at 70% power. 1. Touch CUSTOM PROGRAM pad. 2. Enter the cook time. 2. Touch ENTER/START pad. When the cook time is over, you will hear four beeps and END will display. 3. Touch POWER LEVEL pad. 4. Enter the power level. 5.
i¸fill ii!i!ii!i!iiiiiii! ii_ ii!iii!ii!i ii!!iiiiiill iiiiii!i!i! iii i!! ii!ilii !iiiiiiil i!iiiiiiiiiiii!iill iii iiiii!!i !iiii iiiii!iii!ii iii iii! iii!!!¸ !iiiiiiiii! _'_ i!!iii iiiiiii!il !iiili i!i;i iii!!!iiii! !iiii ii!i!iiiii!!ii!i!i !ii! iiii!i!! !!ii!ii! i!i!i!iii fill iii !!!!i ilil iiiiiiill ii!iiii! !i!i!iiiiill ¸__i!ii! iiii iiiii !iiii!iiiii!ii!iiiiill iiiiiiilil iiil i!iii i!i;; iii ii!ii ¸¸'_' !iiii! _!ili!i ili!ii!!!!i!ii iiilii! i!i iili!i iii!!! iii i!ii!iii! !iiiii! !!il i ii!ilili!
Sensor operating instructions Sensor cooking guide Sensor Cook allows you to cook most of your favorite foods without selecting cooking times and power levels. The display will indicate the sensing period by scrolling the name of the food. The oven automatically determines required cooking time for each food item. When the internal sensor detects Appropriate containers and coverings help assure good Sensor cooking results.
i¸fill ii!i!ii!i!iii_iiii! ii_ ii!iii!ii!i ii!!iiiiiill iiiiii!_i!i! _iii i!! ii!ilii !iiiiiiil i!i_iiiiiiiiiii!iill iii i_iiii!!i _!iiii i_iiii!iii!ii iii iii! iii!_!! ¸!iiiiiiiii! _'_ _i! !iii_ ii; i_iiii!il !iiiii_ i!i;i _iii_!!!'iii_i! !iii_i _i_ _i! 'i_ !!_"_ _i_iiii!_!ii!i!iii!_iiii!i!_!_ !!ii!ii! _i_ !_i!i_i_i _i' !!!!!i iii_i iii iii'_ ilil iiii_iii'il ii!ii_ii! !_i!i!iiiiill ¸__i_!i_i_! _i_i_i iii !i_iii!ili_i_i!ii!_iiiiiii'_iiiiiiiliiiiil i!iii _i;_ii ii!ii ¸¸'_' i!i;;_ !iiii! _!ili!i i_i_i_i _i i
Cook Reheat Using COOK pad lets you heat common microwaveprepared foods without needing to program cooking times and power levels. COOK has 4 preset food categories: Beverage, Frozen Dinner, Frozen Breakfast and Chicken Breast. REHEAT pad lets you heat foods without needing to program cooking times and power levels. REHEAT has 3 preset categories: Dinner Plate, Casserole and Pasta. Example: To reheat Casserole. Example: To cook Frozen Breakfast. 1. Touch REHEAT pad. 1. Touch COOK pad. 2.
i¸fill ii!i!ii!i!iii_iiii! ii_ ii!iii!ii!i ii!!iiiiiill iiiiii!_i!i! _iii i!! ii!ilii !iiiiiiil i!i_iiiiiiiiiii!iill iii i_iiii!!i _!iiii i_iiii!iii!ii iii iii! iii!_!! ¸!iiiiiiiii! _'_ _i! !iii_ ii; i_iiii!il !iiiii_ i!i;i _iii_!!!'iii_i! !iii_i _i_ _i! 'i_ !!_"_ _i_iiii!_!ii!i!iii!_iiii!i!_!_ !!ii!ii! _i_ !_i!i_i_i _i' !!!!!i iii_i iii iii'_ ilil iiii_iii'il ii!ii_ii! !_i!i!iiiiill ¸__i_!i_i_! _i_i_i iii !i_iii!ili_i_i!ii!_iiiiiii'_iiiiiiiliiiiil i!iii _i;_ii ii!ii ¸¸'_' i!i;;_ !iiii! _!ili!i i_i_i_i _i i
Kids Meals KIDS MEALS Sandwiches. Example: lets you heat 4 categories To cook frozen of food: Chicken Nuggets, Hot Dogs, French Fries and Frozen sandwiches. 1. Touch KIDS MEALS pad. 2. Choose food category(I-4). 3. Touch ENTER/START pad. Chicken Nuggets 1 Hot Dogs 2 French Fries 3 Frozen Sandwiches 4 Kids Meals chart 1 serving (4-5 oz.) • Put a paper towel on top of plate and arrange nuggets in spoke fashion on 2 servings (6-7 oz.) paper towel. • Do not cover.
i¸fill ii!i!ii!i!iii_iiii! ii_ ii!iii!ii!i ii!!iiiiiill iiiiii!_i!i! _iii i!! ii!ilii !iiiiiiil i!i_iiiiiiiiiii!iill iii i_iiii!!i _!iiii i_iiii!iii!ii iii iii! iii!_!! ¸!iiiiiiiii! _'_ _i! !iii_ ii; i_iiii!il !iiiii_ i!i;i _iii_!!!'iii_i! !iii_i _i_ _i! 'i_ !!_"_ _i_iiii!_!ii!i!iii!_iiii!i!_!_ !!ii!ii! _i_ !_i!i_i_i _i' !!!!!i iii_i iii iii'_ ilil iiii_iii'il ii!ii_ii! !_i!i!iiiiill ¸__i_!i_i_! _i_i_i iii !i_iii!ili_i_i!ii!_iiiiiii'_iiiiiiiliiiiil i!iii _i;_ii ii!ii ¸¸'_' i!i;;_ !iiii! _!ili!i i_i_i_i _i i
Snacks SNACKS lets you heat 4 categories of food: Nachos, Chicken Wings, Potato Skins, and Cheese Sticks. Example:To cook chickenwings. 1. Touch SNACKSpad. 2. Choose food category(I-4). 3. Touch ENTER/START pad. Nachos 1 Chicken Wings 2 Potato Skins 3 Cheese Sticks 4 1 serving • Place tortilla chips on plate without overlapping. • Sprinkle evenly with cheese. Contents: - 2 cups tortilla chips 5-6 oz. 7-8 oz. • Use pre-cooked, refrigerated chicken wings.
i¸fill ii!i!ii!i!iii_iiii! ii_ ii!iii!ii!i ii!!iiiiiill iiiiii!_i!i! _iii i!! ii!ilii !iiiiiiil i!i_iiiiiiiiiii!iill iii i_iiii!!i _!iiii i_iiii!iii!ii iii iii! iii!_!! ¸!iiiiiiiii! _'_ _i! !iii_ ii; i_iiii!il !iiiii_ i!i;i _iii_!!!'iii_i! !iii_i _i_ _i! 'i_ !!_"_ _i_iiii!_!ii!i!iii!_iiii!i!_!_ !!ii!ii! _i_ !_i!i_i_i _i' !!!!!i iii_i iii iii'_ ilil iiii_iii'il ii!ii_ii! !_i!i!iiiiill ¸__i_!i_i_! _i_i_i iii !i_iii!ili_i_i!ii!_iiiiiii'_iiiiiiiliiiiil i!iii _i;_ii ii!ii ¸¸'_' i!i;;_ !iiii! _!ili!i i_i_i_i _i i
• When using AUTO DEFROST, the weight to be entered is the net weight in pounds and tenths of pounds (the weight of the food minus the container). ° Use AUTO DEFROST only for raw food. AUTO DEFROST gives best results when food to be thawed is a minimum of 0°F (taken directly from a true freezer). If food has been stored in a refrigerator-freezer that does not maintain a temperature of 5°F or below, always program a lower food weight (for a shorter defrosting time) to prevent cooking the food.
i¸fill ii!i!ii!i!iii_iiii! ii_ ii!iii!ii!i ii!!iiiiiill iiiiii!_i!i! _iii i!! ii!ilii !iiiiiiil i!_i_iiiiiiiiiii!i_ill iii i_i_iii!!i _!iiii i_ii'ii!iii!ii iii iii! iii!_!! ¸!iiiiiiiii! _'_ _i! !iii_ ii; i_'iiii!il !ii'ili_ i!i_;i _iii_!!!'_iii_i! !i'ii_i _i_ _i! 'i_ !!_"_ _i_iiii!_!ii!i!iii!_'iiii!i!_!_ !!_ii!ii! _i_ !_i!i_i_i _i' !!!!!i iii_i iii iii"_ ilil iiii_iii_'il ii!ii_ii! !_'i!i!iiiiill ¸__i_!i_i_! _' 'iiii _i_i iii !i_iii!ili_i_i!ii!_iiiiiii_'_iiiiiiiiii'iiil i!iii _i;_'i_i _ii!ii ¸¸'_' i!i;;_ !i
• Cook fish until it flakes easily with a fork. ° Place fish on a microwave-safe ° Use a tight cover to steam fish. A lighter cover of wax paper or paper towel provides less steaming. • Do not overcook fish; check it at minimum cooking time. roasting rack in a microwave-safe ..... : Steaks Up to 1.5 Ibs. Cooking Time: 6-10 rain. / lb. Power Level: Medium-High(7). dish. i Arrange steaks on roasting rack with meaty portions towards the outside of rack. Cover with wax paper.
Cooking utensils Microwave utensil guide USE DO NOT USE OVEN PROOF GLASS (treated for high METAL UTENSILS: intensity heat): Utility dishes, loaf dishes, pie plates, cake plates, liquid measuring cups, casseroles and bowls without metallic trim. Metal shields the food from microwave energy and produces uneven cooking. Also avoid metal skewers, thermometers or foil trays. Metal utensils can cause arcing, which can damage your microwave oven.
Care and Cleaning Care and Cleaning Cleaning the grease filter For best performance and safety, keep the oven clean inside and outside. Take special care to keep the inner door panel and the oven front frame free of food or grease build-up. Never use rough powder or pads. Wipe the microwave oven inside and out, including the hood bottom cover, with a soft cloth and a warm (not hot) mild detergent solution. Then rinse and wipe dry. Use a chrome cleaner and polish on chrome, metal and aluminum surfaces.
iii!iiii!i!i!!i!i Iii!! ii!i!!i! i!i!i !!ii!!!!!i iiill if! !!!i!!!!iii!il ili!i! i!!i!!!!ii iiiiiiiiiiiii!i!ii!!!!i! !!iii _ii!i!!ii! iii! i¸ii!i!i!ii!i !;iili i!i!! i!ii!! i!iI !ii!!i!i!!i!i !i!!!!iill iiii!i_i_iii!!!!!!!!! iiiiiiiillii!ii!iiiii !!! !!iiiii!i!!i ii!i! iiii ii!i !i!!i!i!!ill !!i Iiii!i!i! iili!i i!ii!ili!i!!iiil;i i!ii!!! ilil !!!i !!i!iii_iii!i !!ii!i !ii!i ii!!!! !!i!!! iI!iii iiiiili!iiiii!i!iiii !!i iiii_i iiiiiiiii!i !¸iIi¸I iii!iiiiiiiii!i!!il Iiiiiii ii!Iii!i!;i _Iii!!!ii iiiii!ii!i
Oven Light replacement 1. Unplug oven or turn off power at the main power supply. 2. Open the door. 3. Remove the vent cover mounting screws. (2 middle screws) 4. Slide the grille to the left, then pull straight out. 5. Remove the screw located above the door near the center of the oven that secures the bulb holder. J J 6. Remove bulb holder. 7. Replace bulb with a 40 watt appliance bulb. 8. Replace the bulb holder. 9. Replace the grille and 2 screws.
Troubleshooting Troubleshooting guide Before you call a repair person for your oven, check this list of possible problems and solutions. • Properly insert the plug into a grounded outlet. • If the outlet is controlled by a wall switch, make sure the wall switch is turned on. • Remove the plug from the outlet, wait ten seconds, then plug it in again. • Reset the circuit breaker or replace any blown fuse.
Contenidos Garantia en Combinacibn Garantia enCombinaci6n ....................... 33 ServicioSears.............................. 34 Contratosmaestrosdeprotecci6n.................. 34 Instrucciones deSeguridadImportantes ............. 35 0btenerlosmejoresresultados decocci6n ........... 39 Pruebadela vajillao losutensilios .................. 39 Oaracteristicas .............................. 40 Especificaciones delhorno........................ 40 Features (Caracteristiques) ........................
Servicio Sears Contratos maestrosdeprotecci6n Felicitaciones perhaberrealizadonnacomprainteligente. Su nuevoproductoKenmore®hasido disenadoy fabricadoparagarantizaranosdefuncionamientoconfiable. Noobstante,al igualquetodos losproductos,esposiblequerequieraun mantenimientopreventivoo reparaci6nen algunas ocasiones. Enesosmomentos,un Contratomaestrode protecci6npuedeahorrarledineroy evitarleinconvenientes. El Contratomaestrode protecci6ntambi6nIo ayudaa extenderlavida Otildesu nuevoproducto.
Instrucciones de Seguridad Importantes Loquenecesitasaber sobrelas instrucciones de seguridad Lasadvertenciase instruccionesimportantessobre seguridadqueaparecenen estaGuiade usoy cuidadono est_ndestinadasa cubrirtodaslasposiblescondicionesy situacionesque puedenocurrir.Debeactuarcon sentido comOn,precauci6ny cuidadocuandoinstale,realiceel mantenimientoo pongaen funcionamientoel microondas.
i¸fill ii!i!ii!i!iii_iiii! ii_ ii!iii!iiil !i!iiiiiiii!ii!iiiiiiiiii!!! !_ iii!iii iiiiii _i_i_i_ii! ii_! _!!!!iiiiii_ iiiiiiilil iii!i!iiii_ii! i!iii!il !ii i iiii!iiiii!i!i!! _!!_ !ii_i!iiiii ii_ !i_i_iiiii iil !i_i i!ii!iill i!i !_!!ili i!ii _i:i_!iiiiiiiill iiiiii!ii_!ii!i!i! i!_i _ii ii!iii !i_i! iiii!i! !!!!_'!iii!!ii! !_i_!_! i!i_ !i_i _ii iil i_i_i'! i!ii!_! _!!! !_iii!iiiiii!i_i_ i!:!_iii ii_ i iiiili'!i!ii_!: _i! _;_iiiii!iiiiiill _ii_ _!!!_!i_ i!_!!iiii_!i_ i!!_i!_!_ii!_il !i_ii ¸_i_:ii_ii!i_i _i
Precaucionesparaevitarla posibleexposici6n a energia de microondas excesiva A. NOintentehacerfuncionarestehornocon la puerta abiertapuessepuedeproducirunaexposici6n perjudiciala la energiade microondas.Esimportante no alterarni modificarlastrabasde seguridad. B. NOcoloqueningenobjetoentrela partedelanteradel hornoy la puertani dejequeseacumulesuciedado residuosde limpiadoresen lassuperficiesde sellado. C. NOpongaen funcionamientoel hornosi est,.dafiado.
USA-MHC4 DE68-03143Q.
Obtener los mejores resultados de coccibn Pruebadela vajillao losutensilios Pruebelavajilla o losutensiliosantesdeusarlos.Paracomprobarqueun platoseaseguro,col6queloenel hornocon unatazadeaguaal lado.Pongaen funcionamientoel hornoduranteun minutoa1100%de lapotenciade cocci6n.Si el platose calienta,no Io use. Algunosplatos(de melamina,de cer_mica,etc.)absorbenlaenergiadel microondas,secalientandemasiadocomopara ser manipuladosy demoranel tiempode cocci6n.
Caracterfsticas Manijade la puerta Ventanaconescudo met_.lico Guiade cocci6n Estantede alambre I 0- Sistemade cierrede seguridadde la puerta Placade modeloy nOmerode serie 1 Paneldecontrol del horno Especificaciones delhomo Potenciade entrada 1650W Frecuencia 2450 MHz Dimensionesexteriores(Anchox Altox Profundidad) 758,8x 427x 406 mm Pesoneto 53.4 Ibs. El estantede alambrele ofreceespacloadicionalcuandococinaen m_.sde un recipientea la vez. 1.
I I ® 41 USA-MHC4 DE68-03143Q.
iiiiiill __!i!ii!_!_i_!i___!_i!i__!_i!_ii!!ii_i_________!:_!i!___!i_!__!_i_!!_i!!!!______ !!!i!!!!ii!!!iiiii!i!ii!!i;!!i!iiii!!i!i!!il ii!i!ii!i!!!i! !!i!iiiiii!iiii!iiii!iiii!ii!iiiiiiiiiiiiiiiiiii!iiii!i!!iiiiii ii!!i!ii!i!!!! iiliii iiiiiiii !;ii!ii!iiiiiiiiiii!ili!il !i! i!!i !ili iil !if!! !!i!ii!iil iiiiiill i!i! iilil _iii i!ii! i!iii i!ii! !!i iiili! !ii!i!!i !!!!i! iiiii ili ii_i _ii !!!ii!ii!iiiiiii!iiiiii!i!ilili!i!!i!i! iiil lil iiiiiii!iii!iiiiiiiii!i!i!i!iiii!!!i !ili iil !i!i!i! iiif! iiiiiii
Manual de Instrucciones Conozca suhornodemicroondas ControlSetup(Configuraci6n de EstasecciOnlosconocimientosb_sicosquedebeconocer paramanejarsu hornode microondas.Porfavor leaesta informaci6nantesde utilizarlo. Controles) Puede modificar los valores predeterminados. Consulte la siguiente tabla para obtener m_s informaci6n. Clock(Reloj) Ejemp/o:Paraportere/re/oj a/as 8:00AM.
i¸fill ii!i!ii!i!iii_iiii! ii_ ii!iii!ii!i ii!!i!i_iiil;iii!'!_!! '!iii!!!!!'!! i_iiii iiiili !iiii:'i '!!_!_i _!iiiiiiiiiii!!_! _iiii!iil !iiiii!_ !_!!_i_i! _iiii ii!iii! _!_!!!iiiiiill ii!i!! '!_! _!i ii!_iiii!_! _!!_!!!_! _!iiiiii!i!!ii iiii_,!_!_i_iiiiii_i !!!! ii!_i_i! _!:! _i_!; !ii_i iii_iiii!ii! i ¸ii!i!iiiiiiiiii_i _!!!!i i̧i_i_i_i !iiill ii_i_i_i !_i!!!iiii ;!iiiiiill i_iii!i!iil iilil iiii_i!:! _!_i!iiiiiii_!_i_!i_i!! _iiiiii!_i!il ii!i _i_ i_i_i _i_! ;!:i 'i!i!iii!ill ii!_ !!!;i _i!i_! iiiiiill
LightTimer(Temporizador de la Pourannulerle light timer(Minuteur Luz) dleclairage) 1. Optima latecla LIGHTTIMER. Puede programar la LUZpara que se encienda y se apague autom_ticamente en cualquier momento. La luz se enciende a la misma hora cada dfa hasta que se reinicia. 2. Oprimaiatecla O. Ejemplo:Se enciendea/as 2:00AM, se apaga a/as 7:00AM. NOTA: 1. Oprimalatecla LIGHTTIMER. 2. Ingresela hora a ia quedeseaquese enciendala LUZ. 3. Oprimala tecla ENTER/START. 4. 0prima 1 paraAM.
i¸fill ii!i!ii!i!iii_iiii! ii_ ii!iii!ii!i ii!!i!i_iiil;iii!'!_!! '!iii!!!!!'!! i_iiii iiiili !iiii:'i '!!_!_i _!ii'iiiiiiiii!!_! _iiii!iil !iiiii!_ !_!!_i_i! _iiii ii!iii! _!_!!!iiiiiill ii!i!! '!_! _!i ii!_iiii!_! _!!_!!!_! _!iiiiii!i!!ii i'iii_,!_!_i_iiiiii_i !!!! ii!_i_i! _!:! _i_!; !ii_i iii_iiii!ii! i ¸ii!i!iii"_iiiiiii_i _!!!!i i̧_i!iiill _i_i_i ii_i_i_i !_i!!!iiii ;!iiiiiill i_iii!i!iil iilil iiii_i!:! _!_i!iiiiii_i_!_i_!i_i!! _iiiiii!_i!il ii!i _i_ i_i_i _i_! ;!:i 'i!i!iii!ill ii!_ !!!;i _i!i_! iii
Cocinarcon cocci6n deunciclode Guiadecocci6nparanivelesde potenciam isbajos Paraobtenermejoresresultados,algunasrecetasrequieren un nivelde potenciaduranteuntiempoy otro nivelde potenciaduranteotrotiempo.Su horno puedeconfigurarse parapasarde unoa otro autom_.ticamente, durantetres cicloscomom_.ximosi el primerciclo de calentamientoes el de descongelamiento. Ejemplo: Paracocinaralimentos durante3 minutos a una potencia de/g0%y/uegoa unapotenciade/70%durante7 minutos 30 segundos.
i¸fill ii!i!ii!i!iii_iiii! ii_ ii!iii!ii!i ii!!i!i_iiil;iii!'!_!! '!iii!!!!!'!! i_iiii iiiili !iiiii'i '!!_!_i _!iiiiiiiiiii!!_! _iiii!iil !iiiii!_ !_!!_i_i! _iiii ii!iii! _!_!!!iiiiiill ii!i!! '!_! _!i ii!_iiii!_! _!!_!!!_! _!iiiiii!i!!ii iiii_,!_!_i_iiiiii_i !!!! ii!_i_i! _!:! _i_!; !ii_i iii_iiii!ii! i ¸ii!i!iiiiiiiiii_i _!!!!i i̧i_i_i_i !iiill ii_i_i_i !_i!!!iiii ;!iiiiiill i_iii!i!iil iilil iiii_i!:! _!_i!iiiiiii_!_i_!i_i!! _iiiiii!_i!il ii!i _i_ i_i_i _i_! ;!:i 'i!i!iii!ill ii!_ !!!;i _i!i_! iiiiiill
PizzaSlice(Rebanadade Pizza) BakedPotato(Papaal Horno) Recalentarpizzacon la funci6nPIZZASLICEle permite recalentarunao variasrebanadas de pizzasin seleccionar lostiemposdecocci6ny losnivelesde potencia. LateclaBAKEDPOTATO le permitehornearunao varias papassin seleccionarlostiemposde cocci6ny losniveles de potencia. Ejemplo: Pararecalentar 2 rebanadas depizza. NOTAS: Optima latecla PIZZASLICE. • El tiempo de cocci6n est,. basadoen unapapade 8-10 oz.
ill'fill ii!i!ii!i!iii_iiii!ii!iii!ii!iii!!i!i_iiil;iii!'!_!!'!i_iiiiiii!!!!!'!! _i!_:_!!_!_i_!_i_i_!!_!_!_i_!i_!_!_!!_i_!_i!_i_!_!_!!!_i_ ii!i!! '!_! _!i ii!_iiii!_! _!!_!!!_! _!iiiiii!i!!ii i'iii_,!_!_i_iiiiii_i !!!! ii!_i_i! _!:! _i_!; !ii_i iii_iiii!ii! i ii!i!iii"_iiiiiii_i_!!!!ii_i!iiill _i_i_i ii_i_i_i !_i!!!iiii ;!iiiiiill i_iii!i!iil iilil iiii_i!:! _!_i!iiiiii_i_!_i_!i_i!! _iiiiii!_i!il ii!i _i_ i_i_i _i_! ;!:i 'i!i!iii!ill ii!_ !!!;i _i!i_! iiiiiill i¸_i'ii! _!_ !;i !iii! _i_ ii_i _i_iii:iiii!_ii
Palomitasde maiz Utilices61ounabolsaparamicroondasde palomitasde maizalavez.Tengacuidadocuandosaquey abralabolsacalientedelhorno.Dejeenfriarelhomo durantealmenos5 minutosantesde utilizarlo nuevamente. 3.0 a 3.5 oz. 1 paquete. Papa Pinchecadapapavariasvecescon un tenedor.Col6quelasenel platogiratorioal estilode losrayos de unarueda. D6jelasreposar3-5 minutos.Dejeenfriarel homo duranteal menos5 minutosantesde utilizarlo nuevamente.Utilicela teclaMore(9)cuandococinepapasm_sgrandes.
i¸fill ii!i!ii!i!iii_iiii! ii_ ii!iii!ii!i ii!!i!i_iiil;iii!'!_!! '!iii!!!!!'!! i_iiii iiiili !iiii:'i '!!_!_i _!ii'iiiiiiiii!!_! _iiii!iil !iiiii!_ !_!!_i_i! _iiii ii!iii! _!_!!!iiiiiill ii!i!! '!_! _!i ii!_iiii!_! _!!_!!!_! _!iiiiii!i!!ii i'iii_,!_!_i_iiiiii_i !!!! ii!_i_i! _!:! _i_!; !ii_i iii_iiii!ii! i ¸ii!i!iii'_iiiiiii_i _!!!!i i̧i_i_i_i !iiill ii_i_i_i !_i!!!iiii ;!iiiiiill i_iii!i!iil iilil iiii_i!:! _!_i!iiiiii_i_!_i_!i_i!! _iiiiii!_i!il ii!i _i_ i_i_i _i_! ;!:i 'i!i!iii!ill ii!_ !!!;i _i!i_! iiii
Soften/Melt(Suavizar/Derretir) SOFTEN/MELTlepermite ablandar o derretir 3 categorias de alimentos: Derretir chocolate,Ablandar queso crema y Derretir manteca. Ejemplo: Paraderretirchocolate. 1. Optimala teclaSOFTEN/MELT (SUAVIZAR/DERRETIR). Derretirchocolate 1 2. Elijala categoriade alimento (1-3). Suavizarquesocrema 2 Derretirmantequilla 3 3. Oprimala tecla ENTER/START (INGRESAR/COMENZAR).
i¸fill ii!i!ii!i!iii_iiii! ii_ ii!iii!ii!i ii!!i!i_iiii_iii!'!_!! '!iii!!!!!'!! i_iiii iiiili !iiii:'i '!!_!_i _!ii'iiiiiiiii!!_! _iiii!iil !iiiii!_ !_!!_i_i! _iiii ii!iii! _!_!!!iiiiiill ii!i!! '!_! _!i ii!_iiii!_! _!!_!!!_! _!iiiiii!i!!ii i'iii_,!_!_i_iiiiii_i !!!! ii!_i_i! _!:! _i_!_ !ii_i iii_iiii!ii! i ¸ii!i!iii"_iiiiiii_i _!!!!i i̧_i!iiill _i_i_i ii_i_i_i !_i!!!iiii _!iiiiiill i_iii!i!iil iilil iiii_i!:! _!_i!iiiiii_i_!_i_!i_i!! _iiiiii!_i!il ii!i _i_ i_i_i _i_! _!:i 'i!i!iii!ill ii!_ !!!_i _i!i_! iii
AutoDefrost(Descongelamiento Autom tico) Las opciones de descongelamiento est_.nprogramadas en el horno. La funci6n de descongelamiento le ofrece el mejor m6todo de descongelamiento para alimentos congelados, dado que el horno configura autom_ticamente los tiempos de descongelamiento de acuerdo con el peso que usted ingresa.
i¸fill ii!i!ii!i!iii_iiii! ii_ ii!iii!ii!i ii!!i!i_iiii_iii!'!_!! '!iii!!!!!'!! i_iiii iiiili !iiiii'i '!!_!_i _!iiiiiiiiiii!!_! _iiii!iil !iiiii!_ !_!!_i_i! _iiii ii!iii! _!_!!!iiiiiill ii!i!! '!_! _!i ii!_iiii!_! _!!_!!!_! _!iiiiii!i!!ii iiii_,!_!_i_iiiiii_i !!!! ii!_i_i! _!:! _i_!_ !ii_i iii_iiii!ii! i ¸ii!i!iiiiiiiiii_i _!!!!i i̧i_i_i_i !iiill ii_i_i_i !_i!!!iiii _!iiiiiill i_iii!i!iil iilil iiii_i!:! _!_i!iiiiiii_!_i_!i_i!! _iiiiii!_i!il ii!i _i_ i_i_i _i_! _!:i 'i!i!iii!ill ii!_ !!!_i _i!i_! iiiiiill
Guiadecocci6n • Coloquela carnesobreunaasaderaparamicroondasen unafuenteparamicroondas. • Comiencea cocinarla carneconel ladede la grasahaciaabajo.Utilicetirasfinas de papelde aluminioparaproteger cualquierpuntade huesoo Areadecarnedelgadas. • Controlelatemperaturaenvaries lugaresantesde dejarreposarla carneel tiemporecomendado. Alta(10) durantelos primeros5 minutes, luegomedia(5) Coloqueelladede la grasahaciaabajoenla asadera. Cubracon papelde cera.D6vueltaala mitad delciclo de cocci6n.
i¸fill ii!i!ii!i!iii_iiii! ii_ ii!iii!ii!i ii!!i!i_iiii_iii!'!_!! '!iii!!!!!'!! i_iiii iiiili !iiii:'i '!!_!_i _!iiiiiiiiiii!!_! _iiii!iil !iiiii!_ !_!!_i_i! _iiii ii!iii! _!_!!!iiiiiill ii!i!! '!_! _!i ii!_iiii!_! _!!_!!!_! _!iiiiii!i!!ii iiii_,!_!_i_iiiiii_i !!!! ii!_i_i! _!:! _i_!_ !ii_i iii_iiii!ii! i ¸ii!i!iiiiiiiiii_i _!!!!i i̧i_i_i_i !iiill ii_i_i_i !_i!!!iiii _!iiiiiill i_iii!i!iil iilil iiii_i!:! _!_i!iiiiiii_!_i_!i_i!! _iiiiii!_i!il ii!i _i_ i_i_i _i_! _!:i 'i!i!iii!ill ii!_ !!!_i _i!i_! iiiiiill
Utensilios para Cocinar Guiadeutensiliosparamicroondas UTILICE VIDRIORESISTENTE ALHORNO (tratadopara calordealtadensidad): Piatosde usogeneral,piatosparapastelde carne,platosparatartas,platosparatortas,tazas paramedir liquidos,cacerolasy bolssinadornos met_licos. LOZA: Bols,tazas,platosdeserviry bandejassin adornosmet_licos. PLASTICO: Envoltoriopl_stico(comopor ejemplotapas)-coloqueelenvoltoriopl_sticosin apretarsobrela fuentey presi6nelohacialoslados.
Cuidado y Limpieza Nuncapongaenfuncionamientoel hornosin alimentos dentro;estopuededanareltubo de magnetr6no la bandejade vidrio. Puededejarun vasodeaguaen el hornocuandono se useparaevitardafiosen casode que el hornose enciendaaccidentalmente. Cuidadoy limpieza Paraun mejordesempefioy mayoseguridad,mantengael hornolimpio por dentroy por fuera. Presteespecialcuidadoparaqueel panelinteriorde la puertay el marcodelanterodel hornose mantenganlimpios y sin acumulaci6nde restosde alimentoso grasa.
Reemplazodelfiltrodecarb6n Si su hornotieneventilaci6nhaciael interior,el filtro de carb6ndebereemplazarse cada6 a 12 meses,y m_.sa menudosi es necesario.El filtro de carb6nno sepuede limpiar. Reemplazodela luzdela cubierta/luznocturna Elfiltro de carb6nest,.disponibleenSearssi llamaal 1800-4-MY-HOME® o visitasears.com. 1. Desenchufeel hornoo corte la energiael6ctricadel suministroprincipal. 2. Abrala puerta. 3. Retirelos dostornillosde montajede la rejilla de ventilaci6n.(2 tornillos del medio) 4.
i¸fill ii!i!ii!i!iii!iiii! iiI ii!iii!ii!i ii!!iiiiiill iiiii!:i!i!ill !if!if! iiiiiiill i!!!!:ili!iiiill iii i!i!! iiiii!i!iiii!ii!iiiii!iiiii!i!i!!i!!iiiii!il ill ii!!!!! !!!i!iiiill iii iiii!iiii!iiiiiiiiiiii!i iilili i!i!!!i ii! i:ii!ii!!i!iii iilili!iiii!i! !!iiiiii!ilil ii! iiiiil !iiiiiii! i!ii !if!i!!! ii!iiii! iii i!!iiii !!!i!! !il;iiiiiiii i!iil iii! iiii!iiiiii iiii!i!! ¸iiii!iil ¸iii iiiiiill !!i!i iiii!i! !i! !!!ii!i :iili iii ili! i!!!i iiii iiiii!! i!!i !!i ii!i!i! il;ii!ii!i !!ii! ii!!iil !
Solucibn de Problemas GuiadesoluciCndeproblemas Antesde Ilamara untCcnicoparasu horno,verifiqueesta listade posiblesproblemasy soluciones. • Insertecorrectamente el enchufea un tomacorrienteconectadoa tierra. • Si el tomacorrienteest_controladopor un interruptorde pared,aseg0resede queel interruptorde paredest6 encendido. • Retireel enchufedeltomacorriente,esperediezsegundosy vuelvaa enchufarlo. • Reinicieel disyuntoro reemplacecualquierfusible quemado.
Your Home For repair - in your home - of all major brand appliances, lawn and garden equipment, or heating and cooling systems, no matter who made it, no matter who sold it! For the replacement parts, accessories and owner's manuals that you need to do-it-yourself. For Sears professional installation of home appliances and items like garage door openers and water heaters. 1-800-4-MY-HOME ® (1-800-469-4663) Call anytime, day or night (U.S.A.) www,sears,com For expert home so/utions advice: www.managemyhome.