e Estufa el ctrica Modelos deslizables % 5,:t_q 5::t r _r'_ ......... * .................. ,.<_U,...,.,b_" y CI._ Models, Modelos 790.4676-,-, 790.46785 .,. = Color number, namero de color Sears Roebuck www.sears.com and Co., Hoffrnan Estates, IL 60179 U.S.A.
Table of Contents Control Pad Functions .................................................. 11 Setting Oven Controls .............................................. 12=17 Adjusting the Oven Temperature ................................. 17 Self Cleaning ............................................................. 18-19 General Care & Cleaning ......................................... 20=24 Before you call .......................................................... 25=26 Protection Agreements ..................
important Safety instructions Read all instructions before using this appliance. Save these instructions for future reference. This manual contains many important safety messages. Always read and obey all safety messages. The safety symbol _ calls your attention to safety messages that inform you of hazards that can kill or hurt you or others, or cause damage to the product. Indicates an imminently hazardous situation which, if not avoided may result in death or serious injury.
important Safety instructions When heating fat or grease, watch it closely. Fat or grease may catch fire if allowed to become too hot. Glazed cooking utensils--Only certain types of glass, glass/ceramic, ceramic, earthenware, or other glazed utensils are suitable for rangetop service without breaking due to the sudden change in temperature. Check the manufacturer's recommendations for cooktop use. Use only dry potholders--Moist or damp potholders on hot surfaces may result in burns from steam.
important Safety instructions Placement of oven/warmer drawer (if equipped) Racks. Always place oven racks in desired location while oven/warmer drawer (if equipped) is cool. If rack must be moved while oven is hot use extreme caution. Use potholders and grasp the rack with both hands to reposition. Do not let potholders contact the hot heating elements in the oven/warmer drawer (if equipped). Remove all utensils from the rack before moving. Do not use your broiler pan without its insert.
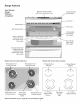
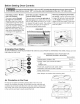
Range features Your Electric Electronic Oven Controls with Clock and Kitchen Timer Range Features Surface Element Knob At a glance Oven Vent Broil Element Oven Light Self-Cleaning Oven (2) Adjustable Oven Racks with Handle Glass or Stainless Steel Front Oven Door (Style varies with model) Door Handle (Style varies with model) Storage Drawer with Integrated Handle or Stainless Steel Handle (style varies with model) Models with Coil Surface Elements Removable 8" Coil Surface Element Removable 6" Coil
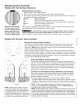
Setting Surface Controls Models with Coil Surface Elements Setting Note: The size and type of utensil used, and the amount and type of food being cooked will influ= ence the setting needed for best cooking results. Models with Ceramic f---\ \ Figure 1 Surface Controls 1. Place the pan on the surface element. 2. Push in and turn the surface element control knob to desired setting. 3. The surface signal light will glow when one or more elements are turned on.
Setting Surface Controls Models with Ceramic Surface Cooking (cont'd) Glass Cooktop (cont'd) Radiant Settings Use the chart (Figure 1) to determine the correct setting for the kind of food you are preparing. The Simmer settings are used to simmer and keep larger quantities of foods warm such as stews and soups. The lower Simmer settings are ideal for delicate foods and melting chocolate or butter. Note: The size and type of cookware used will influence the setting needed for best cooking results.
Setting Surface Controls Models with Ceramic Glass (cont'd) Cooktop (cont'd) Operating the Dual Surface Radiant Element The cooktop is equipped with two dual radiant surface elements located at the right and left front (See Figure 2 & 4) position. "Single and Multi on the control knob are used to indicate which coil of the dual radiant element will heat. "Single" indicates that only the inner coil will heat (Figures 1 & 2). "Multi" indicates that both inner and outer coils will heat (Figures 3 & 4).
Before Setting Oven Controls This range has a fan that will turn "ON" and "OFF" by itself to keep the electronics cool. it may continue to run after the range has been turned "OFF", but may also stop immediately and then turn "ON" after a while. Oven Vent Location - Models with Coil Elements Oven Vent Location - Models with Ceramic Glass Cooktop The oven is vented through the right rear coil element. When the oven is on, warm air is released through the vent(s).
Control Pad Functions Note: The appearance of your oven control may differ slightly from the one illustrated below. However, all functions are the same. Also, push buttons or pads may be shaped differently than those appearing in this Use and Care Guide. READ THE INSTRUCTIONS CAREFULLY BEFORE USING THE OVEN. For satisfactory use of your oven, become familiar with the various functions of the oven as described below.
Setting Oven Controls Note: The time of day must first be set in order to operate the oven. To Set the Clock When the range is first plugged in, or when the power supply to the range has been interrupted, the display will flash "12:00". 1. Press _) pad once (do not hold pad down). 2. Within 5 seconds, press and hold the A orV pad until the correct time of day appears in the display. Note: The clock cannot be changed during any timed bake or Self-Clean cycle. To Set the Timer: 1. Press 2. 3. 4. pad.
Setting Oven Controls To Set or Change (cont'd) the Temperature for Baking The oven can be programmed to bake at any temperature from 170°F to 550°F (77°C to 287°C). To Set the Controls for Baking: 1. Press B;_ke pad." "appears in the display. 2. Within 5 seconds, press the j%. or V pad. The display will show "350°F (177°C) ''. By pressing and holding thej_ or V pad, the temperature can then be adjusted in 5°F increments (1°C if the control is set to display Celsius). 3. As soon as the _%.
Setting Oven Controls To Set the Timed (cont'd) Bake and Delay Start Features The COOK TIME and DELAY START pads operate the features that will turn the oven ON and OFF at the times you select in advance, The oven can be programmed to start immediately and shut off automatically (Timed Bake) or to begin baking at a later time with a delayed start time (Delay Start), To Program the Oven to Begin Baking Immediately and To Shut Off Automatically (Timed Bake): 1. 2.
Setting Oven Controls Oven Baking (cont'd) information For best results, preheat the oven before baking cookies, breads, cakes, pies or pastries, etc. There is no need to preheat the oven for roasting meat or baking casseroles. The cooking times and temperatures needed to bake a product may vary slightly from your previously owned appliance. Refer to "Adjusting the Oven Temperature" section.
Setting Oven Controls (cont'd) Not supplied with appliance To Set for Broiling: Note: For optimum browning results when broiling, preheat the broil element for 3 to 4 minutes. 1. Arrange the oven rack while oven is still cool. Position the rack as suggested in the Broil Rack Position Table below. 2. Press _ro_i pad." 3. Press and hold the ._ display. Press the A "will appear in display. or V pad until the desired broil setting level appears in the pad for HI broil or the V pad for LO broil.
Setting Oven Controls Setting the Warm & Hold TM (cont'd) Feature The wa _,:_ pad turns ON the Serve Warm & Hold feature and will maintain an oven temperature of 170 ° F (77°C). The Warm & Hold feature will keep oven baked foods warm for serving up to 3 hours after cooking has finished. After 3 hours the Warm & Hold feature will shut the oven OFF automatically.
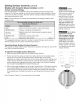
Self-Cleaning During the Self-Cleaning cycle, the outside of the range can become very hot to the touch. DO NOT leave small children unattended near the O I (Z) I CookTime ® ® ® . Bake I BroW, OVEN appliance. SelectcleanI Set/Off Timer I Start Delay ..PREHEAT DOOR LOCKED [_ (_ _ The health of some birds is extremely sensitive to the fumes given off during the Self-Cleaning cycle of any range. Move birds to another wellventilated room.
Self-Cleaning Self-Clean Time (cont'd) Length For satisfactory results, use a 2 hour Self-Clean cycle for light soils, a 3 hour cycle for average, and a 4 hour cycle for heavy soils.
General Care & Cleaning Cleaning Various Parts of Your Range Before cleaning any part of the range, be sure all controls are turned OFF and the range is cool. Remove spillovers and heavy soiling as soon as possible. Regular cleanings now will reduce the extent and difficulty of major cleaning later. Surfaces Aluminum & Vinyl Control Panel and Trim Pieces How to Clean Use hot, soapy water and a cloth. Dry with a clean cloth.
General Care & Cleaning Models with Coil Surface Porcelain Enamel Cooktop (cont'd) Elements Cleaning instructions Do not use a cooktop cleaner on a hot cooktop. The fumes can be hazardous to your health, and can chemically damage the cooking surface. Before cleaning the surface cooktop, be sure the controls are turned to OFF and the cooktop is cool. DO NOT use commercial oven cleaners on the exterior surfaces including rangetop and door frame.
General Care & Cleaning Models with Coil Surface (cont'd) Elements (cont'd) To Raise the Top for Cleaning ............ _ 1. 2. 3. .... _. _rame. When lowering the lift-up range top, grasp the sides with fingertips only. Be careful not to pinch fingers. DO NOT drop or bend the range top when raising or lowering. A rod swings up to support the top for cleaning underneath. This could damage the surface. Models with Ceramic Ceramic .... Glass Grasp the sides and lift from the front.
General Care & Cleaning Models with Ceramic Glass (cont'd) Cooktop (cont'd) Do not use the following on the ceramic glass cooktop: • Do not use abrasive cleaners and scouring pads, such as metal and some nylon pads. They may scratch the cooktop, making it more difficult to clean. • Do not use harsh cleaners, such as chlorine bleach, ammonia or oven cleaners, as they may etch or discolor the cooktop.
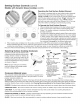
General Care & Cleaning Removing and Replacing (cont'd) the Lift-Off Oven Door The door is heavy. For safe, temporary storage, lay the door fiat with the inside of the door facing down. Door Hinge locations with oven door fully open Fig. 1 Fig. 2 Oven To Remove Oven Door: 1. Open oven door completely (horizontal with floor - See Fig. 1). 2. Pull the door hinge locks on both left and right door hinges down from the oven frame completely towards the oven door (See Fig. 2).
Before you call Solutions to Common Problems Before you carl for service, review this list. It may save you time and expense. The list includes common occurrences that are not the result of defective workmanship or materials in this appliance. OCCURRENCE POSSIBLE CAUSE/SOLUTION Oven Control Beeps and Displays any F code error (example F11). Electronic control has detected a fault condition. Press STOP to clear the display and stop the beeping. Reprogram the oven.
OCCURRENCE POSSIBLE CAUSE/SOLUTION Drip bowls turning color or distorted out of shape, Bottom surface of cookware extends beyond surface elements and touches cooktop surface. This can cause high enough temperatures to discolor the drip bowls. DO NOT use cookware of this type. Pan sizes should be matched to the size of the element. Replacement drip bowls may be purchased from Sears Parts & Repair. Surface elements not seated properly in terminal.Turn control to OFR Be sure surface element is COOL.
PROTECTION AGREEMENTS Master Protection Agreements Acuerdos Congratulations on making a smart purchase. Your new Kenmore®product is designed and manufactured for years of Enhorabuena por haber hecho una compra inteligente. Su nuevo producto Kenmore®esta diseSado y fabricado para brindarle aSos de funcionamiento fiable. Pero, como cualquier producto, puede necesitar mantenimiento preventivo o reparaciones peri6dicas.
Your Home For expert troubleshooting and home solutions advice: www.managemyhome.com For repair - in your home - of all major brand appliances, lawn and garden equipment, or heating and cooling systems, no matter who made it, no matter who sold it! For the replacement parts, accessories and owner's manuals that you need to do-it-yourself. For Sears professional installation of home appliances and items like garage door openers and water heaters.