Use & Care Guide Manual de Uso y Cuidado English / Español Model/Modèle: 790-4942*, 790-4940* Kenmore Electric Built-In Oven ® Horno de pared doble * = color number, número de color P/N 139900101 Rev. A Sears Brands Management Corporation Hoffman Estates, IL 60179 U.S.A. www.kenmore.com www.sears.com Sears Canada Inc. Toronto (Ontario) Canada M5B 2B8 www.sears.
Table of Contents Please carefully read and save these instructions ............................... 2 Kenmore Limited Warranty ..................................................................... 2 Before Setting Oven Controls ...................................................................... 7 Oven vent location ..................................................................................... 7 Oven Controls ..........................................................................................
IMPORTANT SAFETY INSTRUCTIONS Read all instructions before using this appliance. Read all instructions before using this appliance. This manual contains important safety symbols and instructions. Pay attention to these symbols and follow all instructions given. Do not attempt to install or operate your appliance until you have read the safety precautions in this manual. Safety items throughout this manual are labeled with a WARNING or CAUTION statement based on the hazard type.
IMPORTANT SAFETY INSTRUCTIONS Read all instructions before using this appliance. Stepping, leaning, or sitting on the door or drawers of an oven can result in serious injuries and also cause damage to the appliance. Do not allow children to climb or play around the oven. The weight of a child on an open over door may cause the oven to tip, resulting in serious burns or other injury.
IMPORTANT SAFETY INSTRUCTIONS Read all instructions before using this appliance. • Do not use a broiler pan without its insert. • Do not attempt to operate the oven Broiler pans and inserts allow dripping fat during a power failure. If the power fails, to drain away from the high heat of the always turn off the oven. If the oven is not broiler. Do not cover the broiler insert with turned off and the power resumes, the aluminum foil; exposed fat and grease oven will begin to operate again.
IMPORTANT SAFETY INSTRUCTIONS Read all instructions before using this appliance. this appliance for complete installation and SELF-CLEANING OVENS grounding instructions. • Clean only the parts listed in this manual. DO NOT TOUCH HEATING Before using self-clean, remove the broiler ELEMENTS OR INTERIOR SURFACES OF pan, any food, utensils, and bakeware OVEN - Heating elements may be hot even from the oven. Remove oven racks unless though they are dark in color. Interior otherwise instructed.
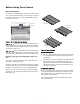
Before Setting Oven Controls Oven vent location The oven vent is located under the control panel. When the oven is on, warm air passes through this vent. This venting is necessary for proper air circulation in the oven and good baking results. Do not block oven vent. flat oven rack oven vent location flat handle oven rack Figure 1: Do not block oven vent location Protective Liners — Do not use aluminum foil to line the oven bottom. Only use aluminum foil as recommended in this manual.
Oven Controls 11 1 5 2 6 3 7 10 9 13 4 8 14 12 Oven Control Features 1. Minimum and Maximum Control Settings Timer Set-Off - Use to set or cancel the timer. All of the features listed have minimum and maximum time and temperature settings that may be entered into the control. An entry acceptance beep will sound each time a key is touched (the Oven Lockout tone is delayed by 3 seconds).
Oven Controls Setting the Clock Add 1 Minute When the appliance is first powered on, 12:00 will flash in the display (See Figure 3). The time of day must first be set before operating the oven. Use the Add 1 Minute key to set additional minutes to the timer. Each press of the key will add 1 additional minute. If the Add 1 Minute key is pressed when the timer is not active, the timer will activate and begin counting down from 1 minute. To add 2 minutes to the timer: Press Add 1 Minute twice.
Oven Controls Changing Oven Temperature Display Setting Oven Lockout The oven control is preset to display temperatures in Fahrenheit (°F) when shipped from the factory. The control can be changed to display either (°F) or Celsius (°C). The control may be programmed to lock the oven door and lock the oven control. To change the temperature to display °C or °F: To activate the oven lockout features: 1. 1. Press and hold Broil for 6 seconds. 2. Press and hold for 3 seconds (see Figure 12).
Oven Controls Setting Bake Use the bake feature whenever the recipe calls for baking using normal temperatures. A reminder tone will sound indicating when the set bake temperature is reached and to place the food in the oven. 5 Bake may be set for any oven temperature between 170°F (77°C) and 550°F (288°C). 3 To set Bake with default temperature of 350°F: 2 1. 1 4 Press Bake. 2. Press . To cancel Bake at anytime, press . To set Bake for oven temperature of 425°F: 1. Press Bake.
Oven Controls Setting Delay Start Warm & Hold™ The Delay Start feature delays starting time to oven cooking or cleaning functions. Prior to setting a delay start, be sure the time of day is set correctly. Warm & Hold will keep cooked foods warm and ready for serving for up to 3 hours after cooking has finished. After 3 hours, the Warm & Hold will shut-off automatically. Warm & Hold should only be used with foods that are already at serving temperatures.
Oven Controls Setting Broil To set Broil with the default broil oven temperature of 550°F: Use the Broil function to cook meats that require direct exposure to radiant heat for optimum browning results. The Broil feature is factory preset to broil at 550°F. The Broil function temperature may be set at any temperature between 400°F (205°C) and 550°F (288°C). 1. Arrange the oven racks when cool. For optimum browning results, preheat oven for 2 minutes before adding food. 2. Position bakeware in oven. 3.
Oven Controls Adjusting Oven Temperatures Restoring Factory Default Settings Your appliance has been factory calibrated and tested to ensure accurate baking temperatures. For the first few uses, follow your recipe times and temperature recommendations carefully. If you think the oven is cooking too hot or too cool for your recipe times, you may adjust the control so the oven cooks hotter or cooler than the oven temperature displayed.
Oven Controls To program oven to Bake with default oven temperature of 350°F and activate the Sabbath feature: Setting the Sabbath Feature (for use on the Jewish Sabbath and Holidays) 1. For further assistance, guidelines for proper usage, and a complete list of models with the Sabbath feature, please visit the web at: star-k.org Be sure the clock is set with the correct time of day. 2. Arrange oven racks, place bakeware in oven, and close oven door. 3. Press the Bake key. 4.
Oven Controls To turn the oven off and keep the Sabbath feature active: Press . To turn off the Sabbath feature: Press and hold both Cook Time and Delay Start keys simultaneously for at least 3 seconds to turn the Sabbath feature off. The control will provide an acceptance tone, and SAb will disappear from the display. The oven is no longer programmed for the Sabbath feature.
Oven Controls tomatoes, sauerkraut, fruit juices, or pie filling) to remain on the surface because they may leave a dull spot even after cleaning. Self Clean A self cleaning oven cleans with very high temperatures well above normal cooking temperatures. The high temperature eliminates soils completely or reduces them to a fine powdered ash you can wipe away afterwards with a damp cloth. • The Self Clean function allows you to set a cleaning time from 2 hours to 4 hours.
Oven Controls message to appear (See Figure 22). When this message turns off, the oven may be opened. 3. Before restarting Self Clean, be sure to read important notes below. Important note: Figure 22: Hot (L) and door OPn (R) • When Self Clean is active, you may check the amount of clean time remaining by pressing the Self Clean key once.
Care and Cleaning Cleaning Various Parts of Your Oven Before cleaning any part of the oven, be sure all controls are turned off and the oven is cool. Remove spills and any heavy soiling as soon as possible. Regular cleaning will reduce the difficulty and time of major cleaning later. Surface Type Recommendation Aluminum and Vinyl Use hot, soapy water and a cloth. Dry with a clean cloth.
Care and Cleaning Removing and Replacing the Oven Door The door is heavy. For safe, temporary storage, lay the door flat with the inside of the door facing down. Oven door hinge locations To remove the oven door: 1. Open oven door completely, horizontal with floor (See Figure 23). 2. Pull the door hinge locks on both left and right door hinges down from the oven frame completely toward the oven door (See Figure 24). A tool such as a small flat-blade screwdriver may be required.
Care and Cleaning Replacing the oven light Be sure the oven is unplugged and all parts are cool before replacing oven light. The interior oven lights are located at the rear of the oven cavity and are covered with a glass shield. The glass shield must be in place whenever the oven is in use (See Figure 27). To replace the oven interior light bulb: 1. Turn electrical power off at the main source. 2. Remove interior oven light shield by turning a quarter turn counter-clockwise. 3.
Before You Call Oven Baking For best cooking results, heat the oven before baking cookies, breads, cakes, pies or pastries, etc. There is no need to preheat the oven for roasting meat or baking casseroles. The cooking times and temperatures needed to bake a product may vary slightly from your previously owned appliance. Baking Problems and Solutions Baking Problems Causes Cookies and biscuits burn on • the bottom. Cookies and biscuits put into oven before the preheating time is completed.
Before You Call Solutions to Common Problems Before you call for service, review the following list. It may save you time and expense. Possible solutions are provided with the problem listed: Problem Solution Poor baking results • Many factors effect baking results. Use proper oven rack position. Center food in the oven and space pans to allow air to circulate. Preheat oven to the set temperature before placing food in the oven. Try adjusting the recipe's recommended temperature or baking time.
Before You Call 24