CONTENTS SAFETY PRECAUTIONS: AVOIDIHG POSSIBLE EXPOSURE MICROWAVE ENERGY FEATURES OF YOUR/OVEN MICROWAVE Control TO OVEN ........................................................................................... 7 Timer, Using e Hold Time ...................................................... 8 To Time Delrost, Hold and Cook .................................. 8 Microwave Time Cooking .................................................... 9 Defrosting by Time, Auto Delrost, Stand Time ........
SAVE Read all instructions appliances, basic safety before THESE INSTRUCTIONS using th_s appliance. precautions should be followed, When using electrical including the following: Teach children notto play with oven knobs or any other part of the oven. Hever store things above an oven. Never leave children alone or unattended where an oven is in use. Never let anyone climb, sit or stand on the open door or any other part of the oven. ;!e:; er leave the oven door open when you _.
Toi insure safety for yourself and your home, please Ca_efuiiyl Keep it handy for quick easy reference. safety sections looking for the of your manual. A symbol read your Owner's Pay close attention You can recognize the safety Manual to the sections by or the word "Safety". Never" use your oven for warming or heating a room. You could be burned or seriously injured. Such misuse could aIso cause damage to the oven. Always keep the oven area clear and flee from things that will burn.
Read all instructions BEFORE using this appliance. De no_ block oven vent area. Wh_ using electrica_ appliances, basic safety precautions should be followed, including the followtn_; Ke_p oven free from grease buildup Keep clean t_ maintain good vent!ng and to avoid grease fires. _lways use this appliance only for its intended use as described in lhis manual.
SAVE THESE IINSTRUCT_ONS IMPORTAHT SAFETY NOTICE The California Safety Drinking Water and Toxic Enforcement Act requires the governor of California to publish a list of substances known to the state to cause birth defects or other reproductive harm and requires businesses to warn customers of potential exposure to such substances. The fiberglass insulation in self-clean ovens gives off a very small amount of carbon monoxide during the cleaning cycle.
mlcrowave e_.ergy, ttcan c_eatee_ectr_ca_ a_c_ngIn_h_ oven and d_mage the oven walls. Wh_= hea_!ng pac_ag.=d foods, a_w_ys place them on a microwave proof dish. Examples are microwave French fries or microwave popcorn. ._NO|D h_a_ing baby food in glass jars, even wt_hou'i their lids; especially meat _nd egg mixtures. be NOT deep fa_ fry In your microwave. safe procedure In the confined cavity.
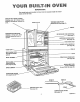
Y@ LTo OVEN IMPORTANT: The model and serial wave on the left wall. WINDOW WITH METAL SHIELD Cooking can be viewed while keeping microwaves confined to oven° number of your oven is located Inside the micro- TEMPERATURE PROBE RECEPTACLE (See page 12) DOOR LATCH GRILLE MICROWAVE OVEN DOOR HANDLE, PuJI to open. Door must be latched for oven to MICROWAVE operate. OVEN CONTROLS (See page 7) MICROWAVE OVEN SHELF .__.-.--(See page 19) - OVEN VENTAREA .LOWER OVEN CONTROLS (Seepage20) ....
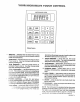
MICROWAVE OVEN ][ D RosTj [DEFROST cook HOLD % Pow1[. .o o Kenmore 1, DOSPLAY .-- Displays time or temperature during cooking functions, power level belng used, cooking mode and Instructions. 2 TIM7 COOK-- Pressto microwave using automatic Power Level 10. You may change power level after entering cooklng time. 3 TIME DEFROST -- Press for gentle thawing at automati¢ Power Level 3. You may change power Ievel after entering defrosting time. _'£_t,) _OOf(!HOLD -- Use the temperature probe _o c_ck.
THE HOLD HOW TO TIME COOK TIMER The HOLD TIMER has three timing functions: DEFROST, HOLD AND TiME • It can be set as a minute timer° 1_ Press TiME • It can be set as a holding time after defrosting. 2, Press number pads to set defrosting time. (Defrosting Is automatically set on power level 3 but can be changed by touching the POWER CONTROL pad and the desired power level.) = Press HOLD TI_ER. It can be set to delay cooking_ The HOLD TIMER operates without microwave energy.
Power level 10 will _ displayed. power level as descr!bed above. The time cooking feature altows you to preset the cooking time. The oven shuts off automat:Ca!ly at the end of the cooking time. If desired, chang_ 4. Press number pads to set second cook!rig time. Power }eve_ 10 (High) is recommended for most cock° tng, but you may change thls for more flexibility. 1. Press T_JE COG_;. 5. Press START. i % COOk IME 2. Press number pads to enter cooking time.
DEFROST|NG • BY TIM Power Level 3 Is automatlcally set for defrosting, you may change this for more flexibility. Q. Should all foods be completely cooktng? but A° Some foods should not be completely thawed before cooking. For example, fish sticks should stll[ be slightly frozen. • See your cookbook for defrosting help. 1. Press TIME DEFROST_ 2. Press number pads to set 1/2 of defrosting time in the cookbook.
CONVERSION GU|D_ If welght of food Is stated in pounds and ounces, the ounces must be converted ! 1 ! I ..............................L.... l CODE ! ,_- ! k----k---- ....... .__£_s ................................. MIN..MACL RECOMMENDED ; to tenths (.1) of a pound. WEIGHT FOODS FIRST SIGNAL , SECOND j 12.-I3 .8 14-_5 .,,q € SIGNAL Separate and _-htetdwhere necessary. 5 mlnute_. Seperl;te,, Remove datros_d pieces minutes Turn over. Remove defrosted areas and break s1_rt.
TEMPERATURE Internal temperature for many foods, COOKING "PROBE" will flash if you do not seat the cable end of the probe securely into the receptacle In the oven wall or If you touch AUTO ROAST and forget to use the probe° is the best test of doneness Temp Cook/Hold takes the guesswork out of cooking because the oven automatically switches to "HOLD" setting after reaching the preset food temperature until you open the door or touch CLEAR/OFF.
TO SET AUTO ROAST 1. Press AUTO ROAST. "AUTO"and "TEMP" appear on display and "ENTER CODE" flashes, 2. Press number pad to set Auto Roast Code, See Auto Roast Guide. 3. Press START. Display shows "COOL"and"CODE" until Food temperature reaches 8O°FoAt 80°F,dtsplay switches to show moat's Internal temperature. 4. When you select Auto Roast Codes 1,2, 3, or 4, th_ oven signals with 4 beeps and "TURN" flashes on the display when it's time to turn the roast over.
TO SET AUTO COOK TO ADJUST 2. Press number pad of desired Code. See chart on next page. 3. Press START. 1_ The word "AUTO" appears on the display and the sensor is activated to sense steam from food. CLOSED 34 Do not open the oven door while "AUTO" is displayed. Steam escaping from the oven can affect cooking performance. If the door is opened, "ERROR" appears. Close the door and press START immediately° AUTOMATIC COOKING CODES Press AUTO COOK.
AUTOMATIC COOKING CONTROL GUIDE Do not open oven door during Auto cycle° When oven signals and countdown time is displayed, door may be opened for stirring, turning or rotating food. To resume cooking, close door and touch START. tightly to ensure even cooking. Be sure outside of container and inside of oven are dry. tf food needs additional cooking, return to oven and use Auto Cook Code 1. Match the amount of food to the slze of container. Fill containers at least 1/2 full.
AUTOMAT|C COOKJHG CONTROL "Auto Cook" Code Food GUIDE App,ox.Ti e t Container Comments Meats and Seafood Chicken pieces (up to 3 Ibs.) 5 12 x 8 x 2-in. glass dish 8-20 mtno Fish fillets (1 Ibo) 1 12 x 8 x 2-in, glass dish 6_9 mlno Cover tightly with plastic wrap. Meat loaf (1 1/2 Ibs..) 9 10-in. pie plate 25-30 mino Cover tightly with plastic wrap. Hamburger patties (4-5) 3 t2 x 8 x 2-in. glass dish 7-9 mino Cover with wax paper. When oven signals, rotate dish 112 turn.
MUCROW VIiHG AUTO ]ATaC TiiP$ • Make sure all cookware used in your microwave oven Is suitable for microwaving_ Most glass casseroles, cooking dishes, measuring dishes, measuring cups, custard cups, pottery or china dinnerware which doe_ nol have metallic trim or glaze with a metallic sheen cap be usec Som_ cookware ts labete_; 5uitabie in: COHTA_H_.
Q, r Why does my oven cut off after the Auto cycle when using Auto Cook Code I when it does not alter other settings? Am When using Code 1, there is no second phase of minutes counting down. Cooking is completed in first phase oi cooking. 0_ If food is not completely cooked suggested code, what should I do? A Use Time Cook and power leve! 10 for -3few tonsures to complete cooking. ,i after My scalloped polatoes were not completely cooked after using Auto Cook.
YOUR MICROWAVE OVEN iMPORTANT SHELF REHF=ATIING MICROWAVE SAFETY Tips INFORMATmON o DO HOT shelf on damage • Use metal MAY o DO when utensils. handEing THEY HOT of Cooking microwave on metal she]If. store dish shelf is not with Similar Foods Two casseroles -- Cover with plastic wrap. Use staggered arrangements of food. Place food on right side of shelf and left side of floor.
YOUR LOWER COHTROL starting and stopping operations° LOWER OVEN times for timed oven TNE CLOCK 8/.
The smallest amount of time you can set is I minute. NOTE: The Timer does not control oven operations, CLEAR/OFF does not control the Timer. TO SET THE 1. Press TIMER. TIMER [ TtMER ( 2, Press NUMBER pads to set the amount of tlme you want. For example, press 3,0,0, to set three hours. It" you make a mistake, again_ 3- Press START° press TIMER twice and begin I_ L___J 1he Timer will immediately start to countdown, After 1 mlnuIe has passed display will change. When time _ _.
OVIH !i)0011111 o When coektng a food for the first time tn your new oven, use time g!ven on reclpes as a gtdde, Your new oven has been set correcly at the factory and Is more apt to be accurate than the o_e_ it replaced. After you have used your ov_n for awhile, if you feel your oven should be holer or cooler, you can adjust it yourself. See T_E_Oz3T,_,7,5.DJL_$T_,'_._NTS In this manual.
Broiling PO$1TBONIHG TO SET BROIL Broiling is cooktng by direct heat from the broil element. Tender cuts of meat or marinated meat should be selected for broiling. For best results steaks and chops should be at least 3/4" thick, 1. Press BROIL. "HI" and "BROIL" appear In display, 2, Press BROIL again to set LO broil, You can alternate between HI(550°F) and LO(450°F) by pressing BROIL.
BEFOR A CLEAN CYCL "i, Press CLEAN, The display will fi}asb aSTA_ _ _t_ show the last entered clean ti;t_a Remove the broiler pan and grid, oven rac_;s, a!_ u_a_lslts and _n_t felt that may be !n tt_e oven, G3 not tiy t_ ciear_ '.t_ensifsor any o_her objects in th_ ov_n durit_g & sei_-ciea;_ cycle, i_ oven racks _e _-={__n n_mber pads to enier hOP_s: m;r_,e;; de.._P_ _t" cleaning, The most frequenfly recommended _.t_ _me is three hours.
AF'rI,_R A CLEAN CYCLE QUESTIONS After a clean cycle Is complete, the oven door will stay locked until the oven temperature cools to a safe level When the oven has cooled "LOCKED" will disappear from display. "CLEAN" will remain In display until you press CLEAR/OFF or enter an oven operation. NEVER TRY TO FORCE THE DOOR TO OPEN WHEN "LOCKED" IS IN THE DISPLAY. Q. Can I use commercla! oven cleaners on any part of my self-cleaning oven? A.
Q -I=IAIII -£@ TII$ On the folowlng pages, al removable pans of your Cooking Cen_er are sho'_vn. R-_fer to those pages when clean!ng your C_okJn_ C_nte._. Warm water, a ml!d detergent, and a soft cloth are saie to use on al cleanable parts of your range. Do not use metal scouring pads, except where recommended. Range finish will be porcelain enamel Porcelain enamel looks like a painted surface.
CLEANING TIPS; (co.t.) PART CLEANING P,_ATERIALS RF._ARKS Temperature Probe Sudsy cloth, plastic scouring pad, water or dishwasher Care should be taken In handling _ probe, DO NOT twist it, DO NOTdrop It. Clean as soon as possible afteruse. Wipe with sudsy cloth, then rub metal parts with plastic scouring pad, if necessary. Microwave Oven Shelf Accessory Mild soap and water or dishwasher Do not clean In selFcleanlng oven.
To repg_ce', 1° Hold the door over the hinges with the s!ots at the bottom edge of the door lined up with the hinges, The hinge arms must still be in the stop position. 2° Slide the door down onto the hinges as far as it wi!l go and close the door. SLOTS REMOVABLE OVEN RACKS Be careful not to scratch the oven finish when installing or removing oven racks° To instalh 1. Set the raised back edge of the rack on a pair of rack guides. 2.
RE OVAL OF PACKAGBNG TAPE: k When packaging tape is removed from new appliances, a residue Is sometimes left on t_ie appliance. The safest way to remove this adhesive, and prevent damageto the product finish, is by using an application of household liquid dish washing detergent, mineral o1!, or cooking oil. Apply with soft cloth and allow to soak. Wipe with soft cloth. DO NOT use plastic pad or equivalent.
IIIFOIIII ALLI£1i F@I SI_INVICl Say-_ _.i_e a_ _oney _ Ch_ck _his list befe:'e yo_ catg _o_ s__;_ice° To et_inate un_;ecessary service ca!s, -lrst, read alt the tnstruclons in this manu_i carefully. Than, tf you have a problem, always check this list of common problems and possible solutions before you call for service. I_.you do ;',_vea probl_ you cannot {ix ycur_lf, call your nearest Sears Store or Service ('.enter for help.
BEFORE CALLING FOR PROBLEM • Food does not roast or bake properly SERVICE PO$SIIBL_ (CONTINUED) CAUSE DON'T UNTIL • Recipe not followed • Is recipe tested and reliable? • Range and oven rack not level , Check the Installation Instruc. tlons for leveling Instructions. Using improper cookware . Loweroven will not self-clean CALL FOR SERVICE YOU CHECK • See cooking section of this manual Check self-clean Instructions.
POSSIBL_. CAU._ UNTIL • Foods over_.ookedo; YOU O_ ::_:_. Not enough t_me se_ when using "lIME COOK function because starting lemperalure_ of ioods varied widei_ "- Probe Rot f,_s_L,=_,__....._e, i , !t;corract power tevei entare_ - Dish no_ rotate_, _.urne.d o_ stirred as called for in recipe • Too many dishes same time • "PROBE" appears on display lt_ ov_ a,'. , Do notov_rcrowo _,_ Food notthoroughlydefrosled , Check Defrost section oiman_. Improper use of coverings .
THERMOSTAT ADJUSTMENTS The temperature in your new oven has been set correctly at the factory, so be sure to follow the recipetemperat ures and cooking times the first few tlmes you bake in your oven. Continue to hold BAKE untll the display changes to show the preset oven temperature adjustment, 4. The temperature can be adjusted up to +35°F hotter or -35°F cooler. Press 1 to increase in 5 ° change. Press 0 to decrease In 5 ° change.
34
KENMOli E E NTY _-_ llllllll i FULL ONE YEAR WARRANTY ON THE FUNCTIONgNG PARTS EXCEPT GLASS PARTS OF ALL If, within one year from the date of Installation, any part, other than aglass part, fails to function properly due to a defect In ma'terlai or workmanship, Sears w!|l repair or replace It, free of charge. Dear Customer: Our constant efforts are directed toward making sure your new Kenmore Oven will arrive at your home In perfect condition and will give you proper performance.