Owner's Manual Manual del Propietario ® ROOM AIR CONDITIONER ACONDICIONADOR DE AIRE DE VENTANA Model, Modelo 580.75080 Sears, Roebuck and Co., Hoffman Estates, IL 60179 U.S.A. www.sears.
TABLE OF CONTENTS Features ................................................. ........................2 WARRANTY .............................................. 2 SAFETY ......................................................3 Important Safety Instructions ELECTRICAL ...................... REQUIREMENTS INSTALLATION 3 Requirements Installation ................................................ 6 How to Install ............................................ 6 Removal from Window ....................
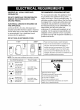
IMPORTANT SAFETY INSTRUCTIONS The safety instructions below will tell you how to use your room air conditioner to avoid harm to yourself or damage to your ROOM AIR CONDITIONER. FOR YOUR SAFETY Do not store or use gasoline or other flammable vapors and liquids in the vicinity of this or any other appliance. Read product labels for flammability and other warnings. PREVENT _Avoid fire hazard or electric shock. Do not use an extension cord or an adapter plug. Do not remove any prong from the power cord.
OBSERVE ALL LOCAL CODES AND ORDINANCES. RECOMMENDED GROUNDING METHOD For your personal safety, this appliance must be grounded. This appliance has a power supply cord with a 3-prong grounding plug. To minimize possible shock hazard, the cord must be plugged into a mating grounding type wall receptacle and grounded in accordance with the National Electrical Code (ANSl/NFPA 70) latest edition and all local codes and ordinances.
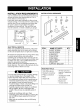
INSTALLATION INSTALLATION REQUIREMENTS HARDWARE Your air conditioner will install into standard double hung windows with actual clear opening widths of 22 to 36 inches (559mm to 914mm) (FIG. 1). Lower sash must open sufficiently to allow a clear vertical opening of 13 inches (331mm). Side louvers and the rear of the air conditioner must have clear air space to allow enough airflow through the condenser for heat removal. The rear of the unit must be outdoors, not inside a building or garage.
INSTALLATION Q Pick a location which will allow you to blow the cold air into the area you want. Windows used for installation must be strong enough to support the weight of the air conditioner. Good installation with special attention to the proper position of the unit will lessen the chance that service will be needed. If air conditioner is blocked by a storm window frame, see step 9 on page 7 before beginning to install.
r_ INSTALL THE AIR CONDITIONER IN THE WINDOW • Carefully lift the air conditioner and slide it into the open window. Make sure the bottom guide of the air conditioner drops into the notches created by the L brackets. • When the air conditioner drops into the L brackets, the air conditioner will be centered in window opening as shown in FIG. 7. • While steadying the air conditioner, carefully bring the window sash down behind the upper guide of the air conditioner, as shown in FIG. 8.
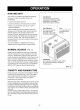
HOW AND WHY Your room air conditioner provides the following functions to make hot weather living more comfortable: Compressor The modern high efficiency compressor may have a high pitched hum or pulsating noise that cycles on and off. • Cools and circulates room air. • Lowers humidity by removing excess moisture. • Filters out summertime dust, dirt, and some airborne impurities. The air conditioner performs these functions by drawing room air through a filter which traps dust and dirt particles.
FEATURES USING THE AIR CONDITIONER To reduce the risk of fire, electric shock, or injury to persons, read the important SAFETY instructions section before operating this appliance To begin operating the air conditioner after installation, follow these steps: 1. Plug in the air conditioner. (To prevent electrical hazards, do not use an extension cord or an adapter plug.) 2. Set the exhaust vent to the CLOSE position. 3. Set the TEMP Control to the coolest setting. 4.
CONTROL PANEL TEMPERATURE REMOTE CONTROL SIGNAL RECEIVER SETTING • Use these buttons to automatically control the temperature of the room. The temperature can be set to one of a temperature between 64°F to 82°F. • Push the TEMP up or down buttons to shift the temperature setting from 82°F • 76°F •70°F •64°F [,.. .............................................. ---_- POWER ITIMER • To turn the air conditioner ON, pushthis button. To turn the air conditioner OFF, push the button again.
REMOTE CONTROL NOTE: The Remote Control will not operate properly if strong light shines on the sensor window of the Air Conditioner or if there are obstacles between the Remote Control and the Air Conditioner. Every time you push button, you will hear a beep from the Air Conditioner. POWER • To turn the air conditionerON, push this button. To turn theair conditionerOFF, push the button again. This button takes priority over any other button.
AIR FILTER CLEANING HOWTO REMOVETHE FRONTGRILLE The Air Filter will become dirty as it removes dust from the inside air. It should be washed at least every 2 weeks. If the Air Filter remains full of dust, the air flow will decrease and the cooling capacity will be reduced, possibly damaging the unit. • Open the inlet grille downward. • Remove the screw securing the Front Grille. • Push the grille up from the bottom and pull the top of the grille away from the case to lift the top tabs out of their slots.
BEFORE CALLING FOR SERVICE Check the following list to be sure a service help you avoid an unneeded service call. THE AIR CONDITIONER Check call is really necessary. A quick reference to this manual may WILL NOT OPERATE. if... Then... Wall plug disconnected. House fuse blown or circuit breaker tripped. MODE selector is OFF position. Unit was turned off and then on too quickly. TEMP Control set warmer than room temperature. Push plug firmly into wall outlet.
-14-
INDICE DE MATERIAS ............................. 15 Caracteristicas ..................................... 22 GARANTIA ................................................ 15 Uso del equipo de aire acondicionado ..22 Panel de control .................................... 23 SEGURIDAD .............................................. 16 Control remoto ...................................... 24 MANTENIMIENTO Importantes instrucciones de seguridad ..... 16 ....................................
IMPORTANTES INSTRUCCIONES DE SEGURIDAD Las siguientes instrucciones de seguridad le indicaran c6mo usar su equipo de aire acondicionado habitaci6n para evitar daSos para usted mismo y para su EQUIPO DE AIRE ACONDIClONADO. POR SU SEGURIDAD No almacene ni use gasolina u otros vapores y Ifquidos inflamables cerca de este o cualquier otto electrodomestico. Lea las etiquetas de los productos para ver si contienen advertencias sobre el car_cter inflamable de los mismos y otras advertencias.
RESPETE TODOS LOS CODIGOS Y REGLAMENTOS. MI_TODO RECOMENDADO TIERRA BAJO NINGUNA ClRCUNSTANCIA CORTE, QUITE O EVITE EL USO DE LA CONEXION A TIERRA DE ESTA CLAVIJA. Por su propia seguridad este aparato debe conectarse a tierra. Este aparato viene equipado con un cable de alimentaci6n y una clavija de tres terminales.
REQUERIMIENTOS INSTALACI ON INSTALACION PIEZAS DE MONTAJE PARA Su equipode aireacondicionadose instalaraenventanas estandarde doblepanelcon anchosde aberturalibrede 559 mm a 914mm(22a 36 pulgadas).(Figura1) El marcoinferiordebeabrirseIo suficientepara permitiruna aberturaverticallibrede 331mm(13 pulgadas).Las rejillas desviadoraslateralesy laparteposteriordelequipode aire acondicionadodebentenerun espaciolibrede airepara permitir suficienteflujode airea travesdel condensadorparaasieliminar elcalor.
INSTALACl0N D Escoja un lugar que le permita Ilevar el aire frio al &rea que desea. Las ventanas que se usen para la instalaci6n deben tener la resistencia suficiente para soportar el peso del equipo de aire acondicionado. Una buena instalaci6n con atenci6n especial a la correcta posici6n de la unidad disminuir& la probabilidad de que sea necesario efectuar reparaciones.
TIPO B r_ INSTALE EL ACONDICIONADOR EN LA VENTANA DE AIRE j, • Levantecon cuidado el aire acondicionadoy desicelo hasta laventana abierta. Asegt_resede que la guia inferior del aire acondicionado pasa por las muescas de lossoportes en L • AI encajar en del soporte L, el acondicionador de aire estate, centrado en la abertura de la ventana, come se muestra en la Figura 7. • Mientras sujeta el acondicionador de aire, baje cuidadosamente el marco corredizo de la ventana detr_.
COMO Y POR QUI En ocasiones,el usode MEDFAN parahacercircularelairepor la habitaci6nhacequeelambientesea m&sconfortableaun cuandoelequipono est6 enfriandoel aire.Mientrasm&stiempo y conmayorfrecuenciafuncioneelequipode aire acondicionado,m_.selectricidadconsumir&y mayoresser_.nlos costosde suuso.
CARACTERiSTICAS USO DEL EQUIPO DE AIRE ACONDICIONADO _Para reducir el riesgo de incendio, descargas el6ctrica o lesiones personales, lea las IMPORTANTES INSTRUCCIONES DE SEGURIDAD antes de operar este aparato. 1 15 6 5 4 Para comenzar a utilizar el equipo de aire acondicionado, siga estos pasos: 1. Enchufe el equipo de aire acondicionado. (Para prevenir riesgos de descargas el_ctricas, no use un cable de extensi6n ni un enchufe adaptador.) 2. Ajuste el extractor de aire en la posici6n CLOSE. 3.
PANEL DE CONTROL RECEPTOR DE SENAL AJUSTE DE LA TEMPERATURA • Utilice estos botones para controlar automaticamente la temperatura de la habitaci0n. La temperatura puede ajustarse en un rango de 64°F a 82°F. • Pulse los botones TEMP arriba o abajo para cambiar el ajuste de temperatura entre 82°F • 76°F • 70°F • 64°F. ENECNDIDO/APAGADO IMARCADOR • Para ENCENDER el sistema presione el boton, y para APAGARLO presione el botdn otra vez. • Este bot6n tiene prioridad sobre todos los otros botones.
CONTROL REMOTO Precaucion: El diepositiovo de control remoto no funcionar& adecuadamente eila ventana eensora del acondicionador de aire e$ expueeta a luz fuerte, o si hay obst&culos entre el diepositivo de control remoto y el acondicionador de aire. Cuando opere el aire acondicionado con el control remoto, deber& oir un pito. ENECNDIDO/APAGADO • Para ENCENDER el sistema presione el bot6n, y para APAGARLO el bot6n otra vez. presione Este bot6n tiene prioridad sobre todos los otros botones. Cuando Ud.
LIMPIEZA DEL FILTRO DEL AIRE COMO A REEMPLAZA EL El filtro del aire se ir_lensuciando a medida que va atrapando el polvo proveniente del aire interior. Es preciso lavar el filtro del aire al menos cada dos semanas. Si el filtro del aire permanece Ileno de polvo, el flujo de aire disminuir& y se reducir_t la capacidad de enfriamiento del equipo, con posibles daSos para la unidad. (Figura 17) • Tire de la rejilla de entrada hacia delante agarrando ambas lengtietas y tire del filtro del aire hasta sacarlo.
ANTES DE LLAMAR PARA SERVICIO Cheque la siguiente lista para asegurarse si en realidad es necesario este manual puede evitar una Ilamada para servicio innecesaria. EL EQUIPO DE AIRE ACONDICIONADO Ilamar para servicio. Una referencia rapida a NO FUNCIONA. El enchufenoesta conectadoenlatoma decorrientede pared. El fusibleesta quemadoo el interruptorde cimuitose hadisparado. El selectordelventiladorMODEestaen la posicionde OFF. Launidadseapag6y sevolvioa encenderdemasiador@ido.
m27m
m28m
m29m
m30m
Master Protection Agreements Congratulations Your new Kenmore manufactured on making a smart ® product is designed maintenance it may require or repair when having from Purchase protect a Maser yourself and operation. preventive time to time. a Master can save you money iEnhorabuena! Ha realizado una compra inteligente. Su nuevo aparato Kenmore® esta diseSado y fabricado para ofrecerle afios de buen funcionamiento.
Your Home iiiiiiiiiiiiii iiiiiiiiiiiiii iiiiiiiiiiiiiiiii For repair - in your home -of all major brand appliances, lawn and garden equipment, or heating and cooling systems, no matter who made it, no matter who sold it! For,the replacement parts accessories and owner s manuals that you need to do-it-yourself. For Sears professional installation of home appliances and items like garage door openers and water heaters. 1-800-4-MY-HOME Call anytime, ® (1-800-469-4663) day or night (U.S.A. and Canada) www.