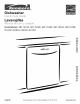
® Dishwasher Lavavajillas CI@ L _:::_,_,_ y ,_,,,,,c ,,;c;t,c,,_,} Model/Modelo _=color 154497901 587.1415_, 587.1515_, 587.1516:_, 587.1615:_, 587.1616:_ number, nL_mero de color Sears Roebuck and Co., Hoffman Estates, IL 60179 U.S.A. www.sears.
Table of Contents Master Protection Agreements Warranty ...................................................................... 3 Before Using Your Dishwasher .................................. 5 Dishwasher Features ................................................. 6 Congratulations on making a smart purchase. Your new Kenmore _*appliance is designed and manufactured for years of dependable operation. But like all products, it may require preventive maintenance or repair from time to time.
Warranty FULL ONE-YEAR WARRANTY DISHWASHERS ON KENMORE For one year from the date of purchase, when this dishwasher is installed and operated according to instructions provided in the Installation Instructions and Use & Care Guide, Sears will repair this dishwasher, free of charge, if defective in material or workmanship.
Dishwasher Safety Your safety and the safety of others are very important. We have provided many important safety messages in the manual and on your appliance. Always read and obey all safety messages. This is the safety alert symbol. This symbol alerts you to potential hazards that can kill or hurt you and others. All safety messages will follow the safety alert symbol and either the word "DANGER" or "WARNING.
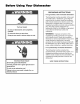
Before Using Your Dishwasher GROUNDING INSTRUCTIONS For a grounded, cord-connected Tip Over Hazard Do not use dishwasher until completely installed. Do not push down on open door. Doing so can result in serious injury or cuts. dishwasher: The dishwasher must be grounded. In the event of a malfunction or breakdown, grounding will reduce the risk of electric shock by providing a path of least resistance for electric current.
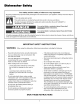
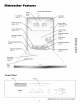
Dishwasher Features Nozzle and Upper Spray Funnel pages 10,16 Tub Gasket page 15 Top Rack page 10,11 Middle Spray Arm Serial Label (located on right side of tub) pages 10,16 Lower Spray Arm pages 11,16 Overfill iii!i; ¸ ......
Wash System Your Kenmore dishwasher filters 100% of the water for optimum cleaning. The wash system uses alternating arms to save water and energy and includes a heavy-duty stainless steel food disposer that grinds up large food particles. How the wash system works 1. Load the dishwasher (See Preparing and Loading Dishes). 2. Hot water enters the dishwasher and covers the filter. 3. Detergent is dispensed at the appropriate time and mixed with the hot water.
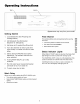
Operating Instructions Vent Latch X o,J_,_6u/_ _ Appearance Getting 1. Started Load dishwasher Loading 2. (See Preparing and Dishes). Add detergent (See Dishwasher Dispenser & Detergents). 3. Add rinse aid, if needed (See Rinse Aid). 4. Turn dial clockwise to select cycle (See Cycle Chart) or number of hours for wash delay. , , Select desired OPTIONS Selections). The indicator when selected. If using WASH number 8. DELAY, (See Option will show red go to step 7.
Operating Instructions (continued) Wash Cycle Selections Note: Cycle times are approximate and will vary with options selected. Cycle Description Cycle To Select Cycle Heavy Wash For heavily soiled dishes and silverware. • Turn dial to HEAVY WASH. • Select desired OPTIONS. Normal Wash Not all cycles available on all models. Chart Water (approx.) Time* (approx.) Washes/ Rinses 7.2 gal. 27.3 liters 1 1/2 hrs. 2 washes 4 rinses For regularlysoiled dishes • Select desired options.
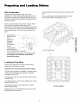
Preparing and Loading Dishes Long-handled knives and utensils can be placed in top rack. Dish Preparation Scrape away large pieces of food, bones, pits, toothpicks, etc. The continuous filtered wash system will remove remaining food particles. Burned-on foods should be loosened before loading. Empty liquids from glasses and cups. Be sure nothing protrudes through the bottom of the rack to block rotation of middle spray arm.
Preparing and Loading Dishes Some models have a fold-down cup shelf or a cup shelf/stemware holder. They can be used to load two levels of cups, juice glasses, and other short items. Stagger items on upper level so that water can reach all inside surfaces. Fold up to load tall glasses. (continued) Loading the Bottom Rack Features and appearance of racks and silverware basket may vary from your model The bottom rack is best for plates, saucers, bowls, and cookware.
Preparing and Loading Loading the Silverware Dishes (continued) Basket When covers are up, mix items in each section of the basket with some pointing up and some down to avoid nesting. Water spray cannot reach nested items. Cut Injury Load sharp items (knives, skewers, etc.) pointing down. Failure to do so may result in injury. Load the silverware basket while it is in the bottom rack or take the basket out for loading on a counter or table.
Dishwasher Dispenser Filling the Detergent Dispenser & Detergents How much Detergent to use The amount of detergent to use depends on the water hardness. Water hardness is measured in grains per gallon. Using too little detergent can result in poor cleaning and hard water filming or spotting. Using too much detergent in soft water can cause a permanent film called etching. Your local water company, water softener company or county extension agent can tell you the water hardness in your area.
Dishwasher & Detergents Dispenser Factors Affecting Performance (continued) Rinse Aid Water Pressure Rinse aid greatly improves drying and reduces water spots and filming. Water "sheets" off dishes rather than forming water droplets that cling and leave spots. The hot water line to dishwasher must provide water pressure between 20 and 120 psi. Low water pressure may occur when laundry or showers are in operation. Wait until water use is reduced before starting dishwasher.
Care and Cleaning Care of Drain Air Gap If a drain air gap was installed for your built-in dishwasher, check to make sure it is clean so the dishwasher will drain properly. A drain air gap is usually mounted on countertop and can be inspected by removing the cover. This is not part of your dishwasher and is not covered by warranty. Burn Hazard Allow heating element to cool before cleaning the interior. Failure to do so can result in burns.
Solutions to Common Dishwashing Dishware Before calling for service, review this list. It may save you both time and expense. This list includes common experiences that are not the result of defective workmanship or material in your dishwasher. Food Soils Left on Dishes Load with care and do not overload. (See Preparing and Loading Dishes.) • Place delicate items in top rack. • Place glasses securely against pins and not over pins.
Solutions to Common Dishwashing Problems (continued) Dishwasher Leaks • Use only fresh detergent designed for automatic dishwashers. Measure detergent carefully. Try a different brand. • Spilled rinse aid can cause foam and lead to overflowing. Wipe up any spills with a damp cloth. • Check to see that dishwasher is level. (See Installation Instructions.) Normal Sounds • • • Dishwasher • If unit is hooked up to a food waste disposer, make sure the disposer is empty.
Solutions to Common Dishwashing Problems (continued) Removing Spots and Film Hard water can cause lime deposit buildup on the interior of the dishwasher. Dishes and glasses may also get spots and film for a number of reasons. (See Glassware/Flatware Spotted or Cloudy section.) To remove buildup, spots and film, clean using the following instructions: 1. Load clean dishes and glasses in normal manner. Do not load any metal utensils or silverware. 2. Do not add detergent. 3.
Tabla Contratos de Protecci6n de Materias Garantia ...................................................................... 20 Instrucciones de Seguridad ..................................... 21 Antes de Usar su Lavavajillas .................................. 22 Caracteristicas 23 del lavavajillas ................................. Sistema de Lavado .................................................... Instrucciones de Funcionamiento Lo felicitamos por haber hecho una compra inteligente.
Garantia GARANTiA COMPLETA DE UN ANO EN LAVAVAJILLAS KENMORE Por un afio desde la fecha de compra, cuando este lavavajillas se instale y se opere de acuerdo con las instrucciones que se proveen en las Instrucciones de Instalacion y la Guia de Uso y Cuidado, Sears reparara este lavavajillas sin cargo alguno, si tiene algun defecto del material o la manufactura. SERVlClO BAJO GARANTiA EL SERVIClO BAJO GARANT[A EN LOS EE.UU. EST,& DISPONIBLE LLAMANDO A SEARS AL 1-800-4-MY-HOME ®.
Seguridad del Lavavajillas Su seguridad y la seguridad de otros son muy importantes. Hemos incluido muchos mensajes de seguridad importantes en el manual yen su aparato domestico. Siempre lea y obedezca todos los mensajes de seguridad. Este es el sfmbolo de alerta de seguridad. Este sfmbolo le avisa de posibles peligros que pueden causar la muerte o lesionarlo a usted y a otros. Todos los mensajes de seguridad seguiran al sfmbolo de alerta de seguridad con la palabra "PELIGRO" o "ADVERTENCIA".
Antes de Usar su Lavavajillas INSTRUCCIONES PARA CONEXION A TIERRA Para un lavavajillas conectado con cable y conectado a tierra: El lavavajillas debe estar conectado a tierra. En caso de mal funcionamiento o averfa, la conexi6n a tierra reducira el riesgo de un choque electrico al proporcionar un paso de menor resistencia a la corriente electrica. El lavavajillas esta equipado con un cable que tiene un conductor de conexi6n a tierra del equipo y un enchufe de conexi6n a tierra.
Caracteristicas del Lavavajillas Boquilla y Rociador Superior Embudo pag 33 Empaquetadura la Tina pagina 32 Brazo Rociador Estante Superior pagina 27,28 del Etiqueta de Serie (ubicada en el lado derecho de la tina) Medio paginas 27,33 Brazo Rociador Inferior Estante Inferior pagina 28 paginas 28,33 ii ¸ LL LG: .....
Sistema de Lavado Su lavavajillas Kenmore filtra el 100% del agua para una limpieza 6ptima. El sistema de lavado utiliza brazos alternos para ahorrar agua y energia, e incluye un triturador de desperdicios de acero inoxidable y de uso pesado que tritura las particulas grandes de alimentos. C6mo funciona el sistema 1. Cargue el lavavajillas (Vease Preparacion y Carga de la Vajilla). 2. El agua caliente entra al lavavajillas y cubre el filtro.
Instrucciones Respiradero de Funcionamiento X Cierre iiii_ I iii O W,,_.Jr, / La apariencia del aparato Como comenzar puede variar del modelo Lavado que usted tiene. Diferido Cargue el lavavajillas (vease Preparacion y Carga de la Vajilla). Esto le permite posponer el arranque del ciclo de HEAVY WAS H (Lavado pesado). • Gire la perilla para seleccionar el numero de horas. Agregue detergente (vease Distribuidor y Detergentes del Lavavajillas).
Instrucciones de Funcionamiento (continuaci6n) Selecciones de ciclo de lavado Nota: La duraci6n de los ciclos es aproximada disponibles en todos los modelos. y variara de acuerdo conel modelo. No todos los ciclos estan Tabla de Ciclos 3iclos Descripci6n Para Seleccionar el Ciclo Agua (aprox.) Lavado _esado 'Heavy Hash) Para platos y cubiertos muy sucios. • Gire la perilla hasta la posici6n de HEAVY WASH. • Seleccione las opciones (OPTIONS) deseadas. 7,2 gal.
Preparaci6n Preparacion y Carga de la Vajilla Asegurese de que nada sobresalga a traves del rondo del estante que pueda obstruir la rotacion del brazo rociador del medio. de la Vajilla Quite los pedazos grandes de comida, huesos, pepitas de frutas, palillos de dientes, etc. El sistema de lavado continuamente filtrado removera las partfculas de comida restantes. La comida pegada debe removerse de la vajilla antes de colocarse en el lavavajillas. Vacfe los Ifquidos de los vasos y las tazas.
Preparaci6n y Carga de la Vajilla Algunos modelos tienen rejillas para tazas que se pueden doblar o bien tienen un soporte para tazas/ utensilios para cocer al vapor. Estas rejillas pueden usarse para colocar en dos niveles tazas, vasos para jugo y otros utensilios cortos. Coloque los articulos en el nivel superior de una forma escalonada, para que el agua Ilegue a todas las superficies interiores. Levante las rejillas para colocar vasos altos.
Preparaci6n y Carga de la Vajilla (continuaci6n) Como Cargar la Canasta de Cubiertos Cuando las cubiertas estan hacia arriba, mezcle los articulos de cada seccion de la canasta, con unos apuntando hacia arriba y otros hacia abajo, para que no se peguen unos con otros. El rocio de agua no puede Ilegar a los articulos que estan pegados unos con otros. Cortaduras Coloque los artfculos afilados (cuchillos, pinchos de brocheta, etc.) con las puntas hacia abajo. No hacerlo puede causar lesiones.
Distribuidor y Detergentes Como Llenar el Distribuidor del Lavavajillas de Cuanto Detergente El distribuidor de detergente tiene una taza cubierta y una descubierta. El detergente en la taza descubierta cae dentro del lavavajillas cuando la puerta se cierra. La taza cubierta se abre automMicamente para soltar el detergente. • Solo use detergente para lavavajillas automaticos fresco. Otros detergentes produciran demasiada espuma.
Distribuidor Detergentes y del Factores que Afectan el Rendimiento Lavavajillas (continuaci6n) Agente de Enjuague Presion de Agua El agente de enjuague mejora grandemente el secado y reduce la pelicula y las manchas de agua en la vajilla. El agua se desliza de la vajilla, en lugar de formar gotas de agua que se adhieren y dejan manchas. La linea de agua caliente al lavavajillas debe suministrar una presion de agua de entre 20 y 120 psi.
Cuidado y Limpieza Cuidado Drenaje Peligro del Espacio de Aire de Si se instal6 un espacio de aire de drenaje en su lavavajillas empotrado, inspeccionelo para asegurar que este limpio, de manera que el lavavajillas drene debidamente. Un espacio de aire de drenaje por Io general esta montado sobre el gabinete y puede inspeccionarse quitando la tapa. Esto no es parte de su lavavajillas y no esta cubierto por la garantia.
Soluciones Vajillas a Problemas Comunes Antes de Ilamar para solicitar servicio, revise esta lista, ya que podria ahorrarle tiempo y dinero. Esta lista incluye las experiencias comunes que no son el resultado de manufactura o materiales defectuosos en su lavavajillas. Elija otro ciclo para un tiempo de lavado mas largo. • Verifique la seccion de carga de los estantes para la forma correcta de cargar el lavavajillas - evite que los articulos queden pegados unos con los otros.
Soluciones Vajillas a Problemas Comunes El lavavajillas • • • • Usar demasiado detergente en agua blanda o ablandada causa esta pelfcula que no puede quitarse. Ajuste la cantidad de detergente de acuerdo con la dureza del agua. (Consulte la Gufa de Uso del Detergente.) Baje la temperatura del agua. Use la opcion HEATED DRY OFF. Queda detergente • • • • • • • ann en las tazas gotea Solo use detergente fresco disefiado para lavavajillas automaticos. Mida el detergente cuidadosamente.
Soluciones Vajillas a Problemas Comunes del Lavado de (continuaci6n) Manchas en el interior de la tina Como quitar las manchas y la graza El agua dura puede causar la acumulaci6n de depositos de cal en el interior del lavavajillas. Los platos y vasos tambien pueden tener manchas y una graza por varias razones. (Vease la seccion de Cristaleria/Cubiertos Manchados o Empa_ados.
Your Home For repair - in your home - of all major brand appliances, lawn and garden equipment, or heating and cooling systems, no matter who made it, no matter who sold it! For the replacement parts, accessories and owner's manuals that you need to do-it-yourself. For Sears professional installation of home appliances and items like garage door openers and water heaters. 1-800-4-MY-HOME Call anytime, ® (1-800-469-4663) day or night (U.S.A. and Canada) www.sears.com www.sears.