® ULTRA WASH® Dishwasher Use & Care Guide Lavavajillas ULTRA WASH® Manual de uso y cuidado Lave-vaisselle ULTRA WASH® Guide d’utilisation et d’entretien Models/Modelos/Modèles 665.1375✼, 665.1376✼, 665.1385✼, 665.1386✼ ✼ = color number, número de color, numéro de couleur W10040720 Sears Roebuck and Co., Hoffman Estates, IL 60179 U.S.A. Sears Canada Inc., Toronto, Ontario, Canada M5B 2B8 www.sears.com www.sears.
TABLE OF CONTENTS PROTECTION AGREEMENTS.......................................................2 In the U.S.A...................................................................................2 In Canada .....................................................................................2 WARRANTY.....................................................................................3 DISHWASHER SAFETY..................................................................4 Before Using Your Dishwasher .............
KENMORE ELITE® APPLIANCE WARRANTY ONE YEAR LIMITED WARRANTY When installed, operated and maintained according to all instructions supplied with the product, if this appliance fails due to a defect in material or workmanship within one year from the date of purchase, call 1-800-4-MY-HOME® to arrange for free repair.
DISHWASHER SAFETY Your safety and the safety of others are very important. We have provided many important safety messages in this manual and on your appliance. Always read and obey all safety messages. This is the safety alert symbol. This symbol alerts you to potential hazards that can kill or hurt you and others. All safety messages will follow the safety alert symbol and either the word “DANGER” or “WARNING.
Before Using Your Dishwasher WARNING GROUNDING INSTRUCTIONS ■ Tip Over Hazard Do not use dishwasher until completely installed. Do not push down on open door. Doing so can result in serious injury or cuts. WARNING: Improper connection of the equipment-grounding conductor can result in a risk of electric shock. Check with a qualified electrician or service representative if you are in doubt whether the dishwasher is properly grounded.
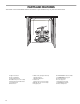
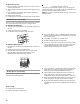
PARTS AND FEATURES This manual covers several different models. The features on your dishwasher may vary from those shown below. A. Upper level wash B. Top rack adjusters C. Removable top rack D. Flexible tines (on some models) E. Model and serial number label F. Fold-down tines G. Bottom rack 6 H. Water inlet opening (in tub wall) I. Heating element J. Detergent dispenser K. Active vent L. Cup shelves (on some models) M. No-flip clips (on some models) N. Top spray arm O. ULTRA FLOW™ water feed tube P.
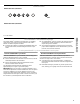
Control Panels Models 665.1375✼, 665.1385✼ Models 665.1376✼, 665.1386✼ ✼ = color number ULTRA WASH® Soil Removal System The ULTRA WASH® Soil Removal System gives you sparkling clean dishes, while using less energy and time. The ULTRA WASH® Soil Removal System includes: ■ A Triple Action Filtration system that intermittently filters soil from the wash water, thus eliminating the need to scrape dishes.
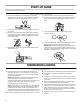
START-UP GUIDE Before using your dishwasher, remove all packaging materials. Read this entire Use and Care Guide. You will find important safety information and useful operating tips. Using Your New Dishwasher 1. Rinse aid is essential for good drying. Be sure to fill the dispenser before you use your new dishwasher. Each filling will last about 1 to 3 months depending on your usage. 2. Scrape large food soil and hard items (toothpicks or bones) from dishes. 3. Properly load the dishwasher.
Quiet operating tips Cup shelves (on some models) To avoid thumping/clattering noises during operation: ■ Make sure lightweight load items are secured in the racks. ■ Make sure pot lids and handles, pizza pans, cookie sheets, etc., do not touch interior walls or interfere with the rotation of the spray arm(s). ■ Load dishes so they do not touch one another.
To replace the top rack 1. Place the rollers on each side of the rack into the rack tracks and push the rack back. 2. Align the open side of the clip with the inside edge of the rack track. 3. Push the ridges and slide the clip toward the outside rack edge until it locks into place. 4. Repeat on the other side. 5. Pull the rack out all of the way to ensure clips are fully seated. Loading Bottom Rack The bottom rack is designed for plates, pans, casseroles, and utensils.
Suggested 10 place setting loading patterns TURBOZONE™ wash area The TURBOZONE™ wash area is located at the back of the lower dishrack. NOTE: You must select the TURBOZONE™ wash option to utilize this wash feature. Do not face items toward the rear of the unit if you are not using this wash option. TURBOZONE™ wash area ■ Load pans, casserole dishes, etc. in the back of the lower dishrack with the soiled surfaces facing the TURBOZONE™ spray jets.
Loading Silverware Basket Load the silverware basket while it is in the bottom rack or take the basket out for loading on a counter or table. NOTE: Unload or remove the basket before unloading the racks to avoid spilling water droplets onto the silverware. ■ Place small items such as baby bottle caps, jar lids, corncob holders, etc., in a covered section. Close the cover to hold small items in place. ■ Use suggested loading patterns, as shown, to increase washability of your silverware.
DISHWASHER USE Detergent Dispenser The detergent dispenser has two sections. The smaller Pre-Wash section empties detergent into the dishwasher when you close the door. The larger Main Wash section automatically empties detergent into the dishwasher during the wash. (See the “Cycle Selection Charts.”) Filling the dispenser 1. If the dispenser cover is closed, open the cover by moving the cover latch to the right.
Rinse Aid Dispenser IMPORTANT: Your dishwasher is designed to use a liquid rinse aid. The use of rinse aids greatly improves drying by allowing water to drain from the dishes after the final rinse. They also keep water from forming droplets that can dry as spots or streaks. Do not use a solid or bar-type rinse aid. 4. Clean up any spilled rinse aid with a damp cloth. Filling the dispenser 5. Place the knob back into the opening and turn to the “Lock” position.
Cycle Selection Charts Select the wash cycle and options desired. Or press START/ RESUME to use the same cycle and options as the previous cycle. NOTE: If the last cycle you completed was a rinse cycle, the dishwasher will run the last full wash cycle and options that you selected when you press START/RESUME. A “●” shows the steps that are in each cycle. Water usage is shown in U.S. gallons/liters. These models meet the ENERGY STAR® guidelines for energy efficiency. Cycle time includes dry time.
Quick Rinse Use this rinse cycle for rinsing dishes, glasses, and silverware that will not be washed right away. Do not use detergent with this cycle. Wash Main Wash Rinse or Purge Final Rinse Dry ● Rinse Time (min) Water Usage (gal/L) 10 1.8-2.2/ 6.8-8.3 †A small amount of water is run through the pump to remove soil particles between the main wash and final rinse.
■ Turn the TURBOZONE™ wash option off if not loading items for this option. Always use heavy soil detergent fill recommendation with TURBOZONE™ wash option. (See “How much detergent to use” in “Detergent Dispenser” section.) Lock On Use the Lock On to prevent unintended use of the dishwasher between cycles. You can also use the lock feature to prevent unintended cycle or option changes during a cycle. When Lock On is lit, all buttons are disabled.
Active Vent The active vent reduces the sounds from your dishwasher. The vent closes, after the cycle starts, to lock in sound. The active vent opens when wash action ends and vapor is vented into room. Between cycles, the vent stays open for airflow, reducing the buildup of odors. NOTE: There is a slight noise when the cover closes or opens. This is normal. IMPORTANT: The vapor is hot. Do not touch the vent during drying.
WASHING SPECIAL ITEMS If you have doubts about washing a particular item, check with the manufacturer to see if it is dishwasher safe. Material Dishwasher Safe?/Comments Material Dishwasher Safe?/Comments Aluminum Yes High water temperature and detergents can affect finish of anodized aluminum. Pewter, Brass, Bronze No High water temperatures and detergent can discolor or pit the finish. Disposable Aluminum No Do not wash throwaway aluminum pans in the dishwasher.
DISHWASHER CARE Cleaning Cleaning the exterior In most cases, regular use of a soft, damp cloth or sponge and a mild detergent is all that is necessary to keep the outside of your dishwasher looking nice and clean. If your dishwasher has a stainless steel exterior, a stainless steel cleaner is recommended. Cleaning the interior Hard water minerals can cause a white film to build up on the inside surfaces, especially just beneath the door area. Do not clean the dishwasher interior until it has cooled.
TROUBLESHOOTING First try the solutions suggested here and possibly avoid the cost of a service call... ■ Dishwasher is not operating properly ■ Was too much detergent used? Refer to the “Detergent Dispenser” section. Dishwasher does not run or stops during a cycle Is the brand of detergent making excess foam? Try a different brand to reduce foaming and eliminate buildup. Is the door closed tightly and latched? Is the right cycle selected? Refer to the “Cycle Selection Charts.
Dishes in the TURBOZONE™ wash area are not clean ■ Are the dishes loaded to face the TURBOZONE™ spray jets? Load soiled dish surfaces to face the back of the dishwasher toward the TURBOZONE™ spray jets. Tilt the dishes toward the back so water can drain from surfaces, and the lower spray arm can wash the item from below. NOTE: Loaded items may shift when dishracks are pushed into the dishwasher. Make sure dishes do not interfere with the spray arms, water feed tube, or TURBOZONE™ spray jets.