
Installation guide


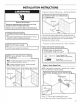
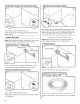


INSTALLATION
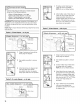
REQUIREMENTS
we
fools
and
Parts
Gather
the
recommended
tools
and
parts
before
starting
installation.
Read
and
follow
the
instructions
provided
with
any
tools
listed
here.
All
Installations
Tools
needed:
Parts
needed:
34"-Compr
x
%4"
hose
Kit
Number:-11000.
fitting.
Contact
your
local
Sears
Store
to
purchase
Pliers
LE.
LL
Flat-blade
screwdriver
nut
drivers
or
hex
sockets
Phillips
SX
Utility
knife
screwdriver
Za
Sie"
and
Ya"
UL
Listed/CSA
Approved
twist-on
wire
connectors*
Measuring
tape
orruler
G)
Small
level
10°
adjustable
w
that
opens
to
1%"
(2.9
em)
rench
52"
open-end
wrench
Torx®":T20°
screwdriver
iP
*Must
be
the
proper
size
to
connect
your
household
wiring
to
16-gauge
wiring
in
dishwasher.
Other
useful
items
you
may
need:
Flashlight
>
Shallow
pan
GP
Parts
supplied:
Drain
hose:
|
Drain
#10
x
4" 2-
under-
Under.-
clamps
(2)
-|
hose
Phillips-head
|
counter
counter
(Varge
and
»
|screws
(2)
|
Mounting.
[side
mount
1-small)
brackets
(top)
brackets
a,
c—3
Make
sure
all
these
parts are
included
in
the
literature
package.
T®TORX
and
T20
are
registered
trademarks
of
Saturn
Fasteners,
Inc.
Other
parts
you
may
also
need:
12"
(3.81-5
cm)
Screw-type
clamps
(3:
maximum)
Masking
or
duct
tape
NOTE:
Parts
available
for
purchase
in
plumbing
supply
stores.
Check
local
codes.
Check
existing
electrical
supply.
See
“Electrical
Requirements”
section.
It
is
recommended
that
electrical
connections
be
made
by
a
licensed
electrical
installer.
In
addition,
for
first-time
installations
Tools
needed:
Cordless.
drill
with
14",
34"
and
1%"
hole
saw
bits
og
Small
tubing
cutter
Wire-stripper
Parts
needed:
Coppertubing
("
See
“Electrical
Requirements”
section.
O.D.
suggested)
or
flexible
braided
water
supply
line
For
Direct
Wire:
|
For
Power
Supply
use
UL
Listed/..-|
Cord:
use
UL
CSA
Approved]
Listed/CSA
strain-relief
Approved
power
to.fit
4"
(2.2.cm)
|
supply-cord
kit
hole
marked
for
use
with
dishwasher