
Manual


Placecupsandglassesintherowsbetweentines.
Placingthemoverthetinescanleadto breakageand
waterspots.
China,crystal,andotherdelicateitemsmustnottouch
eachotherduringdishwasheroperation.Damagemay
occur.
Loadlightweightplasticitemsinthetoprackonly.Only
plasticitemsmarked"dishwashersafe"are
recommended.
Loadplasticitemssotheforceofthespraydoesnot
movethemduringthecycle.
Toavoidchipping,donotletstemwaretouchother
items.
Smallbowls,pans,andotherutensilscanbeplacedin
thetoprack.Loadbowlsinthecentersectionforbest
stability.
Cupshelves (on some models)
Fold down the extra shelf on the left-hand or right-hand
side of the top rack to hold additional cups, stemware or
long items such as utensils and spatulas.
NOTE: The features on your dishwasher may vary from
those shown below.
Deluxe adjustable 2-position top rack (on some models)
You can raise or lower the top rack to fit tall items in either
the top or bottom rack. Raise the top rack to
accommodate items up to 9" (22 cm) in the top rack and
13" (33 cm) in the bottom rack, or lower the top rack to
accommodate items up to 11" (28 cm) in both the top and
bottom racks. Adjusters are located on each side of the
top rack.
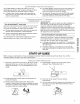
To raise the top rack
i i¸ , _i)i
Lift the rack on both sides until the rack is level.
NOTE: The top rack must be level.
To lower the top rack
Depress both tabs on rack adjusters, as shown above, and
slide the rack back to its original position.
Removable top rack
The removable top rack allows you to wash larger items
such as stock pots, roasters, and cookie sheets in the
bottom rack.
IMPORTANT: Remove dishes prior to removing the rack
from the dishwasher.
To remove the top rack
1. Pull the rack forward slightly to access clips.
2. While pressing the ridges in, push back on the clip until
the outer side releases. Slide the clip to the inside of
the track edge to remove the clip.
3. After removing both clips, pull rack out.
To replace the top rack
1. Place the rollers on each side of the rack into the rack
tracks and push the rack back.
2. Align the open side of the clip with the inside edge of
the rack track.
3. Push the ridges and slide the clip toward the outside
rack edge until it locks into place.
4. Repeat on the other side.
5. Pull the rack out all of the way to ensure clips are fully
seated.
Flexible tines
The row of tines on the left-hand and right-hand sides of
the top rack can be adjusted to make room for a variety of
dishes.
To adjust the flexible tines
1. Grasp the tip of the tine that is in the tine holder.
2. Gently push the tine out of the holder.
3. Lay the tines down, toward the center of the rack.
9