
Installation guide


"1 Check that all parts have been installed Verifiquequestodaslas parteshayansido S'assurerquetouteslespi_cesont6t6install6es
and no steps were skipped. Check that instaladasy quenoseomiti6ningunpaso. et qu'aucune6tapen'a6t6omise.S'assurer
you have all the tools you used. Verfiquesi tienetodaslasherramientasqueutiliz6, d'avoirtousles outilsquevousavezutilisds.
2. At the circuit breaker or fuse box, turn on Enelcortacircuitoe lacaadefusibles,conecte RaccorderI'alimentation61ectriqueaulave-
the electrical supply to the dishwasher, elsuministrode energaelectricaal lavavajillas, vaissele&I'aidedu disjoncteurou delaboftede
fusibles.
3. Check the operation of the cycle status Verfiqueelfuncionamientodelaslucesdeestado V6rifierlefonctionnementdesvoyantslumineux
lights as follows: delciclocomosigue: d'_tatdeprogramme.
a. Openthe door slightly and quickly a.Abraun pocola puertay presione a. Ouvrir16g_rementlaporteetappuyer
r_pidamentelos siguientesbotones,seg_nel rapidementsurlestouchesdansI'ordre
press in the order shown the following ordenquesemuestra:HIGHTEMPWASH suivant: HIGHTEMPWASH(lavagehaute
pads: HIGH TEMPWASH - AIR DRY- (Lavadoa altatemperatura)-- AIRDRY temp.)-- AIRDRY(s_chage_ I'air)-- HIGH
HIGHTEMP WASH - AIR DRY. (Secadocon aire)-- HIGHTEMPWASH-- TEMPWASH(lavagehautetemp.)-- AIR
AIRDRY. DRY(sdchage_ rair).
b. Deber_niluminarselastres luces.Presione b. Lestroisvoyantsdoivents'allumer.Appuyer
CANCELparasalirdeesemodo. sur CANCEL(annuler)pourannulerlemode.
c. Si laslucesnoest_nvisibles,apagueel c.Silesvoyantsnesontpasvisibles,
suministrodeenergiaeldctricaal lavavajillas d_brancherI'alimentation61ectriquedulave-
enelcortacircuitoo lacajadefusibles, vaisselle_ I'aidedudisjoncteuroudelabore
Repitalospapso13A,13By 13D,secci6nB, defusibles.
paraajustarel alineamientodelas luces. Rdp_terlesdtapes13A,13By 13D,sectionB,
Despu_s,repitalos pasosde"Verifiqueel pourajusterler_glagedesvoyants.Ensuite
funcionamiento", rdpdter1'6tape_ V6rificationdu
fonctionnement_.
b. All three lights should be iluminated.
Press CANCELto exit mode.
c. If the lights are not visible, turn off the
electrical supply to the dishwasher at the
circuit breaker or fuse box.
RepeatSteps 13A, 13B and 13D, Section
B, to adjust the alignment of the lights.
Then, repeat "Check Operation" steps.
4. Read the Use and CareGuide that came Lea el Manual del Propietarioque viene Lire le Guided'utilisation et d'entretien
with your dishwasher, con el lavavajillas, livrd avec le lave-vaisselle.
,5. Start dishwasher and allow it to Pongaen marchael lavavajillasy dejeque Mettre le lave-vaisselleen marcheet le
complete the shortest wash cycle. After completeel ciclode lavadom_sbreve, laissercompleterle plus court programme
the first two minutes, unlatch door, wait Despudsde quehayantranscurridodos de lavage.Apr_s les deux premieres
five seconds, then open door. Check to minutos,quite elsegurode la puerta,espere minutes,d6clencherla porte, attendrecinq
see that there is water in the bottom of cinco segundosyabra lapuerta.Verifiquesi secondes,puis ouvrir la porte. V6rifier qu'il
the dishwasher tub. Check that hayaguaen la parteinferior dela tinadel y a de I'eauau fond de la cure du lave-
dishwasher is working properly and that lavavajillas.Verifiquequeel lavavajillasest6 vasselle.S'assurer que le lave-vaisselle
there are no water leaks, funcionandodebidamentey que no haya fonctionne bien et qu'il n'y a pasde fuite
filtracionesde agua. d'eau.
(on some models) (en algunos modelos) (sur certains mod61es)
'1. At fuse box or circuit breaker, turn off Desconecte el cable de suministro Couper le courant dlectrique qui
electrical power supply to dishwasher, el6ctrico al lavavajillas en la caja de alimente le lave-vaisselle, au niveau de
fusibles o en el disyuntor, la boTtede fusibles ou du disjoncteur.
2. Retirer le panneau d'insonorisation du
sachet en plastique.
3t
Remove the bottom sound pad from
inside the dishwasher and take it out of
the plastic bag.
Quite la almohadilla inferior del
aislamiento ac_stico de la bolsa de
pl_stico.
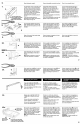
11
Place pad on the floor in front of the
dishwasher, making sure lettering is
facing up and vinyl pad faces down.
Fold up and hold the side panels down.
Carefully slide the pad toward the back
of the dishwasher as far as it will go,
making sure not to push or pull any
wires or hoses. (Do not force.) Side
panels will open to proper position.
NOTE: tf there are pipes or other
obstructions coming up through the
floor, you will need to cut a slit in the
pad to fit around the obstacle.
Coloque la almohadilla en el piso frente
al lavavajillas y aseg_rese de que las
letras estdn haciaarriba.
Plidguela y sostenga hacia abajo los
paneles laterales. Deslice con cuidado la
almohadilla completamente hacia la
parte posterior del lavavajillas,
asegurdndose de no empujar ni jalar
ning_n cable o manguera. (No la
fuerce.) Los paneles laterales se abrir_n
en la posici6n adecuada.
NOTA: Si hay tubos u otro tipo de
obstrucciones que atraviesen el piso
hacia arriba, necesitard hacer una
hendidura en la almohadilla para que
encaje alrededor del obstdculo.
Placer le panneau sur le sol devant le
lave-vaisselle, en s'assurant que les
lettres sont vers le haut.
Replier et tenir les panneaux lat6raux
vers le bas. Faire glisser avec
pr6caution le panneau vers I'arri_re du
lave-vaisselle aussi loin que possible, en
s'assurant de ne pas pousser ou tirer un
fil ou un tuyau. (Ne pas forcer.) Les
panneaux lat6raux se mettront
d'eux-m_mes en bonne position.
REMAROI.IE: S'il y a des tuyaux ou
d'autres obstacles provenant du
plancher, il vous faudra faire une entaille
dans le panneau d'insonorisation pour
contourner I'obstacle.
Fold the front end of the pad up into
position. Make sure the vinyl pad is
tucked up behind the door and the
dishwasher front legs, as shown.
Pliegue el extremo frontal de la
almohadilla hacia su posici6n.
Replier I'extr6mit6 avant du panneau en
position.
32