
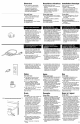
Installation guide


10.
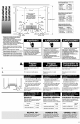
Drain hose
Cut a 1-1/2" (3.8 cm) diameter hole in
cabinet wall or floor on the side of the
opening closest to the sink.
Manguera de desag e
Hagaunorificiode1-1/2"(3.8cm)de di_metro
enla paredoen elpisodelgabinete,enel
costadodelorificio m_scercanoalfregadero.
Tuyau de d6charge
Perceruntrou de 3,8cm (1 1/2 pc) dediam_tre
donslaparoidu placard,oudartsle planchersur
lecStddeI'ouvertureleplusprochedeI'dvier.
Connect drain hose to waste tee or
waste disposer following one method.
If you hove: and:
an air gap
a waste disposer
no air gap*
an air gap
no waste disposer
no air gap*
*on air gap is recommended
gotostep:
11o.
11c.
11b.
11d.
Conecteen"T"lamangueradedesagEiealtubode
desperdicioso alrecipientededesechossiguiendo
unodelossiguientesm_todos:
Sitiene: y: Ccnlinde
onrecipiente
dedesechos
sinrecipiente
dedesechos
conelpaso:
espaciadordeaire 11a.
sinespaciadordeaire* 11c.
espaciadordeaire 11b,
sinespaciadordeaire* 11d.
*serecomiendatenerespociadordeaire
Connecterletuyaudeddcharge&un raccordT
d'dvacuationouun broyeurdeddchetscomme
suit.
Si vousoyez: et:
onbrceur onbdse-siphon
dedd_ets
pasdebrise-siphon*
pasdebroyeut un bdse-siphon
deddcdets
pasdedrise-siphon*
*un brise-siphonestrecommandd
passez
dl'dtape:
11a.
11c.
11b.
11d.
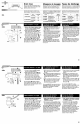
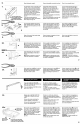
11a.
1. Remove the disposer knockoutplug.
Cut end of drain hose O if needed
(do not cut ribbed section).
2. Attach drain hose to air gap O with
large spring-type clamp O. If the
drain hose was cut, use a 1-1/2" to 2"
(3.8 to 5 cm) screw-type clamp*.
3. Use a rubber hose connector _) with
spring or screw-type clamps* _) to
connect air gap to disposer inlet O.
This connection Q MUST be before
drain trap _) and at least 20" (50.8 cm)
above the floor where dishwasher will
be installed. Go to step 12.
1. Quiteeltap6nextractordelrecipientede
desechos.Corteelextremodelamanguerade
desagi]eO si fueranecesario(nocortela
secci6nnervada).
2. Fijelamangueradedesagiiealespaciadordeaire
0 conunaabrazaderatiporesortegrandeO. Si
secort6larnangueradedesagi]euseuna
abrazaderatipotornillode1-t/Z'toZ'(3.8to5cm).*
3. Utiliceunconectordemangueradecaucho*•
conabrazaderastiporesorteotornillo*_ para
conectarelespaciadordeairealorificiode
entradadelrecipiente0.
Estaconexi6nQ DEBEestarantesdelsif6nde
desagi]e_) y almenosa20"(50.8cm)sobreel
pisodondeellavavajillasser_instalado.ContinUe
conelpaso12.
1.0ter I'operculearrachabledubroyeurde
d_chets.CouperI'extr_mitddutuyaudevidange
O aubesoin(hepascouper]asectionondul_e).
2.Connecterletuyauded_cbargeaubrise-siphon
O avecunegrossebridedetype_]ressortO.
Siletuyauded_charge_taitcoup_,utiliserune
bridedetype_visserde3,8-5cm(1-t/2-2pc).*
3. Utiliseruntuyauencaoutchouc*_ _ I'aidede
bridesdeserrage_visou_ressort*@ pour
connecterlebrise-sipbon_ rentr_edu
broyeurO.
CeraccordementO D01Tsefaireau-dessusdu
pi_gedusiphon_) et_]unehauteurminimalede
50,8cm(20pc) au-dessusduplanchero_)sera
install_lelave-vaisselle.Passer_I'_tape12.
11
11b.
1. Cut end of drain hose O if needed
(do not cut ribbed section).
2. Attach drain hose to air gap _) with
large spring-type clamp. If the drain
hose was cut, use a 1-1/2" to 2"
(3.8 to 5 cm) screw-type clamp*.
3. Use a rubber hose connector*
with spring or screw-type clamps* _)
to connect air gap to waste tee _.
This connection _ MUST be before
drain trap _) and at least 20" (50.8 cm)
above the floor where dishwasher will be
installed. Go to step 12.
1. Corteelextrernodelamangueradedesagi_e
O si fueranecesario(nocortelasecci6n
nervada).
2. Fijelamangueradedesag_iealespaciadordeaire
0 conunaabrazaderatiporesortegrande.Sise
cort_lamangueradedesagi]euseuna
abrazaderatipotornillode1-1/2"to2"(3.8to 5
Cm).
3. Utiliceunconectordemangueradecaucho*
con abrazaderastipo resorteo tornillo*
@ paraconectaren"T" el espaciadorde
airealtubo dedesperdicios_.
Estaconexi6n_ DEBEestarantesdelsif_nde
desagi_e(_ y al menosa20" (50.8cm) sobre
el pisodondeellavavajillasser_instalado.
ContinUeconel paso12.
1. CouperI'extr_mit_dutuyaude d_charge0
au besoin(hepascouperla section
ondui_e).
2. Connecterletuyauded_chargeau brise-
siphon• avecunegrossebridedetype
ressort.Si letuyauded6charge_taitcoup_,
utiliserunebridedetype&visserde3,8-5
cm(1-1/2-2pc).*
3. Utiliseruntuyauencaoutchouc*_ _ I'aide
de bridesdeserrage&vis ou&ressort*
pourconnecterle bfise-siphonauraccordT
d'@acuation_.
Ce raccordement _ DOlTse faire
au-dessus du pi_ge du siphon (_ et _ une
hauteur minimale de 50,8 crn (20 pc)
au-dessus du plancher o5 sera install_ le
lave-vaisselle. Passer_ I'_tape 12.
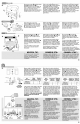
_,.1.C.
1. Remove the disposer knockoutplug.
Do not cut end of drain hose.
2. Attach drain hose O to disposer inlet
O with large spring-type clamp O.
This connection Q MUST be before
drain trap _) and at least 20" (50.8cm)
above the floor where dishwasher will
be installed. It is recommended that the
drain hose be looped up and securely
fastened to the underside of the
counter. Go to step 12.
1. Quiteel tap6nextractordel recipientede
desechos.Nocorte el extremo de la
manguerade desagi_e.
2. Fije lamanguerade desag0eO al orificio
deentradadel recipientede desechos
con unaabrazaderagrandetipo resorteO.
Estaconexi6n _ DEBEestarantes del sif6n
de desag0e® y al menosa 20" (50.8 cm)
sobre el piso donde el lavavajillasser_
instalado. Se recomiendaque la manguera
de desag0eest_enroscaday quese fije de
manerasegura debajodel mostrador.
ContinUecon el paso12.
1.0ter I'opercule arrachabledu broyeur
de d_chets.Ne pas couper I'extr_mit_
du tuyau de ddcharge.
2. Connecter le tuyau de vidange O
I'entr_edu broyeur O _ I'aide d'une
grosse bride de type & ressort O.
Ce raccordement _ DOlT sefaire
au-dessus du pi_ge du siphon ® et &une
hauteur minimale de 50,8 cm (20 pc)
au-dessus du plancher o5 sera install_ le
lave-vaisselle. II est recommandd que le
tuyau de vidangesoit en boucleet
correctement sur laface infdrieuredu
comptoir. Passer_ I'dtape12.
12