
Installation guide
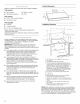


Gather the required tools and parts before starting installation.
Tools needed
• Tape measure • Marker or pencil
• Flat-blade screwdriver • Pliers
Parts needed
• A UL or CSA conduit connector
• UL listed wire nuts
Parts supplied
• Cooktop
• 2 clamp brackets
• 21/2'' (6.4 cm) clamping screw
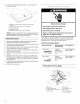
Check local codes. Check existing electrical supply. See
"Electrical Requirements."
All electrical connections should be made by a licensed, qualified
electrical installer.
Proper installation is your responsibility. Make sure you have
everything needed for correct installation. It is the responsibility
of the installer to comply with the installation clearances
specified in these instructions.
IMPORTANT: Observe all governing codes and ordinances.
When installing cooktop, use minimum dimensions given.
Cabinet storage space located above the surface units should be
avoided.
• The cooktop must be a specified cooktop that is approved to
be installed either alone or over an undercounter built-in
oven. Check the cooktop burner box for an approved
installation label. If you do not find this label, contact your
dealer to confirm that your cooktop is approved.
• Ovens approved for this type of installation will have an
approval label located on the top of the oven. If you do not
find this label, contact your dealer to confirm that your oven is
approved. Refer to oven manufacturer's Installation
Instructions for approval for built-in under use and proper
cutout dimensions.
• When installing cooktop over an undercounter built-in oven,
do not fasten cooktop to countertop with clamps. This will
make the cooktop easier to remove if future servicing
becomes necessary.
• The cooktop should be installed away from strong draft
areas, such as windows, doors and strong heating vents or
fans. The cooktop should be located for convenient use in the
kitchen.
• Use the countertop opening dimensions that are given with
these Installation Instructions. Given dimensions are
minimum clearances and provide 0" (0 cm) clearance.
• Grounded electrical supply is required. See "Electrical
Requirements" section.
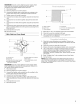
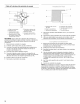
Product Dimensions
15" (38.1 cm)
30" (76.2 crn) or ......... \
36" (91.4 cm)
21-
(54,1
2-7/8" (7,3 cm)
Installation Clearances
_--- A _l 13" (33 crn)
B I " _18" (45.7 cm) rain
c I 1
A. 30" (76.2 cm) on 30" models; 36" (91.4 cm) on
36" models
B. Combustible area above countertop
C. 30" (76.2 cm) minimum clearance between top of
cooktop platform and bottom of unprotected wood or
metal cabinet (24" [61 cm] minimum clearance if
bottom of wood or metal cabinet is protected by not
less than V4"[0.6 cm] flame retardant millboard
covered with not less than No. 28 MSG sheet steel,
0.015" [0.04 cm] stainless steel, or 0.024" [0.06 cm]
aluminum or 0.020" [0.05 cm] copper)
D. 13" (33 cm) recommended upper cabinet depth
E. 2" (5.1 cm)
F. 20.5" (52 cm)
G. Minimum clearance upper cabinet to countertep
within minimum clearances to ceektep
H. Junction box or outlet," 12" (30.5 cm) minimum from
bottom of countertop; 10" (25.4 cm) from right side of
cabinet
I.29.5" (75 cm) on 30" models; 35.5" (90.2 cm) on
36" models
J. Minimum distance to nearest left and right side
combustible surface above cooktop
NOTES: After making the countertop cutout, some installations
may require notching down the base cabinet side walls to clear
the burner box. To avoid this modification, use a base cabinet
having sidewalls wider than the cutout. If cabinet has a drawer, a
3" (7.5 cm) depth clearance from the countertop to the top of the
drawer (or other obstruction) in base cabinet is required.