
Installation guide


REMEMBER: Use the 4-wire cable from power supply where
local codes do not permit connecting the frame-ground
conductor to the neutral (white) junction box wire.
1. Disconnect power.
2. Remove junction box cover if present.
3. Connect the flexible cable conduit from the cooktop to the
junction box using a UL or CSA listed conduit connector.
4. Tighten screws on conduit connector.
5. Connect the two black wires together using the UL listed wire
nuts.
6. Connect the two red wires together using the UL listed wire
nuts.
7. Connect the two white wires together using the UL listed wire
nuts.
8. Connect the green ground wire from the cooktop cable to the
green or bare grounded wire (in the junction box) using the UL
listed wire nuts.
9. Install junction box cover.
10. Reconnect power.
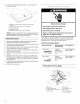
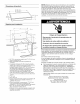
3-Wire Cable from Power Supply
A. Junction box
B. Red wires
C. White wire (from power supply)
D. White and green grounding
wires (from cooktop)
E. 4-Wire cable from cooktop
F. Black wires
G. UL or CSA listed conduit
connector
REMEMBER: Use the 3-wire cable from power supply where
local codes permit connecting the frame-ground conductor to
the neutral (white) junction box wire:
1. Disconnect power.
2. Remove junction box cover if present.
3. Connect the flexible, cable conduit from the cooktop to the
junction box using UL listed wire nuts.
4. Connect the two black wires together.
5. Connect the green and white cooktop cable wires to the
white (neutral) wire in the junction box using the UL listed wire
nuts.
6. Install junction box cover.
7. Reconnect power.
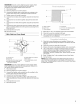
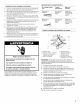
A. Glass cooktop
B. Burner box
C. Clamp bracket
D. Countertop
E. 2 W' (6.4 cm) clamping screw
F. Attachment screw
1. Place the 2.5" (6.4 cm) clamping screws into the brackets.
2. Check to be sure the cooktop is still level.
3. Use a screwdriver to tighten the screws against the
countertop. Do not overtighten.
1. Check to be sure all parts are now installed. If there is an
extra part, go back through the steps to see which step was
skipped.
2. Check to be sure you have all of your tools.
3. Dispose of/recycle all packaging materials and unused parts.
4. Use a mild solution of liquid household cleaner and warm
water to remove waxy residue caused by protective shipping
material. Dry thoroughly with a soft cloth. For more
information, see the "Cooktop Care" section of the Use and
Care Guide.
5. Read "Cooktop Use" in the cooktop Use and Care Guide.
6. Connect power.
NOTE: If the cooktop will not work after turning the power on,
check that the circuit breaker is not tripped or the house fuse
blown. See "Troubleshooting" section in the Use and Care Guide
for further information.