® Microwave Hood Combination Combinacibn Microondas Campana Models/Modelos 665.60622 665.60629 \ 4619-652-60231/8169675 Sears, Roebuck and Co., Hoffman Estates, IL 60179 www.sears.
Table of Contents Microwave Oven Warranty .............................................................. Sears Service ..................................................... 2 3 Microwave Installation 4 7 Oven Safety .................................... Instructions ..................................... Getting to Know Your Microwave Oven ................................................
Sears Service "We service what we sell" "We service what we sell" is our assurance to you that you can depend on Sears for service because Sears Service is nationwide.
Microwave Oven Safety Your safety and the safety of others are very important. We have provided many important safety messages in this manual and on your appliance. Always read and obey all safety messages. This is the safety alert symbol. This symbol alerts you to potential hazards that can kill or hurt you and others. All safety messages will follow the safety alert symbol and either the word "DANGER" or "WARNING.
IMPORTANT SAFETY INSTRUCTIONS • Intended to be used above ranges with maximum width of 36 inches. • Clean Ventilating Hoods Frequently - Grease should not be allowed to accumulate on hood or filter. • Oversized foods or oversized metal utensils should not be inserted in the microwave oven as they may create a fire or risk of electric shock. • Do not clean with metal scouring pads. Pieces can burn off the pad and touch electrical parts involving a risk of electric shock.
ELECTRICAL REQUIREMENTS Observe all governing codes and ordinances. A 120 Volt, 60 Hz, AC only, 15- or 20-amp fused electrical supply is required. (A time-delay fuse is recommended.) It is recommended that a separate circuit serving only this appliance be provided. Electrical Shock Hazard Plug into a grounded 3 prong outlet. Do not remove ground prong. Do not use an adapter. Do not use an extension cord. Failure to follow these instructions can result in death, fire, or electrical shock.
Installation Instructions REMOVING AND REPLACING THE MICROWAVE COMBINATION HOOD 5. Grasp the microwave oven. Rotate the microwave that door does not swing open.) Lift off the support tabs _ at the bottom of the mounting plate. Set the microwave oven aside on a protected surface. (Be careful oven downward. Excessive Weight Hazard Use two or more people to move and install microwave oven. Failure to do so can result in back or other injury.
Getting to Know Your Microwave Oven This section discusses the concepts behind microwave cooking. It also shows you the basics you need to know to operate your microwave oven. Please read this information before you use your oven. HOW YOUR MICROWAVE OVEN WORKS Microwave energy is not hot. It causes food to make its own heat, and it's this heat that cooks the food. Microwaves are like TV waves, radio waves, or light waves. You cannot see them, but you can see what they do.
TESTING YOUR DINNERWARE Test dinnerware or cookware before using. To test a dish, put it into the oven with 1 cup (250 mL) of water beside it. Cook at 100% cook power for one minute. If the dish gets hot and water stays cool, do not use it. Some dishes (melamine, some ceramic dinnerware, etc.) OR COOKWARE absorb microwave energy, and may become too hot to handle or may slow cooking times.
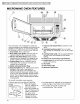
MICROWAVE OVEN FEATURES ? ® Your microwave oven is designed to make your cooking experience as enjoyable and productive as possible. To help get you up and running quickly, the following is a list of the oven's basic features: 1. Door Handle. Pull to open door. 2. Door Safety Lock System. The oven will not operate unless the door is securely closed. 3. Window with Metal Shield. Shield prevents microwaves from escaping. It is designed as a screen to allow you to view food as it cooks. 4.
CONTROL PANEL FEATURES Your microwave oven control panel lets you select a desired cooking function quickly and easily. The following is a list of all the Command pads located on the control panel. For more information on these features, see "Using your microwave oven" section. 1. Display. This display includes a clock and indicators to tell you the time of day, cooking time settings, and cooking functions you chose. 2. POPCORN. Touch this pad when popping popcorn in your microwave oven.
CONTROL PANEL FEATURES (CONT.) NOTES: • if you have entered all settings for a function but do not touch START/ENTER in 5 seconds, the START? indicator light will show. • if you open the door while the oven is on and then shut the door, the START? indicator light will show. Touch START/ENTER to continue. • if you choose a function but do not touch another command pad within 1 minute, the display returns to the time of day and you have to start over.
CONTROL PANEL FEATURES (CONT.) Mes '47 ha '$ele FAs I® of Iced When heating plates of food with a cook time that you set, you can heat two 10 in. (25.4 cm) plates side by side or one plate larger than the turntable. You can heat 2 more plates on the Cooking Rack for a possible total of 4 plates. For best results, halfway through cooking turn the plates halfway around until the food in the front is in the back. Do the same when heating a larger (9 to 13 in. [23 to 33 cm]) casserole.
USING THE COOKING RACK The Cooking Rack gives you extra space when cooking in more than one container at the same time. NOTES: If you need a replacement rack (Part No. 4393826), you can order one from your Sears Service Center, or by calling 1-800-366-7278. Make sure to have your model number when ordering. • Do not store the metal rack in the oven. Arcing and damage to the oven could result if someone accidentally starts the oven.
USING THE COOKTOP/COUNTERTOP The pad on the bottom right of the control panel controls the cooktop/countertop light. LIGHT 2, Turn off light when desired, TOUCH 1, Turn on light, TOUCH (1 or 2 times, depending on light setting) (once for regular light, twice for night light) SETTING THE CLOCK When your microwave oven is first plugged in, or after a power failure, the display will flash ":". if a time of day is not set, ":" will flash until you touch any pad.
USING THE KITCHEN TIMER You can use your microwave oven as a kitchen timer. Use the Kitchen Timer for timing up to 99 minutes, 99 seconds. NOTE: The oven can operate while the Kitchen Timer is in use. The Kitchen Timer always will be displayed in the lower right portion of the display. 1, Touch KITCHEN TOUCH 2, Enter YOU SEE TIMER, YOU SEE the time to be counted down. Example for 1 minute, 30 seconds: TOUCH NOTE: If you do not do this step within 5 seconds of doing Step 2, "START?" will appear.
USING ADD ONE MINUTE ADD ONE MINUTE lets you cook food for 1 minute at 100% cook power or add an extra minute to your cooking time cycle. You can also use it to extend cooking time cycles in multiples of 1 minute, up to 99 minutes. • You can use ADD ONE MINUTE only for the cook time function. NOTES: 2, Touch ADD ONE MINUTE, • To extend cooking time cycles in multiples of 1 minute, touch ADD ONE MINUTE repeatedly during cooking.
Usi This section carefully. Your Microwave gives you instructions for operating each function. Please Oven read these instructions COOKING AT HIGH COOK POWER 1, Put your food in the oven and close the door, 4, Start the oven, TOUCH 2, Touch COOK YOU SEE TIME, TOUCH YOU SEE At the end of the cooking time: YOU SEE 3, Enter the cooking time, TOUCH YOU SEE (four tones will sound) You can change the cooking time any time during cooking by repeating Steps 2, 3, and 4.
COOKING AT DIFFERENT COOK POWERS (CONT.
COOKING AT DIFFERENT COOK POWERS (CONT.) 5, Start the oven, TOUCH YOU SEE You can change the cooking time or cook power any time during cooking by repeating Steps 2, 3 and/or 4 and 5. At the end of the cooking time: YOU SEE (four tones will sound) COOKING IN STAGES For best results, some recipes call for one cook power for a certain length of time, and another cook power for another length of time. Your oven can be set to change from one to another automatically, for up to 3 stages.
COOKING IN STAGES (CONT.) Example for 50% cook power: TOUCH YOU SEE At the end of the cooking time: YOU SEE OR (four tones will sound) (repeat until desired cook power appears) 5, Repeat Steps 2, 3, and 4 to set the cooking time and cook power for each additional stage, You can change cooking times or cook powers for a stage any time after that stage starts by repeating Steps 2, 3 and/or 4 and 5. 6, Start the oven, TOUCH YOU SEE After the first stage is over, you will hear 2 tones.
USING AUTO COOK You can cook microwavable foods just by choosing a category and quantity. AUTO COOK has preset times and cook powers for 5 categories (see following chart).
USING AUTO COOK (CONT.) This chart shows you how to choose a type of food and the amounts you can choose for each type. FOOD TOUCH AUTO COOK* Rice once 1 0.5, 1, 1.5, or 2 cups** (118 ml, 237 ml, 355 ml, or 473 ml) Canned Vegetables 2 times 2 1 to 4 cups (237 ml to 946 ml) Bacon 3 times 3 1 to 6 pieces, average thickness 4 1 to 4 servings 5 1 to 4 pieces French Toast OR TOUCH NUMBER PAD 5 times AMOUNTS YOU CAN CHOOSE You must touch AUTO COOK once before choosing the food type. Set 0.
USING AUTO REHEAT (CONT.) NOTES: 4. Touch • If you do not enter a quantity within 2 seconds, AUTO REHEAT will prompt you to choose a quantity. You then have 1 minute to enter a quantity and to touch START/ENTER. If you do not do so, AUTO REHEAT will be canceled. YOU SEE • If you touch AUTO REHEAT 6 times, the display returns to the Pizza Slice setting. • If you need more or less time, do not touch AUTO REHEAT again. Touch POWER before you touch START/ENTER.
USING ZIP DEFROST (CONT.) NOTES: 3. Touch Number pad(s) to enter the weight. Input the correct weight. [_ • If you do not enter a weight within 2 seconds, ZIP DEFROST will prompt you to enter a weight. You then have 1 minute to enter a weight and to touch START/ENTER. If you do not do so, ZIP DEFROST will be canceled. Example forkg) 1.1 Ibs (0.5 YOU SEE • If you enter a weight higher than the highest weight or lower than the lowest weight (0.2 lb.
ZIP DEFROST CHART FOOD SPECIAL INSTRUCTIONS Beef Meat of irregular shape and large, fatty cuts of meat should have the narrow or fatty areas shielded with foil at the beginning of a defrost cycle. Ground Beef, Bulk Do not defrost less than ¼ Ib (113 g). Ground Beef, Patties Do not defrost less than two 4 oz (113 g) patties. Round Steak, Tenderloin Steak, Pot Roast, Chuck Roast, Rib Roast, Rolled Rump Roast Place on a microwavable Stew Beef Place in a microwavable baking dish.
ZIP DEFROST CHART (CONT.) ish oett g FOOD SPECIAL INSTRUCTIONS Fish Fillets Place in a microwavable cold water. baking dish. Carefully separate fillets under Steaks Place in a microwavable baking dish. Run cold water over to finish defrosting. Whole Place in a microwavable baking dish. Cover head and tail with foil; do not let foil touch sides of microwave oven. Finish defrosting by immersing in cold water.
USING BREAD DEFROST You can use this feature for defrosting feature works similarly to Zip Defrost. bread. The To use BREAD DEFROST, follow the steps below: 1, Touch the BREAD DEFROST pad to enter the Bread Defrost function, BREAD APPRO)gMATE WEIGHT 1 Loaf of Bread 1.0 lb. (454 g) 1 Dinner Roll 0.2 lb. (91 g) 1 Hamburger/Hot Dog Bun 0.2 lb. (91 g) 1 Small Muffin 0.2 lb. (91 g) 1 Large Muffin 0.3 lb. (136 g) once The display will ask you to enter the weight. , 2.
USING BEVERAGE You can heat one or two 8-ounce (237 to 473 mL) cups of a beverage by touching just one pad. The number of times you touch this pad determines the number of cups your oven will heat. 3. Change TOUCH to 2 cups (473 mL), if desired. YOU SEE NOTES: • If you touch BEVERAGE 3 times, the display returns to the 1-cup setting. • You do not need to touch START/ENTER to start the oven. The oven will start heating by itself in 5 seconds. • If you need more or less time, do not touch BEVERAGE again.
USING BAKED POTATO (CONT.) At end of cooking time: 3, Change to 2 to 4 potatoes, if desired, YOU SEE Example for 2 potatoes: TOUCH YOU SEE OR (four tones will sound) After 5 seconds, the oven will start cooking. Example for 2 potatoes: YOU SEE (countdown time may vary from above) USING FRESH VEGETABLE You can cook 1 to 4 cups (237 mL to 946 mL) of a fresh vegetable by touching just one pad. The number of times you touch this pad determines the number of cups your oven will cook.
USING FRESH VEGETABLE (CONT.) At end of cooking time: 3, Change to 2 to 4 cups, Example for 2 cups: TOUCH if desired, YOU SEE YOU SEE OR (four tones will sound) After 5 seconds, the oven will start cooking. Example for 2 cups: YOU SEE (countdown time may vary from above) USING FROZEN VEGETABLE You can cook 1 to 4 cups (237 mL to 946 mL) of a frozen vegetable by touching just one pad. The number of times you touch this pad determines the number of cups your oven will cook.
USING FROZEN VEGETABLE (CONT.) At end of cooking time: 3, Change to 2 to 4 cups, if desired, YOU SEE Example for 2 cups: TOUCH YOU SEE OR (four tones will sound) After 5 seconds, the oven will start cooking. Example for 2 cups: YOU SEE (countdown time may vary from above) USING HOLD WARM 2, Touch HOLD WARM, Food Poisoning Hazard Do not let food sit in oven more than one hour before or after cooking.
Caring for Your Microwave ven To make sure your microwave oven looks good and works well for a long time, you should maintain it properly. For proper care, please follow these instructions carefully. For interior surfaces: Wash often with warm, sudsy water and a sponge or soft cloth. Use only mild, nonabrasive soaps or a mild detergent. Be sure to keep the areas clean where the door and oven frame touch when closed. Wipe well with clean water.
INSTALLING AND CARING FOR FILTERS 3, To remove I Electrical Shock Hazard Charcoal filter Grease filter Disconnect power before removing filters. Replace all panels before operating. Failure to do so can result in death or electrical shock. the charcoal Tabs (black fiber) filters, gently bend back the metal tabs on the back of the grease filter and pull the charcoal filter out. To replace the charcoal filters, align the charcoal filter over the grease filter.
REPLACING THE COOKTOP AND OVEN LIGHTS 3, Tip the grille forward, then lift out to remove. 1, Unplug microwave oven or disconnect power. I 1 2, Remove the bulb cover mounting screw and carefully remove the cover. Mounting screw 4. Lift up the bulb cover. 3, Replace bulb(s) with candelabra-base 30-watt bulb(s) (Part No. 4393681) available from your Sears Service Center. 4. Replace the bulb cover and mounting screw. 5. Plug in microwave oven or reconnect power. 1.
Cooking Guide MICROWAVE COOKING TIPS • If you increase or decrease the amount of food you prepare, the time it takes to cook that food will also change. For example, if you double a recipe, add a little more than half the original cooking time. Check for doneness and, if necessary, add more time in small increments. • The lower the temperature of the food being put into the microwave oven, the longer it takes to cook.
MICROWAVE COOKING TIPS (CONT.) • Place the container in a glass bowl and add some water so that it covers the bottom of the container, not more than ¼ in. (.64 cm) high. This ensures even heating of the container bottom. • Always remove the lid to avoid damage to the oven. • Use only undamaged containers. • DO not use containers taller than s/4in. (1.9 cm). • Container must be at least half filled.
Questions and Answers QUESTIONS ANSWERS Can I operate my microwave oven without the turntable or turn the turntable over to hold a large dish? No. If you remove or turn over the turntable, you will get poor cooking results. Dishes used in your oven must fit on the turntable. Can I use a rack in my microwave oven so that I may reheat or cook on two levels at a time? You can use a rack only if the rack is supplied with your microwave oven.
Troubleshooting Most cooking problems often are caused by little things you can find and fix without tools of any kind. Check the lists below and on the next page before calling for assistance or service. If you still need help, see the Sears toll-free numbers on the back cover. MICROWAVE OVEN DOES NOT WORK PROBLEM CAUSE Nothing works. • The power supply cord is not plugged into a grounded 3 prong outlet.
TURNTABLE PROBLEM CAUSE The turntable will not turn. • You have turned off the turntable. (See the "Heating more than one plate of food" section on Page 13.) • The turntable is not correctly in place. It should be correct-side sitting firmly on the center shaft. up and • The support is not operating correctly. Remove the turntable and restart the oven. If the support still does not move, call an authorized service technician for repair. Cooking without the turntable can give you poor results.
Index This index is alphabetical. you can find each topic. It contains all the topics included in this manual, along with the page(s) on which TOPIC ALUMINUM PAGE TOPIC 36-38 FILTERS FOIL .................................................. AUDIBLE SIGNALS .................................................. CARING FOR YOUR MICROWAVE OVEN 12 ............ 33 CHARTS Auto cook ................................................................ 23 Auto reheat ..............................................
Ind,ce de materias f • Garantia .................................................................... Servicio de Sears ..................................................... 44 45 Seguridad del homo de microondas ..................... 46 Instrucciones para la instalacibn ........................... 49 Conozca su horno de microondas ......................... 51 C6mo funciona su homo de microondas ............. 51 Interferencia electromagn6tica .............................
Servicio de Sears "Reparamos Io que vendemos" "Reparamos Io que vendemos" es nuestra garantla de que usted puede confiar en Sears para obtener servicio t6cnico porque el Servicio t6cnico de Sears esta en todo el paJs.
Seguridad del horno de microondas Su seguridad y la seguridad de los demos es muy importante. Hemos incluido muchos mensajes importantes de seguridad en este manual yen su etectrodomestico. Lea y obedezca siempre todos los mensajes de seguridad. Este es el simboto de advertencia de seguridad. Este simbolo te llama ta atenci6n sobre peligros potenciales que pueden ocasionar la muerte o una lesi6n a usted y a los demas.
INSTRUCCIONES IMPORTANTES • Para reducir el riesgo de incendio en la cavidad del homo: - No recocine los alimentos. Preste cuidadosa atenci6n al homo si usa papet, plastico u otro material combustible dentro del homo para facilitar la cocci6n. DE SEGURIDAD • No use articulos de papel mientras la operaci6n del homo esta en el modo "Pan Brown" (Dorado en la sart_n). • No almacene ningOn material en el homo cuando no est6 en uso, salvo los accesorios recomendados por el fabricante.
REQUERIMIENTOS ELI CTRICOS Cumpla con todos los c6digos y 6rdenes vigentes. Se requiere un suministro de electdcidad de 120 voltios, 60 Hz, Qnicamente CA de 15- 6 20ampedos a fusible. (Se recomienda un fusible de acci6n retardada.) Se recomienda que se use un circuito dedicado exctusivamente para este aparato etectrodomestico. Peligro de Choque EI6ctrico Conecte a un contacto de pared de conexi6n a tierra de 3 terminales. No quite el terminal de conexibn a tierra. No use un adaptador.
Instrucciones para la instalacibn COMO SACA.R Y VOLVER A COLOCAR LA COMBINACION DE MICROONDAS CAMPANA Peligro de Peso Excesivo Use dos o mds personas para mover e instalar el horno de microondas. No seguir esta instruccibn puede ocasionar una lesion en la espalda u otro tipo de lesiones. Si por algQn motivo usted necesita quitar su combinaci6n microondas campana, siga los siguientes pasos: 4. Sostenga la combinaci6n microondas campana en su lugar con una mano.
COMO SACA.R Y VOLVER A COLOCAR LA COMBINACION DE MICROONDAS CAMPANA (CONT.) 1. Levante cuidadosamente el homo de microondas y cu61guelo en las lengL)etas de soporte ubicadas en la parte inferior de la plancha de montaje. 2. Gire hacia abajo la parte frontal del gabinete para el homo de microondas. Pase el cable electrico a trav6s del orificio Iocalizado en la parte inferior del gabinete superior. 3, Gire el homo de microondas hacia el gabinete.
Conozca Su Horno de Microondas Esta seccibn habla de los conceptos de coccibn a microondas. Tambi6n le muestra los elementos basicos que usted debe conocer para operar el homo de microondas. Por favor lea esta informacibn antes de usar su homo. COMO FUNCIONA SU HORNO DE MICROONDAS La energla de microondas no produce calor. Esta energia hace que los alimentos generen calor y 6ste a su vez hace que los alimentos se cocinen. Las microondas son como las ondas de TV, radio o luz.
COMO PROBAR SU VAJILLA O SUS UTENSILIOS DE COCINA Pruebe la vajilla de mesa o de cocina antes de usarla. Para saber si un plato se puede usar en forma segura, col6quelo dentro del homo junto a una taza (250 mL) con agua. Cocine a 100% de intensidad durante un minuto. Si el plato se calienta y el agua est_ fria, no Io use. Atgunos platos (melamina, alguna vajilla ceramica, etc.
CARACTERiSTICAS DEL HORNO DE MICROONDAS ® Su homo de microondas ha sido diseSado para que su experiencia culinaria sea de Io mas amena y productiva posible. Para ayudarle a familiarizarse con rapidez, a continuaci6n tiene una lista de las caracteristicas basicas del homo: 1. Manija de la puerta. Jalela para abrir la puerta. 2. Sistema de traba de seguridad de la puerta. El homo no funcionara a menos que la puerta est_ bien cerrada. 3. Ventana con proteccibn metdlica.
CARACTERJSTICAS DEL PANEL DE CONTROL El panel de control de su horno de microondas le permite seleccionar una funci6n de cocci6n deseada con rapidez y con facilidad. La siguiente es una Iista de todos los botones de comando ubicados en el panel de control. Para obtener mds informacibn acerca de estas caracteristicas, vea la seccibn "C6mo usar su homo de microondas." 1. Pantalla.
CARACTERiSTICAS DEL PANEL DE CONTROL (CONT.) 18. TURNTABLE ON/OFF (bandeja giratoria encendida/apagada). Toque este bot6n para encender o apagar su bandeja giratoria. 19. START/ENTER (iniciar/ingresar). Toque este bot6n para comenzar una funci6n. 20. OFFICANCEL(apagarlanular). Toque este bot6n para borrar un comando incorrecto, anular un programa durante la cocciSn o para despejar la pantalla. 21. (Exhaust Fan) HIGH/LOW/OFF (Extractor de aire - ALTO/BAJO/APAGADO).
CARACTERiSTICAS DEL PANEL DE CONTROL (CONT.) AI calentar platos de comida con un tiempo de cocci6n que usted fija, usted puede calentar dos platos de 10 pulgadas (25.4 cm) lado a lado o un plato m_s grande que la bande_a giratoria. Usted puede calentar 2 platos mas en la parrilla de cocci6n con un total de 4 platos. Para obtener 6ptimos resultados, a media cocci6n, gire los platos hasta que los alimentos que estan al frente queden en la parte de atr&s.
COMO UTILIZAR LA PARRILLA DE COCCION La Parrilla de cocci6n le ofrece un espacio extra cuando est& cocinando en mAs de un recipiente a la vez. NOTAS: Si usted necesita una parrilla de recambio (Parte No. 4393826), puede pedirla a su Centro de Servicio Sears, o Ilamando al 1-888-784-6427. AsegQrese de tener consigo el nQmero del modelo en el momento de hacer su pedido. • No guarde la parrilla de metal en el homo. Se podHan producir chispas y da_os al homo si, accidentalmente, alguien Io pone a funcionar.
COMO UTILIZAR LA LUZ DE LA SUPERFICIE DE COCCION/MOSTRADOR El bot6n que est& en la parte inferior derecha del panel de control controla la luz de la superficie de cocci6n/mostrador. 1. Encienda 2. Apague TOQUE la luz cuando Io desee. la luz. TOQUE (1 o 2 veces, dependiendo del ajuste de la luz) (una vez para la luz regular, dos veces para la luz nocturna) COMO PONER EL RELOJ A I.
COMO UTILIZAR EL TEMPORIZADOR Usted puede usar su homo de microondas coma un temporizador de cocina. Use el temporizador de cocina para fijar el tiempo hasta 99 minutos, 99 segundos. NOTA: El homo puede funcionar mientras el temporizador de cocina est& en uso. El temporizador de cocina siempre aparecerA en la parte inferior derecha de la pantalla. 1. Toque KITCHEN TOQUE DE COCINA NOTA: Si usted no sigue este paso en 5 segundos depu6s del paso 2, "START?" aparecerA.
COMO UTILIZAR ADD ONE MINUTE (AGREGAR UN MINUTO) ADD ONE MINUTE le permite cocinar los alimentos durante un minuto al 100% de intensidad de cocci6n o agregar un minuto extra a su ciclo de cocci6n. Adem&s puede usarlo para prolongar los ciclos de cocci6n en mQItiplos de 1 minuto, hasta 99 minutos. • Usted puede usar ADD ONE MINUTE s61o para la funci6n de tiempo de cocci6n.
Cbmo Utilizar Su Horno de Microondas Esta secci6n le proporciona clones con cuidado. instrucciones para el funcionamiento COCClON A INTENSIDAD 1. Ponga sus alimentos cierre la puerta. en el horno y de cada funci6n. Por favor lea estas instruc- ALTA 4, Ponga el horno a funcionar, TOQUE 2. Toque COOK USTED VE TIME, TOQUE USTED VE AI final del tiempo de cocci6n: USTED VE 3. Ingrese TOQUE el tiempo de coccibn.
COCClON A DISTINTAS INTENSIDADES Para obtener 6ptimos resultados, algunas recetas necesitan distintas intensidades de cocci6n. Cuanto mas baja es la intensidad, m&s lenta es la cocci6n. Cada bot6n numerado tambi6n representa un porcentaje distinto de intensidad de cocci6n. Muchas recetas de libros de cocina para microondas le indican mediante nQmero, porcentaje o nombre, la intensidad de cocci6n que debe utilizar.
COCClON A DISTINTAS INTENSIDADES 1. Ponga sus alimentos cierre la puerta. en el horno y (CONT.) 5. Ponga el horno a funcionar, TOQUE USTED VE 2. Toque COOK TIME, TOQUE USTED VE AI fin del tiempo de cocciSn: USTED VE 3. Ingrese TOQUE el tiempo de coccibn. USTED VE (se escuchar&n sonidos) CD CD Ejemplo para 7 minutos, 30 segundos : 4.
COCCION POR ETAPAS Para Iograr 6ptimos resultados, algunas recetas necesitan una intensidad de cocci6n durante un tiempo determinado y otra intensidad de cocci6n durante otro perJodo de tiempo. Su homo puede ser fijado para cambiar de uno a otto automAticamente hasta un m&ximo de 3 etapas. Usted puede fijar las funciones de cocci6n seleccionadas en cualquier orden. Sin embargo, si usted usa ZIP DEFROST, esta deberA ser la primera etapa. 1. Ponga cierre sus alirnentos la puerta.
BARRA INDICADORA DE PROGRESO La pantalla contiene una barra indicadora de progreso, la cual indica hasta d6nde han avanzado las funciones de Auto Cook y cu&nto tiempo m&s resta a dichas funciones. La Iongitud total de la barra representa el tiempo estimado de duraci6n del ciclo de cocci6n. La barra indicadora avanza linea por linea durante un ciclo.
COMO UTILIZAR AUTO COOK (COCCION AUTOMATICA) CONT.) • Si usted toca AUTO COOK 6 veces, la pantalla regresa al ajuste de arroz. 4, Toque • Si usted necesita m&s o menos tiempo, no toque AUTO COOK de nuevo. Toque POWER antes de tocar START/ENTER. (Consulte "C6mo cambiar los tiempos prefijados de cocci6n" en la secci6n "Conozca su horno de microondas.") • AI cocinar tocino, tenga en mente que las diferencias en la cantidad de grasa, carne, espesor y proceso de ahumado afectar&n el modo de cocinar el tocino.
COMO UTILIZAR AUTO REHEAT (RECALENTAMIENTO AUTOMATICO) Usted puede recalentar alimentos con microondas tan s61oeligiendo una categorfa y cantidad. AUTO REHEAT tiene tiempos e intensidades de cocci6n prefijados para 5 categorfas (vea el cuadro siguiente).
COMO UTILIZAR AUTO REHEAT (CONT.) NOTAS: 4. Toque • Si usted no ingresa una cantidad dentro de 2 segundos, AUTO REHEAT le pedira que elija una cantidad. De alli usted tendr& 1 minuto para ingresar una cantidad y tocar START/ENTER. Si usted no Io hace, AUTO REHEAT se anular& USTED VE • Si usted toca AUTO REHEAT 6 veces, la pantalla regresa al ajuste de la porci6n de pizza. • Si usted necesita m&s o menos tiempo, no toque AUTO REHEAT nuevamente. Toque POWER antes de tocar START/ENTER.
COMO UTILIZAR ZIP DEFROST (CONT.) USTED VE NOTES: Ejemplo para carnes 3. Toque el(los) botbn(es) para ingresar el peso, Seleccione el peso correcto, Ejemplo libras (0.5para kg) 1.1 USTED VE Ejemplo para 1.1 libras (0.5 kg) 4, Toque • Si usted no ingresa un peso dentro de 2 segundos, ZIP DEFROST le pedira que ingrese un peso. De all usted tendra 1 minuto para ingresar un peso y para tocar START/ENTER. Si usted no Io hace, ZIP DEFROST se anularA.
CUADRO DE ZIP DEFROST (DESCONGELACION VELOZ) ALIMENTO INSTRUCCIONES ESPECIALES Carne de res Si la came es de forma irregular y son cortes grandes de came con mucha grasa se debe proteger las Areas angostas o grasosas con papel de aluminio al inicio de un ciclo de descongelaciAn. Came molida, en bloque No descongele menos de ¼de libra (113 g). Came molida, hamburguesas No descongele menos de dos hamburguesas de 4 oz (113 g).
CUADRO DE ZIP DEFROST (CONT.) ALIMENTO INSTRUCCIONES ESPECIALES Pescado Filetes Col6quelos en una vajilla para homear con microondas. los filetes bajo agua frla. Separe cuidadosamente Rodajas Col6quelos en una vajilla para homear con microondas. para terminar de descongelarlos. Paselos por agua frJa Entero Col6quelo en una vajilla para hornear con microondas. Cubra la cabeza y la cola con papel de aluminio; no deje que el papel de aluminio toque las paredes del homo de microondas.
COMO UTILIZAR BREAD DEFROST (DESCONGELACION DE PAN) Usted puede utilizar esta caracterlstica para descongelar pan. Esta caracteristica funciona de modo similar a Zip Defrost. PAN 1 molde de pan 1 .O libra (454 g) Para usar BREAD DEFROST, siga los pasos detallados a continuacibn: 1 bolillo 0.2 de libra (91 g) 1 pan para hamburguesa/ hot dog 0.2 de libra (91 g) 1 panecillo (muffin) pequedo 0.2 de libra (91 g) 1 panecillo (muffin) grande 0.
COMO UTILIZAR POPCORN (CONT.) Este cuadro le indica c6mo elegir el tamado de una bolsa. 3.5 oz (100 g) una vez 3.0 oz (85 g) dos veces 1.75 oz (50 g) 3 veces Las r na+cas @ pab s tas +t® _sfu8 +, 8_++@ El resultado de coaai6n de sus palomitas de maiz depender_ de la marca de palomitas de maiz y de la cantidad de grasa que contenga. Pruebe con varias marcas para decidir cu&l es la que rinde mejor. Para Iograr 6ptimos resultados, use bolsas frescas de palomitas de maiz.
COMO UTILIZAR BAKED POTATO (PAPAS AL HORNO) Usted puede cocinar de una a cuatro papas para homear (10 oz [284 g] a 13 oz [369 g] cada una) tocando un sSIo bot6n. El nQmero de veces que usted toca este botSn determina el nQmero de papas que su homo va a cocinar. 3, Cambie de 2 a 4 papas, si Io desea, Ejemplo para 2 papas: TOQUE USTED ME NOTAS: • Si usted toca BAKED POTATO 5 veces, la pantalla regresa al ajuste de 1 papa. • No necesita tocar START/ENTER para poner el homo en marcha.
COMO UTILIZAR FRESH VEGETABLE (VERDURA FRESCA) Usted puede cocinar de 1 a 4 tazas (237 mL a 946 mL) de verdura fresca tocando s61o un bot6n. El nQmero de veces que usted toca este bot6n determina el nQmero de tazas que su homo va a cocinar. 3, Cambie de 2 a 4 tazas, si Io desea, Ejemplo para 2 tazas: TOQUE USTED VE NOTAS: • Si usted toca FRESH VEGETABLE 5 veces, la pantalla regresa al ajuste de 1 taza. • Usted no necesita tocar START/ENTER para poner el homo en marcha.
COMO UTILIZAR FROZEN VEGETABLE (VERDURA CONGELADA) Usted puede cocinar de 1 a 4 tazas (237 mL a 946 mL) de verdura congelada tocando s61o un bot6n. El n0mero de veces que usted toca este bot6n determina el n0mero de tazas que su homo va 8 cocinar. 3, Cambie de 2 a 4 tazas, Ejemplo de 2 tazas: TOQUE USTED si Io desea, VE NOTAS: • Si usted toca FROZEN VEGETABLE 5 veces, la pantalla regresa al ajuste de 1 taza. • No necesita tocar START/ENTER para poner el homo en marcha.
COMO UTILIZAR HOLD WARM (MANTENER CALIENTE) 2, Toque HOLD WARM, TOQUE USTED VE Peligro de Intoxicacibn Alimentaria No deje sus alimentos en el horno por mds de una hora antes o despu_s de su coccibn. No seguir esta instruccibn puede ocasionar intoxicacibn alimentaria o enfermedad. HOLD WARM mantiene calientes los alimentos cocinados calientes en su homo de microondas. Usted puede usar HOLD WARM por si s61o, o para continuaci6n autom&tica de un ciclo de cocci6n.
El cuidado de su horno de microondas Para asegurarse de que su homo de microondas luzca bien y funcione con eficiencia por mucho tiempo, usted debe mantenerlo adecuadamente. Para Iograr un cuidado apropiado, por favor siga estas instrucciones con cuidado. Para superficies internas: Lavelas a menudo con aguaesponja tibia jabonosa una o pado y suave. Use Qnicamente jabones suaves, no abrasivos o un detergente suave.
INSTALACION Y CUIDADO DE LOS FILTROS 3, I Peligro de Choque Eldctrico Desconecte el suministro de energia antes de quitar los filtros. Vuelva a colocar todos los paneles antes de hacer funcionar. No seguir estas instrucciones puede ocasionar la muerte o choque eldctrico. Para sacar los filtros de carb6n (fibra negra), con cuidado doble nuevamente las leng0etas de metal que est&n en la parte posterior del filtro de grasa y jale hacia fuera el filtro de carb6n.
CAMBIO DE LAS LUCES. DEL HORNO Y DE LA SUPERFICIE DE COCCION 3, Incline la rejilla hacia adelante, luego lev&ntela 1. Desenchufe el horno o interrumpa el suministro electrico. I ] para sacarla. 2. Saque el tornillo de montaje de la pantalla de la bombilla y con cuidado quite la pantalla. 4. Levante la pantalla de la bombilla. Tornillo de montaje 3. Reemplace la(s) bombilla(s) con una(s) de 30 vatios con base de candelabro (Parte No. 4393681) que se pueden adquirir en su Centro de Servicio Sears. 4.
Guia para cocinar CONSEJOS PARA COCINAR CON EL HORNO DE MICROONDAS 0,= IllllellI@;_, • Si usted aumenta o disminuye la cantidad de alimentos que prepara, el tiempo requerido para cocinarlos tambi6n cambiar&. Por ejemplo, si usted usa el doble de una receta, agregue un poco m&s de la mitad del tiempo de cocci6n original. Verifique si est& cocido y, si es necesario, agregue m&s tiempo en incrementos pequedos.
CONSEJOS PARA COClNAR MICROONDAS (CONT.) CON EL HORNO DE • Cuando cocina alimentos con forma o espe• Siempre quite la tapa para evitar que el homo se da_e. sot irregular, tales como pechugas de polo, coloque las partes m_s peque_as y delgadas • Use sblo recipientes que no est&n da_ados. hacia el centro del plato donde se calentar&n en • No use recipientes m&s altos de ¾ de pulgada Qltimo lugar. (19 mm).
Preguntas y Respuestas PREGUNTAS RESPUESTAS &Puedo hacer funcionar mi homo de microondas sin la bandeja giratoria o voltear la bandeja giratoria para acomodar un plato m&s grande? No. Si usted saca o da vuelta a la bandeja giratoria, tendra resultados de cocciSn insatisfactorios. Los platos que use en su homo deben caber en la bandeja giratoria.
Diagnbstico problemas y solucibn de La mayorfa de los problemas al cocinar a menudo son causados per pequeSas cosas que usted puede encontrar y arreglar sin herramientas de ningQn tipo. Revise las siguientes listas detaltadas a continuaci6n y en la pr6xima pagina antes de pedir ayuda o servicio. Si usted aQn necesita ayuda, vea los nQmeros tetef6nicos gratuitos de Sears, que se encuentran en la contraportada EL HORNO DE MICROONDAS NO FUNCIONA PROBLEMA CAUSA Nada funciona.
BANDEJA GIRATORIA PROBLEMA CAUSA La bandeja giratoria no funciona. • Usted ha apagado la bandeja giratoria. (Vea la secci6n "C6mo calentar mAs de un plato de alimentos" en la pAgina 56.) • La bandeja giratoria no est& en su debido lugar. Su posici6n correcta debe ser con el lado piano hacia arriba y bien asentada en el eje central. • El soporte no esta funcionando correctamente. Saque la bandeja giratoria y ponga el homo a funcionar de nuevo.
Indlce f • Este indice est& en orden alfab6tico. Contiene todos los temas incluidos en este manual al igual que la(s) p&gina(s) d6nde puede encontrar cada tema. TEMA PAGINA BARRA INDICADORA DE AVANCE .......................... 65 CAMBIO DE LAS LUCES DEL HORNO Y DE LA SUPERFICIE DE COCCION ...................... 80 CONSEJOS Cocci6n ............................................................ 81, Descongelaci6n ..................................................... Palomitas de maiz .......................
For repairof major brand appliancesin your own home... no matter who made it, no matterwho soldit! 1"8004"IVlY-HOME sMAnytime,dayor night (1-8004694663) wiA_l/.Seal_.OBitl To bring in productssuchas vacuums,lawn equipmentand electronics for repair, callfor the locationof your nearest Sears Parts & Repair Center 1-800488-1222 AnyUme, dayor night ww11/i/.sea13=col11 Forthe replacementparts, accessoriesand owner's manuals that you need to do-it-yourself,call Sears PartsDire_L_! 1-800-366-PART 6=m- 11p.