Use & Care Guide Manual de Uso y Cuidado English / Español Models/Modelos: 253.70013 Kenmore ® Multi-Door Refrigerator/ Freezer Frigorífico/congelador americano P/N A15014801 (1807) Sears Brands Management Corporation Hoffman Estates, IL 60179 U.S.A. www.kenmore.com www.sears.
Record Model/Serial Numbers Important Safety Instructions Please read and save these instructions. Safety Precautions Do not attempt to install or operate your unit until you have read the safety precautions in this manual. Safety items throughout this manual are labeled with a Danger, Warning, or Caution based on the risk type. This Use & Care Guide provides specific operating instructions for your model. Use your unit only as instructed in this guide.
Important Safety Instructions Before you throw away your old refrigerator/freezer: WARNING Please read all safety instructions before using your new appliance. • Remove doors. • Leave shelves in place so children may not easily climb inside. • Have refrigerant removed by a qualified service technician. For your Safety DO NOT store or use gasoline, or other flammable liquids in the vicinity of this or any other appliance. Read product labels for warnings regarding flammability and other hazards.
Important Safety Instructions Electrical information IMPORTANT The refrigerator must be plugged into its own dedicated 115 Volt, 60 Hz., 15 Amp, AC only electrical outlet. The power cord of the appliance is equipped with a threeprong grounding plug for your protection against electrical shock hazards. It must be plugged directly into a properly grounded three prong receptacle. The receptacle must be installed in accordance with local codes and ordinances. Consult a qualified electrician.
Warranty Information KENMORE LIMITED WARRANTY WITH PROOF OF SALE, the following warranty coverage applies when this appliance is correctly installed, operated and maintained according to all supplied instructions. One Year on Appliance FOR ONE YEAR from the date of sale this appliance is warranted against defects in material or workmanship. A defective appliance will receive free repair. If the appliance cannot be repaired it will be replaced free of charge.
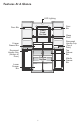
Features At A Glance LED Lighting Door Bin Fresh Food Section Door Bin Glass Shelf Recessed Handle Grip (Top of Door) Crisper Drawer Bin Recessed Handle Grip (Bottom of Door) Top Drawer Bin Freezer Section Lower Drawer Bin 6 Middle Drawer Bin
Installation Tools Necessary: PhillipsTM Head CAUTION Do Not install the refrigerator where the temperature will drop below 55°F (13°C) or rise above 110°F (43°C). The compressor will not be able to maintain proper temperatures inside the refrigerator. Socket Wrench Set Do Not block the lower front of your refrigerator. Sufficient air circulation is essential for the proper operation of your refrigerator. WARNING Make sure unit is unplugged before beginning the door removal process.
Installation Cabinet Leveling & Refrigerator Door Alignment (if necessary) Ensure both doors close freely with their seals touching the cabinet on all four sides and that the cabinet is stable. Guidelines for final positioning of your refrigerator: • All four corners of the cabinet must rest firmly on the floor. • Doors should align with each other and be level. If doors are not aligned, use the supplied spacers to raise the door that is lower.
Door Removal Instructions Getting through narrow spaces To remove the freezer door If your refrigerator will not fit through an entrance area, you can remove the doors. Check first by measuring the entrance. NOTE Fresh food door must be removed before the freezer door. WARNING 1 Use screwdriver to remove center hinge. 2 Lift freezer door off lower hinge to remove from unit. Make sure the electrical power cord is unplugged from the wall outlet.
Door Removal Instructions To reinstall the fresh food door NOTE Doors should align with each other and be level. If doors are not aligned, use the supplied spacers to raise the door that is lower. NOTE Freezer door must be reinstalled before reinstalling fresh food door. To raise the door, lift up the door and place a spacer onto the hinge pin. Lower the door back down onto the hinge pin. 1 Place door on center hinge. Make sure to guide hinge post into corresponding hole on bottom of fresh food door.
Controls User Interface (UI) Controls Ref. Temp Temperature setting decreases every time the Ref. Temp indicator is pressed. It cycles between 44°F and 34°F. When 34°F is shown, pressing Ref. Temp again will loop back to 44°F. Control temperatures range from +34°F / +1°C to +44°F / +7°C Frz. Temp Temperature setting decreases every time the Frz. Temp indicator is pressed. It cycles between +7°F and -7°F. When -7°F is shown, pressing Frz. Temp again will loop back to +7°F.
Controls Under Vacation Mode the fresh food compartment defaults to 37°F. While the freezer defaults to ~0°F (-18°C). When exiting Vacation Mode the setting temperature of the fresh food compartment and freezer will both be restored to those set before going into Vacation Mode. show the temperature in the Fresh Food compartment under normal operation or a Fault code if there is a failure.
Controls Storage Features Setting cooling temperatures CAUTION NOTE To avoid personal injury or property damage, handle tempered glass shelves carefully. Shelves may break suddenly if nicked, scratched, or exposed to sudden temperature change. Allow the glass shelves to stabilize to room temperature before cleaning. Do not wash in dishwasher. The recommended settings for a product installed in a kitchen is 37˚F for the fresh food compartment and 0˚F for the freezer.
Storage Features Freezer Drawer Bins The freezer compartment drawers are removable for easy cleaning. Some have open access while others have closed storage. Open Drawer bins are great for frequently used items, also are ideal for storing frozen fruits and vegetables, meats and other items.
Storing Food and Saving Energy Ideas for storing foods Fresh food storage • Keep the fresh food compartment between 34°F and 40°F with an optimum temperature of 37°F. • Avoid overcrowding the refrigerator shelves, which reduces air circulation and causes uneven cooling. • Avoid placing food in front of air ports. (See Controls Section for illustration.) Fruits and vegetables • Store fruits and vegetables in crisper drawers, where trapped moisture helps preserve food quality for longer time periods.
Care & Cleaning Protecting your investment Keeping your refrigerator clean maintains its appearance and prevents odor build-up. Wipe up any spills immediately and clean the freezer and fresh food compartments at least twice a year. NOTE Do not use abrasive cleaners such as window sprays, scouring cleansers, flammable fluids, cleaning waxes, concentrated detergents, bleaches, or cleansers containing petroleum products on plastic parts, interior doors, gaskets, or cabinet liners.
Care & Cleaning Care & Cleaning Tips PART WHAT TO USE TIPS AND PRECAUTIONS Interior & Door Liners • Soap and water • Baking soda and water Door Gaskets Drawers & Bins • Soap and water • Soap and water Glass Shelves • Soap and water • Glass cleaner • Mild liquid sprays • Soap and water Do not use commercial household cleaners • Non Abrasive Glass containing ammonia, bleach or alcohol to clean. Use a soft cloth to clean. DO NOT Cleaner use a dry cloth to clean smooth doors.
Before You Call Before calling for service, review this list. It may save you time and expense. This list includes common occurrences that are not the result of defective workmanship or materials in this appliance. CONCERN POTENTIAL CAUSE COMMON SOLUTION OPENING/CLOSING OF DOORS/DRAWERS Door(s) will • Door was closed too hard, • Close both doors gently. Not all doors not close. causing other door to open are self closing. slightly. • Refrigerator is not level.
Before You Call CONCERN POTENTIAL CAUSE COMMON SOLUTION WATER/MOISTURE/FROST INSIDE REFRIGERATOR Moisture • Weather is hot and humid. • The rate of frost buildup and internal collects on sweating increases. inside of refrigerator walls. Water • Vegetables contain and • It is not unusual to have moisture on collects on give off moisture. the bottom side of the cover. bottom side of drawer cover.
Registre números de modelo/serie Instrucciones importantes para la seguridad Por favor, lea estas instrucciones y consérvelas. Precauciones de seguridad No intente instalar u operar su unidad hasta que haya leído las precauciones de seguridad en este manual. Los elementos de seguridad en este manual están etiquetados con Peligro, Advertencia o Atención, según el tipo de riesgo. Esta Guía de uso y cuidado le ofrece instrucciones específicas de funcionamiento para su modelo.
Instrucciones importantes para la seguridad o eliminación de electrodomésticos. Consulte a su empresa de servicios públicos o visite www.energystar.gov/recycle para obtener más información sobre la forma de desechar su refrigerador viejo. ADVERTENCIA Lea todas las instrucciones de seguridad antes de utilizar su nuevo electrodoméstico.
Instrucciones importantes para la seguridad Información eléctrica IMPORTANTE El refrigerador debe estar enchufado en un tomacorrientes eléctrico de 115 voltios, 60 Hz, 15 amp., CA solamente, donde no puede haber enchufado ningún otro aparato. El cable eléctrico del artefacto está provisto de un enchufe de tres patas con conexión a tierra, para protegerlo contra el peligro de las descargas eléctricas. Debe enchufarse directamente en un tomacorrientes de tres patas con conexión a tierra adecuada.
Información de la garantía GARANTÍA LIMITADA KENMORE La cobertura de la siguiente garantía será válida, JUNTO CON UN COMPROBANTE DE VENTA, siempre que este electrodoméstico se haya instalado, utilizado y mantenido correctamente, de acuerdo con todas las instrucciones provistas. Un año para el electrodoméstico Este aparato queda cubierto por garantía contra defectos de material y mano de obra DURANTE UN AÑO desde la fecha de la venta. Si el electrodoméstico está defectuoso, será reparado sin cargo.
Características generales Luces LED Contenedor para puerta Zona para alimentos frescos Contenedor para puerta Estantes de cristal Contenedor cajón de verduras Tirador empotrado (parte superior de la puerta) Tirador empotrado (parte inferior de la puerta) Contenedor cajón superior Zona congelador Contenedor cajón inferior 6 Contenedor cajón central
Instalación Herramientas necesarias: Destornillador de punta PhilipsMR PRECAUCIÓN No instale el refrigerador en un lugar donde la temperatura pueda bajar a menos de los 55 °F (13 °C) o elevarse por encima de los 110 °F (43 °C). El compresor no podrá mantener las temperaturas adecuadas en el interior del frigorífico. Juego de llaves de cubo No bloquee la rejilla inferior en la parte frontal inferior del refrigerador.
Instalación Nivelación del gabinete y alineamiento de la puerta del refrigerador (si es necesario) Para subir la puerta, elévela y coloque una arandela en el perno de la bisagra. Vuelva a bajar la puerta por el perno de la bisagra. Consulte Instrucciones para Quitar las Puertas para ver imágenes. Pautas para la posición final de su refrigerador: • Las cuatro esquinas del gabinete deben estar apoyadas firmemente contra el suelo. • Las puertas deben alinearse la una con la otra y estar niveladas.
Instrucciones para quitar la puerta Para pasar por espacios reducidos Para quitar la puerta del congelador Si su refrigerador no pasa por el área de la entrada, puede quitar las puertas. Primero mida el área de entrada para verificar si no pasa. NOTA Se debe quitar la puerta de la comida fresca antes de quitar la puerta del congelador ADVERTENCIA 1 Utilizar un destornillador para quitar la bisagra central. 2 Levantar la puerta del congelador para quitarla.
Instrucciones para quitar la puerta Para volver a instalar la puerta del congelador 3 Reajustar tornillos de bisagra y conexiones eléctricas de la bisagra superior de la puerta de alimentos frescos. 4 Ajustar la cubierta de plástico de la bisagra y fijar con los tornillos adecuados. 1 Colocar la puerta del congelador en la clavija inferior de la bisagra. Alinear el orificio de la base de la puerta del congelador con la clavija inferior de la bisagra.
Mandos Controles de interfaz de usuario (UI) Ref. Temp La temperatura establecida disminuye cada vez (Temperatura que se presiona el indicador de Frz. Temp. Tiene de referencia) un ciclo de entre 44°F (+7° C) y 34°F (+1° C). Si presiona Ref. Temp cuando aparece 34°F (+1° C). en pantalla, la temperatura volverá a 44°F (+7° C). Los rangos de control de temperatura varían de +34°F / +1°C a +44°F / +7°C. Frz. Temp La temperatura establecida disminuye cada vez (Temperatura que se presiona el indicador de Frz.
Mandos Alarmas la configuración vuelve a la temperatura establecida antes de activar el modo Quick Freeze. En el modo de vacaciones (los valores predeterminados del compartimento de alimentos frescos a 37°F (3°C). Mientras el congelador predeterminados a ~0°F (-18°C). Cuando se sale de vacaciones el modo de ajuste de la temperatura del compartimento de alimentos frescos y del congelador se restaura a aquellos establecidos antes de entrar en el modo de vacaciones.
Mandos Características de almacenamiento Cómo establecer la temperatura de enfriamiento PRECAUCIÓN NOTA Para evitar lesiones y daños, manipule con cuidado las bandejas de cristal atemperado. Se pueden romper súbitamente si se mellan, rayan o quedan expuestas a cambios bruscos de temperatura. Deje que las bandejas de cristal se estabilicen a temperatura ambiente antes de limpiarlas. No las lave en el lavavajillas.
Características de almacenamiento Contenedores para puerta Las puertas del compartimento de alimentos frescos utilizan un sistema de repisas de almacenamiento modulares. Todas estas repisas se pueden extraer para facilitar la limpieza. Algunas tienen posición fija y otras se pueden ajustar según sus necesidades. Las repisas de la puerta son perfectas para guardar jarras, botellas, latas y contenedores de bebidas grandes. También permiten elegir rápidamente los productos más usados.
Almacenamiento de Alimentos y Ahorro de Energía Sugerencias para guardar los alimentos Conservación de alimentos frescos • Mantenga el compartimento de alimentos frescos entre 1,1 y 4,4 ºC con una temperatura óptima de 2,7 ºC. • Evite sobrecargar las bandejas del frigorífico, ya que se reduce la circulación de aire y provoca una refrigeración desigual. • Evite colocar alimentos frente a los conductos de aire. (Ver ilustración en la sección de Mandos).
Cuidado y limpieza Protección de su inversión Mantener el frigorífico limpio conserva el aspecto y evita la creación de malos olores. Limpie inmediatamente todo lo que se derrame y limpie el congelador y los compartimentos de alimentos frescos al menos dos veces al año.
Cuidado y limpieza Consejos de cuidado y limpieza PIEZA Revestimiento de puertas e interior Juntas de puertas QUÉ UTILIZAR CONSEJOS Y PRECAUCIONES Utilice dos cucharadas de bicarbonato en • Jabón y agua • Bicarbonato y agua un litro de agua tibia. Asegúrese de quitar el exceso de agua de la esponja o paño antes de limpiar los controles, luz LED o cualquier pieza electrónica. • Jabón y agua Seque las juntas con un paño suave limpio.
Antes de llamar Antes de solicitar servicio técnico, repase esta lista. Puede ahorrarle tiempo y dinero. Esta lista incluye circunstancias habituales que no se deben a defectos de mano de obra o materiales en el aparato. PROBLEMA POSIBLE CAUSA SOLUCIÓN HABITUAL APERTURA Y CIERRE DE PUERTAS Y CAJONES La(s) • La puerta se ha cerrado • Cierre ambas puertas suavemente. puerta(s) no con fuerza y ha provocado No todas las puertas son de cierre se cierra(n). que otra puerta se abra automático. ligeramente.
Antes de llamar PROBLEMA POSIBLE CAUSA SOLUCIÓN HABITUAL AGUA/HUMEDAD/CONGELACIÓN EN EL INTERIOR DEL FRIGORÍFICO • El tiempo es cálido • La velocidad de formación de La humedad y húmedo. escarcha y condensación interna se acumula aumenta. en el interior de las paredes del frigorífico. El agua se • Las verduras contienen • No es extraño que haya humedad en acumula en la y desprenden humedad. el parte inferior de la tapa. parte inferior de la tapa del cajón.
Notes / Notas
Notes / Notas
Kenmore ® Customer Care Hotline To schedule in-home repair service or order replacement parts Para pedir servicio de reparación a domicilio, y ordenar piezas 1-844-553-6667 www.kenmore.