® Microwave Hood Combination Use & Care Guide Combinaci6n Microondas Campana Gui'a de uso y cuidado Models/Modelos 721.63652 / 721.63653 721.63654 / 721.63659 , vJI -- 3828W5A3469 Sears, Roebuck and Co., Hoffman Estates, IL 60179 www.sears.
Table of Contents Microwave Hood Combination Warranty Warranty ........................................................... 2 Microwave Oven Safety .................................. 3 Getting to Know Your Microwave Oven .............................................. 6 How your microwave oven works ................... 6 Radio interference .......................................... 6 For the best cooking results ........................... 6 Testing your microwave oven .........................
Microwave Oven Safety Your safety and the safety of others are very important. We have provided many important safety messages in this manual and on your appliance. Always read and obey all safety messages. This is the safety alert symbol. This symbol alerts you to hazards that can kill or hurt you and others. Atl safety messages will be preceded by the safety alert symbol and the word "DANGER" or "WARNING.
IMPORTANT SAFETY • The microwaveoven shouldbe servicedonly by qualifiedservice personnel. Call an authorized servicecompanyfor examination,repair,or adjustment. • See door surfacecleaninginstructionsin the "Caring for Your MicrowaveOven" section. • To reducethe risk of fire inthe oven cavity: - Do notovercookfood. Carefullyattend the microwaveoven when paper,plastic,or other combustiblematerialsare placedinsidethe oven to facilitatecooking.
PRECAUTIONS TO AVOID POSSIBLE EXPOSURE TO EXCESSIVE MICROWAVE ENERGY (a) Do not attempt to operate this oven with the door open since open-door operation can result in harmful exposure to microwave energy. It is important not to defeat or tamper with the safety interlocks. (b) Do not place any object between the oven front face and the door or allow soil or cleaner residue to accumulate on sealing surfaces. (c) Do not operate the oven if it is damaged.
Getting to Know Your Microwave Oven This section discusses the concepts behind microwave cooking. It also shows you the basics you need to know to operate your microwave oven. Please read this information before you use your oven. How your microwave oven works Microwave ovens are safe. Microwave energy is not hot. It causes food to make its own heat, and it's this heat that cooks the food. Magrtetron u Microwaves are like TV waves, radio waves, or light waves.
Testing your dinnerware or cookware Test dinnerware or cookware before using. To test a dish for safe use, put itinto the oven with a cup of water beside it. Cook at 100% cook powerfor one minute. If the dish gets hot, do not use it. Some dishes (melamine, some ceramic dinnerware, etc.) absorb microwave energy, becoming too hot to handle and slowing cooking times.
Microwave oven features m Your microwave oven is designed to make your cooking experience as enjoyable and productive as possible. To get you up and running quickly, the following is a list of the oven's basic features: _) Metal Shielded Window The shield prevents microwaves from escaping. It is designed as a screen to allow you to view food as it cooks. Model and Serial Number Plate & Cooking Guide Label Charcoal Filter (behind Vent Grille) 1. Turntable (_ Vent Grille _0 Turntable.
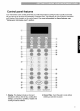
Control panel features Your microwave oven control panel lets you select the desired cooking function quickly and easily. All you have to do is touch the necessary Command Pad. The following is a list of all the Command and Number Pads located on the control panel. For more information on these features, see "Using your microwave oven" section. 1. Display.
3. Frozen Entree. Touch this pad to cook a 10 - to 20 - ounce (284 to 567 g) frozen entree without entering a cook time or power. 18. Cook Time. Touch this pad followed by Number Pads to set a cooking time. 5. Frozen Vegetable. Touch this pad to cook without entering a cook time or power. 19. Power. Touch this pad after the cook time has been set, followed by a Number Pad to set the amount of microwave energy released to cook the food.
CHILD LOCK Using Your Microwave Oven This section gives you instructions for operating each function. Please read these instructions carefully. AUDIBLE SIGNALS Use this safety feature to lock the control panei when you are cleaning the oven,or so that children cannot use the oven unsupervised. To set CHILD LOCK: Touch: Audible signals are available to guide you when setting and using your oven: • A programming tone will sound each time you touch a pad.
KITCHEN TIMER COOKTOP LIGHT Your microwave oven can be used as a kitchen timer. You can set up to 99 minutes, 99 seconds. The pad on the bottom right of the control panel controls the cooktop light. Example: Example: To set 3 minutes. Display 1. : EI'ITERTI_Elhlfllhl _"lfl SEE Touch: Touch: 2. 3 0 • nn 0 Tnl Shows: IF T To set the Lamp for HIGH. Display Shows: I-II,5/-I 1. T once for HIGH light twice for NIGHT light DFF 2. 3. 3.uu TIMER and time counting down.
EXPRESS DEFROST One express defrost sequence The Express Defrost feature quick defrosting BEEF" only, Example: TIMED COOKING is preset in the oven. provides you with the method for 1.0 pound "GROUND To defrost Touch: lib of Ground This feature lets you program a specific cook time and power. For best results, there are 10 power level settings in addition to HIGH (100%) power. Refer to the "Microwave Power Levels Table" on page 15 for more information.
MULTI-STAGE COOKING OPTION For best results, some recipes call for different cook powers during different stages of a cook cycle. You can program your oven to switch from one power level to another for up to three stages. You can change the default values for beep sound, clock, display speed and defrost weight. See following chart for more information. No, Function No. Result Example: To set a 3-stage cook cycle.
MICROWAVE POWER LEVELS For best results, some recipes cell for different cook powers. The lower the cook power,the slower the cooking. Each number from I to 9 stands for a different percentage of full cook power. The following chart gives the percentage of cook power each number pad stands for, and the cook power name usually used. COOK Power NAME 100% of full power High It also tells you when to use each cook power. Follow recipe or food package instructions if available.
AUTO DEFROST Three defrost sequences are preset in the oven. The auto defrost feature provides you with the best defrosting method for frozen foods. The cooking guide will show you which defrost sequence is recommended for the food you are defrosting. For added convenience, the Auto Defrost includes a built-in beep mechanism that reminds you to check, turn over, separate, or rearrange to get best defrost results. Four different defrosting levels are provided. 1 MEAT 2 POULTRY 3 FISH 4.
AUTO DEFROST TABLE Meat setting FOOD SETTING AT BEEP SPECIAL INSTRUCTIONS Ground Beef, Bulk MEAT Removethawed portbns with fork. Turn over. Return remainderto oven. Do not defrost less than lJ4lb. Freeze in doughnut shape. Place on the DEFROST PLATE. Ground Beef, Patties MEAT Separate and rearrange. Do not defrost less than 2 oz. patties. Depress center when freezing. Round Steak MEAT Turn over. Cover warm areas with aluminum foil, Place on the DEFROST PLATE.
AUTO DEFROST TABLE (CONT.) Poultry setting FOOD CHICKEN Whole (up to 6 Ibs) SETTING POULTRY Turn over (finish defrosting breastside down). Cover warmareas with aluminum foil, Cu#up CORNISH HENS Whole TURKEY Breast (up to 6 Ibs) Fish AT BEEP SPECIAL INSTRUCTIONS Place chicken breast-side up on the DEFROST PLATE. Finish defrosting by immersing in cold water. Remove giblets when chicken is partially defrosted. Separate pieces and rearrange. Place on the DEFROST PLATE. Turn over.
DEFROSTING TIPS • When using Auto Defrost, the weight to be entered is the net weight in pounds and tenths of pounds (the weight of the food minus the container). • Before starting, make sure you have removed any of the metal twist-ties which often come with frozen food bags, and replace them with strings or elastic bands. • Open containers such as cartons before they are placed in the oven. • Always slit or pierce plastic pouchesor packaging.
Using Sensor Cooking SENSOR COOKING SENSOR OPERATING INSTRUCTIONS Sensor Cook allows you to cook most of your favorite foods without selecting cooking times and power levels. The oven automatically determines required cooking time for each food item. When the internal sensor detects a certain amount of humidity coming from the food, it will tell the oven how much longer to heat. The display will show the remaining heating time. For best results by Sensor, following these recommendations.
SENSOR COOKING CATEGORY TABLE DIRECTION AMOUNT Dinner Plate Place foods to be heated on dinner plate or similar dish. Cover with plastic wrap and vent. After cooking, allow to stand for 3 minutes. 1-2 servings Frozen Entree Remove from outer display package.Slit cover. If not in microwave safe container, place on a plate. Cover with plastic wrap and vent. After cooking, allow to stand for 3 minutes. 10 to 21 oz.
AUTO COOK AUTO REHEAT Auto Cook lets you heat common microwaveprepared foods without selecting cooking times and power levels. Auto Cook has preset cook powers for 4 food categodes: Casserole, Rice, Bacon and Hot Cereal. Auto Reheat lets you heat foods without selecting cooking times and power levels. Auto Reheat has preset cook powers for 3 categories: Casserole, Roll/Muffin, and Beverage. Example: To reheat Casserole. Example: To cook Rice.
AUTO COOK TABLE CATEGORY TOUCH PAD NUMBER DIRECTION AMOUNT Casserole (Sensor) 1 Assemble the ingredients per the recipe in a 1-2 quart casserole. Cooking with plastic wrap and vent. After cooking, stir and allow to stand for 3 minutes. 1-4 cups Rice (Sensor) 2 Place rice and twice as much liquid (water, chicken or vegetable stock) in a 2 quart microwave dish. Cover with plasticwrap and vent. After cooking, allow to stand for 10 minutes. Stir for fluffier rice.
Caring for Your Microwave Oven To make sure your microwave oven looks good and works well for a long time, you should maintain it properly. For proper care, please follow these instructions carefully. For interior surfaces: Wash often with warm, sudsy water and a sponge or soft cloth. Use only mild, nonabrasive soaps or a mild detergent. Be sure to keep the areas clean where the door and oven frame touch when closed. Wipe well with clean cloth.
CARING FOR THE FILTERS The grease filter should be removed and cleaned often, at least once a month. NOTE: If your microwave hood combination is installed to recirculate air, purchase a charcoal filter available from Sears by calling 1-8OO-4-MY-HOME ®. The charcoal filter cannot be cleaned and should be replaced every 6 to 12 months. Grease filter: Charcoal filter: 1. Unplug microwave oven or disconnect power. 2. Remove the vent grille mounting screws. 1. Unplug microwave oven or disconnect power. 2.
REPLACING THE COOKTOP AND OVEN LIGHTS The cooktop light 1. Unplug microwave oven or disconnect power. 5. Slide a new charcoal filter into place. The filter should rest at the angle shown. 2. Remove the bulb cover mounting screw. 4 3. Replace bulb with candelabra-base 30-watt bulb available from Sears by calling 1-8OO-4-MY-HOME ®. 4. Plug in microwave oven or reconnect power. 6. Slide the bottom of the vent grille intoplace. Push the top until itsnaps intoplace, Replace the mounting screws.
4. Lift up the bulb holder. 5, Replace the bulb with a candelabra-base 30-watt bulb available from Sears by calling 1-800-4-MY-HOME®. 6, Slide the top of the vent gdlle into place. Push the bottom until it snaps into place. Replace the mounting screws. 7, Plug in microwave oven or reconnect power.
MICROWAVE COOKING TIPS Amount of food Releasing pressure in foods • If you increase or decrease theamountoffood you prepare, the time it takes to cook that food will also change. For example, if you double a recipe, add a little more than half the original cooking time. Check for doneness and, if necessary, add more time in small increments. • Several foods (for example:baked potatoes, sausages, egg yolks,and some fruits) are tightly coveredby a skin or membrane.
MICROWAVE COOKING TIPS (CONT.) Using aluminum foil (cont.) • Place the container in a glass bowl and add some water so that it covers the bottom of the container, not more than 1/4in. (.64 cm) high. This ensures even heating of the container bottom. • Always remove the lid to avoid damage to the oven, Removing the rack • When popping commercially packaged popcom, Remove the rack from the oven; Do not place the bag of microwave popcorn on the rack or under the rack.
Questions and Answers QUESTIONS ANSWERS Can I operate my microwave oven without the turntable or turn the turntable over to hold a large dish? No. If you remove or turn over the turntable, you will get poor cooking results. Dishes used in your oven must fit on the turntable. Can I use either metal or aluminum pans in my microwave oven? You can use aluminum foil for shielding (use small, fiat pieces), small skewers, and shallow foil trays (if tray is not taller than 3/4 in. [1.
Troubleshooting Most cooking problems often are caused by little things you can find and fix without tools of any kind. Check the lists below and on the next page before calling for assistance or service. If you still need help, call Sears Service at 1-8OO-4-MY-HOME ® MICROWAVE OVEN DOES NOT WORK PROBLEM CAUSE Nothing works. • The power supply cord is not plugged into a grounded 3 prong outlet. (See the Electrical Requirements" section on page 5 and the "Electrical connection" section on Page 7.
TURNTABLE PROBLEM CAUSE The turntable will not turn. • The turntable is not correctly in place. It should be correct-side up and sitting firmly on the center shaft. • The support is not operating correctly. Remove the turntable and restart the oven. If the support still does not move, call Sears Service at 1-800-4-MY-HOME®.Cooking without the turntable can give you poor results. TONES PROBLEM CAUSE You do not hear the • You touched the wrong key. Follow the scrolling instruction on the display.
Contenidos Garantia en Combinacibn Garantia .......................................................... 34 Seguridad del horno de microondas ........... 35 Aprender a conocer su horno de microondas ............................................... 38 Como trabaja su homo de microondas ........... 38 Interferencia de radio ...................................... 38 Para los mejores resultados ........................... 38 Probar su homo de microondas ......................
Seguridad del horno de microondas Su seguridad y la seguridad de los otros son muy importante. Hemos dado muchos mensajes de seguridad en este manual yen su utensilio. Lea siempre y acate todos los mensajes de seguddad. Este es et simbolo de alerta de seguddad. Este simbolo indicaque hay peligro de muerte o de heridas graves para usted u otros. Todos los mensajes de seguddad estaran precedidos por el simbolo de alerta de seguddad y de la palabra"PELIGRO" o "ADVERTENCIA.
IMPORTANTES INSTRUCCIONES • El servicioal homo de microondasdebe ser hecho sob por personalcal_cado. Llame a una compafiia de servido autorizadapara examinar,repararo hacerajustes. • Vea las instruccionesparala limpiezade la superficie de la puertaen la secci6n"Cuidadode su Homo de microondas". • Para reducirel riesgode incendioen el interiordel homo: - No cocine de mas los alimentos.
PRECAUCIONES PARA EVITAR POSIBLE EXPOSICION A UNA EXCESIVA POTENCIA DE MICROONDAS (a) No intentehacer funcionareste horno con la puerta abierta ya que el fundonamientocon puertaabierta puede causarexposici6nnccivaa la petenda de microondas.Es importanteno descuidar u obstaculizarla seguddadde los enclavamientos el_ctricosde interbbqueo. (to)Nocoloque ningt_nobjetoentre la carafrontal del homo y la puertao permitaque se acumule suciedado residuos de limpiadorsobre las superficiede sellado.
Aprender a conocer su horno de microondas Esta secci6n trata los conceptos detr_s de la cocci6n de microonda. Tambi6n muestra los conceptos b_sicos que necesita saber para operar su homo de microondas. Tenga a bien leer esta informaci6n antes de usar et homo. Como trabaja su horno de microondas Los hornos de microondas son seguros. La Potencia Magnetr6n microonda no es caliente.
Probar su vajilla o bateria de cocina Pruebesu vajilla o bateriade cocinaantes de usar. Para probar un platoy taner un uso seguro,col6queloen el homo con una taza de agua al lado del mismo.Si el platose calientademasiadoy el agua queda fria, no Io use. Si la vajilla se calienta,no Io use. Algunos platos (de melanina,alguna vajinaceramica,etc.)absorbela energia de las microondas,calentandosedemasiadopara tomadoscon la mano y demorandobs tiemposde cocci6n.
Caracteristicas del horno de microondas Su homo de micrcondas est_ diseSado para hacer su expedenda de codna lo m_s agradable y productiva posible. Para resumir y explicar rapidamente, la siguiente es una lista de las caractefisticas b_sicas del homo: (_ Ventana con pantalla de metal evita que las micrcondas se escapen. Est_ diseSada como una pantalla para permitirle visualizar la comida mientras se cocina. (_ Rejilla de ventilacibn. (_ Bandeja giratoria.
Funciones del panel de control El panel de control de su horno de microondas le permite seteccionar r_pida y f_cilmente la funci6n de cocci6n deseada. Todo Io que tiene que hacer es tocar et pad de comando. La siguiente es una lista de todos los pads de comando y n6meros ubicados en et panel de control. Para m_s informacibn sobre estas caracteristicas, vea la seccibn "Usar su horno de microondas". 1. Pantalla.
3. Entrada congelada. Toque este pad para cocinar de 10 a 20 onzas (284 a 567 g) de entrada congelada sin introducir una potencia o tiempo de cocci6n. 4. Sopa o salsa. Toque este pad para preparar sin introducir una potencia o tiempo de cocci6n. 5. Verduras congeladas. Toque este pad para cocinar sin introducir una potencia o tiempo de cocci6n. 6. Verduras frescas. Toque este pad para cocinar sin introducir una potencia o tiempo de cocci6n. 7. Verduras enlatadas.
INTERRUMPIR Usar su horno de microondas Esta secci6n contiene instrucciones para llevar a cabo cada funci6n. Tenga a bien leer cuidadosamente estas instrucciones. SENALES AU DITIVAS Las seSales auditivas estan disponibles para guiarto cuando programa y usa su homo ; • Un tono de programacibn sonar_ cada vez que usted toque un pad. • Siete tonos seSalan el final de un conteo del cron6metro de cocina. • Cuatro tonos seSalan la finalizaci6n de un cicto de cocci6n.
RECETA FAVO RITA VENTILADOR DE EXTRACCI_)N Los dos pads en el centro inferior del panel de control, controlan las 5 velocidades del ventilador de extracci6n La tecla 'FAVORITE RECIPE' le permite recuperar una instrucci6n de cocci6n previ-amente guardada en la memoria y comenzar a cocinar r_pidamente. Ejemplo: Para coccibn de 2 minutes. Ejemplo: Para determinar una de las 4 velocidades de! ventilador de extraccibn. Toque: Toque: La pantalla mostrar_: Tnl 2.
BANDEJA GIRATORIA ON/OFF AGREGAR Es un pad de ahorro de tiempo, este control simplificado le permite programar r&pidamente e inidarla cocci6n por microonda a1100% de potencia sin necesidad de tocar START. Para mejoresresultadosde cocd6n, deje encendidala bandejagiratoria.Se lapuede detener para platosgrandes. Toque: La pantalla mostrard: 1. 2. Te _Ne r,,r , n,,, ,, ,RSLE_,, Presione Bandeja giratoria (T/TABLE) On/Off para girar o detener la bandeja.
COCCION EN ETAPAS MOLTIPLES Para mejores resultados, algunas recetas necesitan un Cido de potencia para un periodo de tiempo determinado y otro Ciclo de potencia para otro periodo de tiempo. Su homo puede programarse para cambiar autom_ticamente de uno a otro en un total de hasta tres cidc_. Ejemplo: Para programar un ciclo de coccibn de 3 etapas. Toque: nn ,VT nil 5 •.u_b,,ERP;_ER 11. I EIIEIII I 12. 0 La pantalla mostrar&: 3 0:0 £ •"uu nn Tnl ,_.
NIVELES DE POTENCIA MICROONDA Paraobtenermejoresresultados, algunasrecetasrequieren diferentespatencias de cocci6n.Cuantomasbajaesla potenda de cocci6n,m&sbajaes lac0cci6n.Cadant_mero de I a 9 representaundiferenteporcentaje de potenciacompletade cocci6n. La siguientetablamuestrael porcentaje de potencia decocd6n quecadan_merorepresenta y el hombrede patenciade cocci6ngeneralmente usado. POTENCIA DE COCCI(_N NOMBRE 100% de potencia completa AIta Tambi_n dice cuando usar cada potencia de cocd6n.
DESCONGELAMIENTO AUTOMATICO Tres secuencias de descongelamiento est&npredeterminadas en el homo. La funci6n de descongelamiento autom&tico le proporciona el mejor m6todo de descongelamiento para alimentos congelados. La guia de cocina le mostrar_ cu&l secuencia de descongelamiento se recomienda para el alimento que desea descongelar. Para mayor conveniencia, el descongelamiento autom_tico incluye un mecanismo sonoro incorporado (bip)que le recuerda que debe controlar.
TABLA DE DESCONGELAMIENTO Programar carnes ALIMENTOS PROGRAMAR AUTOMATICO SEI_AL ACUSTICA INSTRUCCIONES ESPECIALES CARNE DE VACA Came molida, en bulto CARNE Quite con un tenedor las porciones No descongelar menos de 1/4 onza. Congele en descongeladas.D_ vuelta.Vuelva el forma de rosca (dona). resto al homo. Celoquesebrela PLACADELADESCONGELACION. Camemolida,en hamburguesas CARNE Separe y vuelva a disponer. Nodescongele menosde dosonzasde hamburguesas. Comprimaelcentrocuandopongaa congelar.
TABLA DE DESCONGELAMIENTO Programar ALIMENTOS POLLO Entero (hasta 6 libras) AUTOMATICO (CONT.) aves PROGRAMAR AVES SEI_IAL ACUSTICA INSTRUCCIONES ESPECIALES Devuelta(conduyael descongelamiento conlapechugahaciaabajo).Cubralas _reascalientes conhojasdepapelde ]luminio. Coloqueel polioconla pechuga h,aciaarribasobrela PLACADELADESCONGELACION. Conduyael descongelamiento sumergiendo en aguafria.Quite losmenudoscuandoel polio est0parcialmente descongelado. Separe las partes y reacomode.
SUGERENCIASPARADESCONGELAMIENTO MANTENER •CuandouseelDescongelamiento autom_tico, elpesoa ser introduddo esel pesonetoenlibrasy d_cimas delibras(elpeso delalimentomenosel envase). •Antesdecomenzar, asegQrese dequitarcualquiera delashiloso ataduras demetalquea menudo vienenconlasbolsasde alimentos y reempl_calas conhibso bandas elasticas. •Abralosenvases talescomocar[ones antesdecolocarlos enel homo. •Siempre rompao perforelasbolsaspl_sticas o envolturas.
USAR DEL SENSOR DE COCCION SENSOR DE COCCI_N SENSOR OPERATIVA INSTRUCCIONES El sensor de cocci6n le permite cocinar la mayoda de sos comidas favoritas sin seleccionar los tiempos de cocci6n y niveles de potencia. La pantalla indicar& "round shape" (forma redonda) durante el periodo inicial del sensor. El homo automaticamente determina el tiempo de cocoi6n requerido para cada artFculode cocina.
CUADRO DE COCCI )N CATEGORIA DEL SENSOR DIRECCIONES CANTIDAD Plato de Cena Coloque los alimentos para ser calentado en el plato de cena o vajilla similar. Cubra con envoltura plastica y abra unos respiraderos. Despu6s de la cocci6n, deje reposar unos 3 minutos. 1-2 porciones Entrada Congelada Saque del empaque exterior. Dividalo. Si no est& en un platode homo apto para microondas, col6quelo sobre el plato, cubra con envoltura plastica y abra unos respiraderos.
COCCI_)N AUTOMATICA RECALENTAMIENTO AUTOMATICO Cocci6n Automatica le permite calentar los alimentos comunes preparados por microonda sin necesidad de selecci6n de tiempos de cocci6n o niveles de potencia. El programa "Auto Cock" tiene la potencia de cocci6n predeterminada para 4 categodas de alimentos: cacerola, arroz, tocino (bae6n) y Cereal caliente. Ejemplo: Para cocinar arroz.
CUADRO DE COCCI )N CATEGORiA AUTOMATICA TOCARELPAD NUMERO DIRECCIONES CANTIDAD Caserola (Sensor) 1 Prepare los ingredients por recipiente en una caserola cuarta de 1-2. Cocine con envoltura plastica y abra unos respiraderos. Despu6s de la cocci6n, agite y deje reposar unos 3 minutos. 1-4 vasos Arroz (Sensor) 2 Coloque arroz y liquido doble veces de su cantidad (agua, polioo esencia de verdura) en un plato de homo apto para microondas de 2 cuarto.
Cuidar su horno de microondas Para asegurarse de que su homo de microondas se vea bien y trabaje debidamente durante mucho tiempo, debe mantenedo adecuadamente. Para su cuidado correcto, siga cuidadosamente estas instrucciones. Para las superficies interiores : Lave a menudo conagua jabonosatibia con esponja o paso suave. Use solo jabones suaves no abrasivos o un detergente suave. Asegt]rese de mantener las areas limpias donde se tocan la puerta y el marco del homo cuando se cierran.
CUIDADO DE LOS FILTROS Los flltro de grasa deben ser quitados y lavados a menudo, al menos una vez al mes. NOTA: Siesta instalada la combinaciOnen ia campana de su microonda para recircuiar el aire, el filtro de carbon disponibie de Sears Ilamando a 1-800-4-MY-HOME_. El fiitro de carbon no puede ser limpiado y deberia ser reemplazado carla 6 a 12 meses. Filtro de carbbn: FUtro de grasa: 1. Desenchufe el homo de microondas o desconecte ia energia electrica. 2.
REEMPLAZARLAS LUCES DE LA PARTESUPERIOR Y DEL HORNO La luz de la parte superior para la cocina (cooktop) 1. Desenchufe el homo de microondas o desconecte la energia electrica. 5. Deslice un Nuevo filtro de carb6n en su lugar. El flltro debe descansar en el angulo que se muestra. 2. Quite el tornillo de montar de cubierta de bombilla. 3. Reemplace la bombilla con una bombilla de base candelabra de 30 vatios disponible de Sears Ilamando a 1-800-4-MY-HOME®. 6.
SOPORTE DE BOMBILLA 4. Levante el soporte de la bombilla. 5. Reemplace la bombilla con una bombilla de base candelabro de 30 vatios disponible de Sears Ilamando a 1-8004-MY-HOME _. 6. Desplice la parte superior de la re ilia de ventilaci6n dentro de su lugar. Empuje la parte inferior hasta que encaje dentro del lugar. Recoloque los tomillos de montaje. 7. Enchufe el homo de microondas o reconecte la energia.
SUGERENCIAS PARA LA COCINA Cantidadde alimentos EN SU MICROONDA Liberarla presibnen losalimentos • Siaumenta o disminuye lacantidad dealimentos queprepara, • Cortarlosalimentos (porejemplo: papasalhomo,salchichas, eltiempoqoetomacosinaresealimento tambiencambiar&Pot yemasdehuevos, y algunas frutas)estanajustadamente ejemplo, siduplicalacantidad queindicaunareceta, agregueun cubiertos porunapielo membrana. Elvaporpoedelevaetarse pocom_sdelamitaddeltiempooriginalindicado decocci6n.
SUGERENCIAS PARA LA COCINA EN SU MICROONDA (Cont. Uso de la hoja de papel de Remover el separador aluminio (cont.) • AI preparar las palomitas empacadas comercialmente, Remueva el separador del homo; No coloque ]a bolsa de las palomitas para el homo microondas sobre el separador o debajo del separador. • Coloque los envases en un cuenco de vidrio y agregue agua hasta cubrir la parte inferior de los envases, no mas de 1/4 de pulgada (0.64 cm.) de altura.
Preguntas y Respuestas PREGUNTAS RESPUESTAS z,Puedo usar mi homo de microondas sin la bandeja giratoda o haceda girar sosteniendo un plato grande? No. Si quita o no hace girar la bandeja giratoria, tendr& resultados pobres. Los platos que se usan en su homo deben encajar en la bandeja giratoda.
Solucibn de problemas La mayoria de los problemas de cocina estan causados a menudo por pequeSas cosas que usted puede determinar y solucionar sin herramientas de ningt_ntipo. Controle las listas de mas abajo en las paginas siguientes antes de pedir asistencia a un servicio. Si at_nnecesita ayuda, Ilame a Service Sears a 1-8OO-4-MY-HOME ® EL HORNO DE MICROONDAS NO FUNCIONA PROBLEMA CAUSA Nada funciona.
BANDEJA GIRATORIA PROBLEMA CAUSA La bandeja giratoria no gira. • La bandeja giratoria no esta colocada correctamente en su lugar. Debe ser corregida levantando un costado y presionando firmemente sobre el eje central. • El soporte no esta funcionando correctamente. Quite la bandeja giratoria y reinicie el homo. Si aQn necesita ayuda, Ilame a Service Sears a 1-800-4-MY-HOME®.Cocinar sin la bandeja giratoria le dara resultados pobres.
Master ProtectionAgreements Acuerdos Maestrosde proteccibn Congratulations on making a smart purchase. Your new Kenmore®product is designed and manufactured for years of dependable operation. But like all products, it may require preventive maintenance or repair from time to time. That's when having a Master Protection Agreement can save you money and aggravation. Felicitacionespor haber hecho una compra inteligente Su nuevoproducto Kenmore®est_ disefiado y fabricado para afios de operaci6nsegura.
Your Home For repair- in your home- of all major brand appliances, lawn and garden equipment, or heating and coolingsystems, no matter who made it, no matter who sold it! For the replacement parts, accessories and owner's manuals that you need to do-it-yourself. For Sears professionalinstallationof home appliances and items like garage door openers and water heaters. 1-800-4-MY-HOME ® (1-800-469-4663) Call anytime, day or night (U.S.A. and Canada) www.sears.com www.sears.