Owner's Manual Manual del Propietario Vacuum Cteaner Aspiradora iViodei, Modelo 721.33078 72! .33079 CAUTION: Read and follow a!l safety and operating instructions before first use of this product. CUIDADO: Lea y sigue todas tas instrucciones de operaci6n y seguridad antes del uso de este producto. Directions for Use It is a violation of Federal law to use this product in a manner inconsistent with its labeling.
Before Using Your New Vacuum ........................2 Vacuum Cleaner Care ............................................. 11 Kenmore Vacuum Cfeanet Warranty ................ 2 Vacuum Storage ................................................t t Cleaning E×_erior and Attachments ..................t t Dust Bag Changing ............................................i2 Motor Safety Fil!_erC[eanhlg ............................... I3 Exhaust Filter C_eaning and Replacement .....
WA G-To reduce the risk of fire, etectric shock, or injury: Your safety is important te us. To reduce the risk of fire, electric shock, injury to persons or damage when using your vacuum cleaner, foltow basic safety precautions including the following: Read this manual before assembling or using your vacuum cleaner. Do not operate the cleaner with a punctured hose. Replace if cut or worn. Avoid vacuuming sharp objects.
_t:is important to know your vacuum cleaneCs parts an_ features to assure its proper and: safe use, Review these before, _sing your cleaner. _tem Dust Bag Bait Pa_SNo.
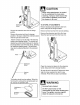
Before assembling your vacuum, check the PACKING UST on the cover of the separate Parts List. Use this {_stte verify that you have received aJl the components of your nmv Kenmore v_uum. Position the handle as shown befow and slide the handle into the opening at the top of the, vacuum, inse_ thescrew so itpasses 1_hrough the handle intothevacuum, WARNING Electric Shock Hazard Do not plug _nt_ the electrical supply until the assembly is complete. Failure to do so could result ir_ electric shock or iniury.
HOSE ASSEMBLY CORD ASSEMBLY After the handle has been assembled to. the Make sure the quick release cord hange_ is in body and power cord has been wrapped a'ound the cord hangers_ inser_ the upper end of the hose i_o the opening on the body and place the hose over the hose hoBer. the upright pos_ion. Lock the cord into place by forcing _ into the _ocking notch on the body Locking Notch of the upper cord Hose Holder hanger as shown.
This vacuum ciea_er is designed with s_ Automatic Height Ad!ustment which adjusts the floor nozzle to the proper height of a_qyca_et pile.. The height of floor nozzle is in_an_y and automatically adi_,_sted when yo_ move from one carpeted area to ano_ser. Release the handle by stepping, on the embossed pal1 on either" side of the fbor nozzle and pulling back and dow_ on the handle with your hand.
CAUTION When using attachments, be carefu_ not to overextend the hose when reaching. Trying to reach beyond the hose stretch capability couRd cause the cleaner to tip over. TO STORE ATTACHMENTS Wand Remove dusting brush/upholstery tool from wand. Snap into its storage location. Remove the extension wand from its storage position. Remove the crevice tool from its storage position in the wand. Attach the extension wand onto the open end of the hose. Remove crevice tool from the wand by twisting.
CLEANING AREA A]3"ACHMENT Furniture* DUSTING BRUSH _,_ Betweel_ Gush ons* X X CREVICE TOOL tJPHOL_T_d .. _: I*._ ¸ TOOL Smi_ × X Wails X X X A_ways cban attachments _bre Drapes_ X X using on fabdcs, Carpet edges Guide efther side or the front of the nozzle For best cleaning results, keep the airfbw passage clear. abng a baseboard. The full length brushes he_p remove dirt at carpet edges. Occasionally, for chgs. Stairs Put handle in _uL!upright position.
WARNING Electric Hazard Shock And, Persona! injury Disconnect efectricai supply before ,servicing or cleaning the ur_it. Failure to do so could resu_ in emectric shock or personal cleaner suddenly starting° injury from To reptace nozzle covel._ insetl tabs into.
VACUUM CLEANER CARE Always fotiow al_ safety precautions when WARNING o_eaning and servicing the vacuum cteaner. Etectric Shock Hazard And, Persona_ injury Disconnecl etectricai supply before servicing or clieaning the unit. Failure to do so could resullt in electric cleaner shock or personal suddenly starting. injury from Gather the cord and wrap it loosely around the WARNING quick release cord har_er and tower cord hanger, Stere the cl.
TO REMOVE BAG Check the bag, holder and the BOO .... motor safety filter. WARNING If either is: bbcked, check them. See, MOTOR SAFETY FILTER CLEANING. Motor-Safety :_t'l Pull the dust cover gr{p forward. Remove cover and lay aside. TO REPLACE / BAG Un_oId the new dust bag, Dust -Cover onto the bag hotde[ completely by holding the bag ii Grasp the dust bag collar and puit gentty, carefulFy removing the dust bag.
Checkmotorsafetyfi_erfrequently., WARNING ff the motor safety filter, local_ed in the bottom of the dust bag cavity is dirty, remove it by pulling forward out from under the ribs. Etectric Shock Hazard Do no_: operate the cl_ner without: the motor safety fi_tero Be sure the ;j filter FilterFoam ........... is d:_ and properly prevent shock. motor failure installed and/or to electric Always unplug power cord from electrical outlet before performing Wash the foam fitter in wal'm soapy waNr.
WARNING WARNING Persona_ tn}ury Be carefut ag_t_r Failure when remo:ving the as the belt tension is h_gh. to do so coul_d result in personaf injury releasing q_ick|y from: the agitator and snapping away, TO CLEAN AGFATOR Frequently check and remove hair, string and Iint buitd-up in the brush area. _fbuitd-up becomes excessive, fc41owthe steps below. Note: in order to keep ctea.
TO REPLACE BELT Press firmly, checking to see that each end is completely inserted. Loop the new belt on the motor shaft. Belt Belt Pulley Check to see that the belt is centered on the Note: See PARTS AND FEATURES for belt number. belt pulley. Turn the agitator with your fingers to see that it turns freely. Loop the other end of the belt on the belt pulley on the agitator. Insert in the insert in the Replace the nozzle cover and secure the latches.
TO REPLACE AGITATOR WARNING ENecttic Ha_rd Sh_ck or Personali _njury Remove the nozzle cover and ag_ator, See BELT CHANGING AND AGITATOR CLEANING. Reptace agitator with a new one, Disconnect etectrica_ suppty before serv_dng oF cleaning the uniL Faiiure to do so could tesutt in etectric from shock cleaner or persona| suddeniy Reassemble the belt, agitator and nozzle cover. See BELT CHANGING AND AGITATOR CLEANING, injury sta_:ing.
Alwaysfol}owallsafetyprecautions wher_ cleaningandservicing thevacuumc}eaner. WARNING Etectric Hazard: Shock Or Personam Injury Disconnect eSectricai suppty before Re4nsert the hose into the opening on the Iower body from which it was removed. Press firmly to assure conn,ection. if the bag and fitter areas and the hose areas are free of clogs, check the floor nozzle area. To check this area, see the sections on BELT CHANGING AND AGITATOR CLEANING.
Review this chart to find do-it-youraeff solutions for mine{' pertormance problems Any other sewice needed_ otl_er than 1hose described in this owneCs manual should be performed by a Sears o_'otheF quaBfled service _epfe_ntatk_e_ WARNING Disconnect eiectricai Etectdc Shock Hazard supply before sewicing Faiture, to do so, coutd resu_ in electric Clea#er wen t slarL ] } Poor Job ol et_ plck-up0 Cleaner picks up movable rugs: or pushes too hard:, Agitator does not turn, Pe_ormat_c_ in_|ea_or, some mod
Master Protection Agreements: Congratulations on making _ smart:purchase, Yo_ new Kenmore_;produ_ is,designed and manufactured for years of de#endabte operation.. But iike ati prod_Jc_,it m_y require prevent ve maintenance or repair _om time to line, That's when h_ving a Master Protection Agreement c_n s:_veyou money a_d _ggr_vation_ Purchase a Master Promotion Agreeme_ now and p_3teotyourself from u_expected hass:ieand expense. O_ce you purcha_ the AgreemenI.
Your Home For repair - in your home - of 8U major brand appliances, lawn and garden equipment, or heating and cooling systems, no ma_er who made it, no manet who so_d it! For the replacement parts, accessories and owne#s manuals that you need to do-tt-your_eff. For Sears professionaM }nstaHation of home appl_ances _nd items tike garage door openers and water hea_e.rs. !-800-4oHY-HOHE ® (_-_00-469_4663) 24/ 7 / 3s5 (U.S.A. www,sears.com and Canada) www.sears.r.
Owner's Manual Manual del Propietario Vacuum Cteaner Aspiradora iViodei, Modelo 721.33078 72! .33079 CAUTION: Read and follow a!l safety and operating instructions before first use of this product. CUIDADO: Lea y sigue todas tas instrucciones de operaci6n y seguridad antes del uso de este producto. Directions for Use It is a violation of Federal law to use this product in a manner inconsistent with its labeling.
Before Using Your New Vacuum ........................2 Vacuum Cleaner Care ............................................. 11 Kenmore Vacuum Cfeanet Warranty ................ 2 Vacuum Storage ................................................t t Cleaning E×_erior and Attachments ..................t t Dust Bag Changing ............................................i2 Motor Safety Fil!_erC[eanhlg ............................... I3 Exhaust Filter C_eaning and Replacement .....
WA G-To reduce the risk of fire, etectric shock, or injury: Your safety is important te us. To reduce the risk of fire, electric shock, injury to persons or damage when using your vacuum cleaner, foltow basic safety precautions including the following: Read this manual before assembling or using your vacuum cleaner. Do not operate the cleaner with a punctured hose. Replace if cut or worn. Avoid vacuuming sharp objects.
_t:is important to know your vacuum cleaneCs parts an_ features to assure its proper and: safe use, Review these before, _sing your cleaner. _tem Dust Bag Bait Pa_SNo.
Before assembling your vacuum, check the PACKING UST on the cover of the separate Parts List. Use this {_stte verify that you have received aJl the components of your nmv Kenmore v_uum. Position the handle as shown befow and slide the handle into the opening at the top of the, vacuum, inse_ thescrew so itpasses 1_hrough the handle intothevacuum, WARNING Electric Shock Hazard Do not plug _nt_ the electrical supply until the assembly is complete. Failure to do so could result ir_ electric shock or iniury.
HOSE ASSEMBLY CORD ASSEMBLY After the handle has been assembled to. the Make sure the quick release cord hange_ is in body and power cord has been wrapped a'ound the cord hangers_ inser_ the upper end of the hose i_o the opening on the body and place the hose over the hose hoBer. the upright pos_ion. Lock the cord into place by forcing _ into the _ocking notch on the body Locking Notch of the upper cord Hose Holder hanger as shown.
This vacuum ciea_er is designed with s_ Automatic Height Ad!ustment which adjusts the floor nozzle to the proper height of a_qyca_et pile.. The height of floor nozzle is in_an_y and automatically adi_,_sted when yo_ move from one carpeted area to ano_ser. Release the handle by stepping, on the embossed pal1 on either" side of the fbor nozzle and pulling back and dow_ on the handle with your hand.
CAUTION When using attachments, be carefu_ not to overextend the hose when reaching. Trying to reach beyond the hose stretch capability couRd cause the cleaner to tip over. TO STORE ATTACHMENTS Wand Remove dusting brush/upholstery tool from wand. Snap into its storage location. Remove the extension wand from its storage position. Remove the crevice tool from its storage position in the wand. Attach the extension wand onto the open end of the hose. Remove crevice tool from the wand by twisting.
CLEANING AREA A]3"ACHMENT Furniture* DUSTING BRUSH _,_ Betweel_ Gush ons* X X CREVICE TOOL tJPHOL_T_d .. _: I*._ ¸ TOOL Smi_ × X Wails X X X A_ways cban attachments _bre Drapes_ X X using on fabdcs, Carpet edges Guide efther side or the front of the nozzle For best cleaning results, keep the airfbw passage clear. abng a baseboard. The full length brushes he_p remove dirt at carpet edges. Occasionally, for chgs. Stairs Put handle in _uL!upright position.
WARNING Electric Hazard Shock And, Persona! injury Disconnect efectricai supply before ,servicing or cleaning the ur_it. Failure to do so could resu_ in emectric shock or personal cleaner suddenly starting° injury from To reptace nozzle covel._ insetl tabs into.
VACUUM CLEANER CARE Always fotiow al_ safety precautions when WARNING o_eaning and servicing the vacuum cteaner. Etectric Shock Hazard And, Persona_ injury Disconnecl etectricai supply before servicing or clieaning the unit. Failure to do so could resullt in electric cleaner shock or personal suddenly starting. injury from Gather the cord and wrap it loosely around the WARNING quick release cord har_er and tower cord hanger, Stere the cl.
TO REMOVE BAG Check the bag, holder and the BOO .... motor safety filter. WARNING If either is: bbcked, check them. See, MOTOR SAFETY FILTER CLEANING. Motor-Safety :_t'l Pull the dust cover gr{p forward. Remove cover and lay aside. TO REPLACE / BAG Un_oId the new dust bag, Dust -Cover onto the bag hotde[ completely by holding the bag ii Grasp the dust bag collar and puit gentty, carefulFy removing the dust bag.
Checkmotorsafetyfi_erfrequently., WARNING ff the motor safety filter, local_ed in the bottom of the dust bag cavity is dirty, remove it by pulling forward out from under the ribs. Etectric Shock Hazard Do no_: operate the cl_ner without: the motor safety fi_tero Be sure the ;j filter FilterFoam ........... is d:_ and properly prevent shock. motor failure installed and/or to electric Always unplug power cord from electrical outlet before performing Wash the foam fitter in wal'm soapy waNr.
WARNING WARNING Persona_ tn}ury Be carefut ag_t_r Failure when remo:ving the as the belt tension is h_gh. to do so coul_d result in personaf injury releasing q_ick|y from: the agitator and snapping away, TO CLEAN AGFATOR Frequently check and remove hair, string and Iint buitd-up in the brush area. _fbuitd-up becomes excessive, fc41owthe steps below. Note: in order to keep ctea.
TO REPLACE BELT Press firmly, checking to see that each end is completely inserted. Loop the new belt on the motor shaft. Belt Belt Pulley Check to see that the belt is centered on the Note: See PARTS AND FEATURES for belt number. belt pulley. Turn the agitator with your fingers to see that it turns freely. Loop the other end of the belt on the belt pulley on the agitator. Insert in the insert in the Replace the nozzle cover and secure the latches.
TO REPLACE AGITATOR WARNING ENecttic Ha_rd Sh_ck or Personali _njury Remove the nozzle cover and ag_ator, See BELT CHANGING AND AGITATOR CLEANING. Reptace agitator with a new one, Disconnect etectrica_ suppty before serv_dng oF cleaning the uniL Faiiure to do so could tesutt in etectric from shock cleaner or persona| suddeniy Reassemble the belt, agitator and nozzle cover. See BELT CHANGING AND AGITATOR CLEANING, injury sta_:ing.
Alwaysfol}owallsafetyprecautions wher_ cleaningandservicing thevacuumc}eaner. WARNING Etectric Hazard: Shock Or Personam Injury Disconnect eSectricai suppty before Re4nsert the hose into the opening on the Iower body from which it was removed. Press firmly to assure conn,ection. if the bag and fitter areas and the hose areas are free of clogs, check the floor nozzle area. To check this area, see the sections on BELT CHANGING AND AGITATOR CLEANING.
Review this chart to find do-it-youraeff solutions for mine{' pertormance problems Any other sewice needed_ otl_er than 1hose described in this owneCs manual should be performed by a Sears o_'otheF quaBfled service _epfe_ntatk_e_ WARNING Disconnect eiectricai Etectdc Shock Hazard supply before sewicing Faiture, to do so, coutd resu_ in electric Clea#er wen t slarL ] } Poor Job ol et_ plck-up0 Cleaner picks up movable rugs: or pushes too hard:, Agitator does not turn, Pe_ormat_c_ in_|ea_or, some mod
Master Protection Agreements: Congratulations on making _ smart:purchase, Yo_ new Kenmore_;produ_ is,designed and manufactured for years of de#endabte operation.. But iike ati prod_Jc_,it m_y require prevent ve maintenance or repair _om time to line, That's when h_ving a Master Protection Agreement c_n s:_veyou money a_d _ggr_vation_ Purchase a Master Promotion Agreeme_ now and p_3teotyourself from u_expected hass:ieand expense. O_ce you purcha_ the AgreemenI.
Your Home For repair - in your home - of 8U major brand appliances, lawn and garden equipment, or heating and cooling systems, no ma_er who made it, no manet who so_d it! For the replacement parts, accessories and owne#s manuals that you need to do-tt-your_eff. For Sears professionaM }nstaHation of home appl_ances _nd items tike garage door openers and water hea_e.rs. !-800-4oHY-HOHE ® (_-_00-469_4663) 24/ 7 / 3s5 (U.S.A. www,sears.com and Canada) www.sears.r.