® Gas Range Estufa a as Mode{s, Mode{os 790. 7851", 7852*, 7853*, 7854*, 7857*, 7858*, 7859*, 7861", 7862* * = co{or number, nQmero de co{or ¢)¢j ¢j_ ii'% iii......... www.sears.com Sears Roebuck and Co., Hoffman Estates, {L 60179 U.S.A.
Table of Contents Product Record Free-Standing Range Warranty ........................................... 2 Product Record ................................................................... 2 iMPORTANT SAFETY iNSTRUCTiONS .......................... 3-5 Protection Agreements ........................................................ 5 Range Features .................................................................. 6 Before Setting Oven Controls ..............................................
important Safety instructions Read all instructions before using this appliance. Save these instructions for future reference. This manual contains important safety symbols and instructions.
important Safety instructions Do Not Leave Children AIoneiChildren should not be left alone or unattended in the area where appliance is in use. They should never be allowed to sit or stand on any part of the appliance. DO NOT TOUCH SURFACE BURNERS, AREAS NEAR THESE BURNERS, OVEN BURNERS OR INTERIOR SURFACES OF THE OVEN. Both surface and oven burners may be hot even though flames are not visible. Areas near surface burners may become hot enough to cause burns.
important Safety instructions Conversion to Liquefied Petroleum Gas (or L.P. Gas) The natural gas range is designed to allow for conversion Liquefied Petroleum (L.P.) Gas. to If L.P. conversion is needed, contact 1-800-4-MY-HOME® for assistance. The L.P. Conversion Kit is provided with this range and is located on the left lower REAR (back side) panel of the range. Before installing the kit be sure to follow the L.P. Installation Instructions carefully.
PROTECTION AGREEMENTS ACUERDOS En los EE.UU. In the U.S.A. Master Protection Agreements Congratulations on making a smart purchase. Your new Kenmore C_ product is designed and manufactured for years of dependable operation. But like all products, it may require preventive maintenance or repair from time to time. That's when having a Master Protection Agreement can save you money and aggravation. Purchase a Master Protection Agreement now and protect yourself from unexpected hassle and expense.
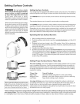
Before Setting Oven Controls Oven Vent Location OVEN VENT The oven vent is located below the backguard (See Fig. 1 ). When the oven is on, warm air is released through this vent. This venting is necessary for proper air circulation in the oven and good baking results. DO NOT BLOCK THE VENT. i Arranging Fig. 1 Oven Racks ALWAYS ARRANGE OVEN RACKS WHEN THE OVEN IS COOL (PRIOR TO OPERATING THE OVEN). Always use oven mitts when using the oven.
Setting Surface Controls Do not place plastic items such as salt and pepper shakers, spoon holders or plastic wrappings on top of the range when it is in use. These items could melt or ignite. Potholders, towels or wood spoons could catch fire if placed too close to a flame. Setting Surface Controls Your range may be equipped with different sized surface burners. The ability to heat food quicker and in larger volumes increases as the burner size increases.
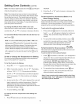
Oven Control Functions READTHEINSTRUCTIONS CAREFULLY BEFORE USING THE OVEN. Forsatisfactoryuseofyouroven, the various pad functions of the oven as described below. BROIL PAD Used to select the variable broil function, UP and DOWN ARROW PADS Used along with the function pads to select oven temperature, time of day, clean time and becomefamiiiarwith FEATURE INDICATOR LIGHTS-- These light to show which feature is in CLOCK SET PAD Used to set the time of day.
Setting Oven Controls Note: The indicator light located above the _ (cont'd) displayed. pad will glow while the minute timer is active. 2. Press the A or V pad to increase or decrease the set temperature. Note: The minute timer does not start or stop cooking. It serves as an extra timer in the kitchen that will beep when the set time has run out. The minute timer can be used To Set Control Hour alone or during any of the other oven functions.
Setting Oven Controls (cont'd) To Set for Broiling: 1. Arrange the oven rack while oven is still cool. Position the rack as suggested in the Broil Rack Position Table below. 2. Press B,o, ,,__,,will 3. Press and hold the ,i_ or V appear in display. until the desired broil setting level appears in the display. Press the/_, broil or the V 4. 5. 6. 7. for Hi for LO broil. Most foods may be broiled at the Hi broil setting.
Self-Cleaning • • • (cont'd) Oven racks should be removed, if they are not removed during the Self-Clean cycle their color will turn slightly blue and the finish will be dull. After the cycle is complete and the oven has cooled, rub the sides of the oven racks with wax paper or a cloth containing a small amount of salad oil (this will make the racks glide easier into the rack position). Remove any excessive spillovers in the oven cavity before starting the Self-Cleaning cycle.
General Care & Cleaning Cleaning Chart Surfaces How to CJean Glass, Painted Plastic Control Body Parts & Knobs For general cleaning, use a soft cloth, clean with mild dish detergent & water or a 50/50 solution of vinegar & water. Follow by rinsing the area with clean water; dry & polish with a soft cloth. Glass cleaners may be used if sprayed on a soft cloth 1st. DO NOT spray liquids directly on the control pad and display areas.
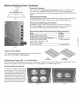
General Care & Cleaning Cleaning the Contoured Well Areas, (cont'd) Burner Cap, Burner Head and Burner Drip Pans (some models) The contoured well areas, burner cap, burner head and burner drip pans (some models) should be routinely cleaned. Keeping the burner ports clean will prevent improper ignition and an uneven flame. Refer to the following instructions: Surface Burner ..
General Care & Cleaning (cont'd) Special Door Care Instructions- Most oven doors contain glass that can break. Read the following recommendations: 1. Do not close the oven door until all the oven racks are fully in place. 2. Do not hit the glass with pots, pans, or any other object. 3. Scratching, hitting, jarring or stressing the glass may weaken its structure causing an increased risk of breakage at a later time.
Before You Call Solutions to Common Problems Before you call for service, review this list. It may save you time and expense. The list includes common occurrences that are not the result of defective workmanship or materials in this appliance. Oven smokes excessively during broiling - (1) Control(s) not set properly. Follow Broil instructions under Setting Oven Controls. (2) Oven door is open. Make sure oven door is closed. (3) Meat too close to the broil element.
® Registered ® Marca MC Marque Trademark Registrada / TM Trademark / TMMarca de commerce / SM Service de Fabrica / MD Marque Mark of Sears / SM Marca de Servicio deposee de Sears Brands, Brands, de Sears LLC LLC Brands, LLC @ Sears Brands, LLC