6) GAS COOKTOP Use & Care Guide PLA CHA E COCl A A GAS Manual del Usuario Models, Modelos 790. 3244.',-, 3245.',-, 3248.',-, 3249.',.',-= color number, n0mero de color Sears Roebuck www.sears.com and Co., Hoffman Estates, IL 60179 U.S.A. P/N 318203653 Rev.
Table of Contents Cooktop Warranty .............................................................. 2 IMPORTANT SAFETY INSTRUCTIONS ......................... 3-4 Product Record ................................................................. 5 Serial Plate Location ......................................................... 5 Grounding Instructions ...................................................... 5 Liquefied Petroleum (Propane) Gas Conversion ................. 5 Surface Cooking ..........................
important Safety instructions Read all instructions before using this appliance. Save these instructions for future reference. This manual contains important safety symbols and instructions.
important Safety instructions • Do Not Use Water or Flour on Grease Fires--Smother ,, Utensil Handles Should Be Turned Inward from Edges of Cooktop and Not Extend Over Adjacent Surface Burners--To reduce the risk of burns, ignition of flammable materials, and spillage due to unintentional contact with the utensil, the handle of the utensil should be positioned so that it is turned inward, and does not extend over adjacent surface burners.
Please carefully read and save these instructions This Use & Care Manual contains general operating instructions for your appliance and feature information for several models.Your product may not have all the described features. The graphics shown are representative. The graphics on your appliance may not look exactly like those shown. Common sense and caution must be practiced when installing, operating and maintaining any appliance.
Surface Cooking CORRECT INCORRECT Use Proper Cookware = Curved and warped pan bottoms. Cookware should have flat bottoms that make good contact with the entire surface heating element. Check for flatness by rotating a ruler across the bottom of the Figure 1 cookware (See Figure 1 ). Be sure to follow the recommendations for using cookware as shown in Figure 2. Note: The size and type of cookware used will influence the setting needed for best cooking results. _i!i!ii!iiiiiiii_i_ ....
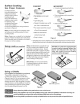
Setting Surface Controls Sizes of the Surface Gas Burners Burner Cap 36" Models only Your appliance is supplied with the different surface gas burners: Simmer Burner (5,000 BTU) 1 (or 2 on 36" models) Standard Burners (9,500 BTU) 1 Power Burner (12,200 BTU or 14,200 BTU) 1 Power Burner (16,200 BTU) or Dual Burner (18,000 BTU) Burner Cap (Standard) Models only Burner Extra Large "POWER" Burner Head (12,200 BTU or 14,200 BTU) Left Rear )Gas Opening Left Front Center Gas Opening Gas Opening When se
Setting Surface Controls Dual Burner Head Assembly (present on Models 790.3248 & 790.3249 only) Step 4 Make sure that the Burner Head, Burner Caps and Burner Skirt are installed properly and at the correct locations. Burner Outer 1. Follow the Installation Instructions before installing and using your new range. 2. Remove all packing tape from cooktop and the dual burner. 3. Discard all packing material located under all Burners (if applicable). 4.
Setting Surface Controls Do not place plastic items such as salt and pepper shakers, spoon holders or plastic wrappings on top of the range when it is in use. These items could melt or ignite. Potholders, towels or wood spoons could catch fire if placed too close to a flame. In the event of an electrical power outage, the surface burners can be lit manually. To light a surface burner, hold a lit match to the burner head, then slowly turn the surface control knob to LITE.
Setting Surface Controls Setting the Dual Burner (present on Models 790.3248 & 790.3249 only) The Dual Burner has two rings of flame that you can control for two different heat levels, one for small and one for large cookware. Small 1. 2. 3. 4. 5. Cookware 3. 4. 7. (Figure 1 ; Zone A) position (See Figures 2 & 3). Release the knob and rotate to the LITE position. Note: All electronic surface ignitors will spark at the same time. However, only the Dual Burner will ignite.
General Care & Cleaning Cleaning Various Parts of Your Cooktop Before cleaning any part of the cooktop, be sure all controls are turned OFF and the cooktop is COOL. REMOVE SPILLOV ERS AND HEAVY SOILING AS SOON AS POSSIBLE. REGULAR CLEANINGS NOW WILL REDUCE THE DIFFICULTY AND EXTENT OF A MAJOR CLEANING LATER. Surfaces How to Clean Aluminum (Trim Pieces) & Vinyl Use hot, soapy water and a cloth or paper towel. Dry with a clean cloth.
General Care & Cleaning Porcelain enamel cooktop cleaning instructions (some Correct and consistent cleaning is essential to maintaining your porcelain enamel cooktop. If food spills and grease spatters are not removed, they may burn onto the surface of the cooktop and cause permanent discoloration. Daily Cleaning For normal soil: 1. Allow cooktop surface to cool. 2. Wipe off spills and spatters using a clean paper towel ora clean cloth with warm, soapy water. 3.
General Care & Clear|ing Sealed Burner To Clean the Burner Grates, Countoured Heads Burner Skirts (some models), Burner Caps and Burner The burner grates, contoured burner skirts (some models), burner caps and burner head should be routinely cleaned. Keeping the burner ports clean will prevent improper ignition and an uneven flame. See instructions below. To Clean the Burner Grates Be sure burners and grates are cool before you place your hand, a potholder, cleaning cloths or other material on them.
Before You Call Solutions to Common Problems Before you call for service, review this list. It may save you time and expense. The list includes common occurrences that are not the result of defective workmanship or materials in this appliance. OCCURRENCE POSSIBLE CAUSE/SOLUTION Surface burners do not light. Surface Control knob has not been completely turned to LITE. Push in and turn the Surface Control knob to LITE until burner ignites and then turn control to desired flame size.
PROTECTION AGREEMENTS Master Protection Agreements Acuerdos Congratulations on making a smart purchase. Your new Kenmore®product is designed and manufactured for years of Enhorabuena por haber hecho una compra intetigente. Su nuevo producto Kenmore®esta diseSado y fabricado para brindarle aSos de funcionamiento fiable. Pero, como cualquier producto, puede necesitar mantenimiento preventivo o reparaciones peri6dicas.
Your Home For expert troubleshooting and home solutions advice: www.managemyhome.com For repair - in your home - of all major brand appliances, lawn and garden equipment, or heating and cooling systems, no matter who made it, no matter who sold it! For the replacement parts, accessories and owner's manuals that you need to do-it-yourself. For Sears professional installation of home appliances and items like garage door openers and water heaters.