-°°. E L I T E ® Gas ar e Estufa a as Models, Modelos 790.7942 *, 7944* * = color number, ntJmero de color www.sears.com Sears Roebuck and Co., Hoffman Estates, {L 60179 U.S.A.
Table of Contents Freestanding Setting , Setting Bake ...................................................................... , , Setting Setting Range 8 , Setting Before Setting Oven Controls .............................................. 9-10 Before Setting Surface Controls ............................................ 10 Surface Cooking ................................................................. 11-13 Setting Warmer Drawer & Controls ..................................
important Safety instructions Read all instructions before using this appliance. Save these instructions for future reference. This manual contains important safety symbols and instructions. Please pay attention to these symbols and follow all instructions given.
important Safety instructions • Do Not Leave Children Alone--Children should not be left alone or unattended in the area where appliance is in use. They should never be allowed to sit or stand on any part of the appliance. + Protective Liners--Do not use aluminum foil to line surface burner pans, or oven bottom, except as suggested in this manual. Improper installation of these liners may result in risk of electric shock, or fire.
important Safety instructions FOR CERAMIC-GLASS COOK TOP MODELS (some models) Do Not Cook on Broken Cook Top--If cook top should break, cleaning solutions and spillovers may penetrate the broken cook top and create a risk of electric shock. Contact a qualified technician immediately. Clean Cook Top with Caution--if a wet sponge or cloth is used to wipe spills on a hot cooking area, be careful to avoid a steam burn. Some cleaners can produce noxious fumes if applied to a hot surface.
PROTECTION AGREEMENTS In the U.S.A. Master Protection Agreements Congratulations on making a smart purchase. Your new Kenmore C_ product is designed and manufactured for years of dependable operation. But like all products, it may require preventive maintenance or repair from time to time. That's when having a Master Protection Agreement can save you money and aggravation. Purchase a Master Protection Agreement now and protect yourself from unexpected hassle and expense.
Before Using Your Range Assembly of Burner Heads & Burner Caps (for Deep Well Cooktop models only) Your range is shipped with the Burner Heads and Burner Caps in the correct locations. Packing material is located between the Burner Heads and the cooktop. a. Be sure to follow the installation instructions before installing and using your new range. b. Remove all packing tape from cooktop area. Remove all Burner Caps and Burner Heads. c. Discard all packing material located under Burner Heads. d.
Range Features Your Elite Gas Range ii_ Features ® Include: j 1. 2. 3. ............................. Electronic Oven Control with Timer. Glass Touch Sensitive Control Panel. Left Front Burner Valve & Knob. 4. Left Rear Burner Valve & Knob or Bridge Burner Valve & Knob (some models). 5. Center Burner Valve & Knob (some models). 6. Right Rear Burner Valve & Knob. 7. Right Front Burner Valve & Knob. 8. Easy to clean Deep Well Cooktop (some models) or Ceramic Gas through Glass Cooktop (some models). 9.
Before Setting Oven Controls Oven Vent Location OVEN VENT The oven vent is located below the backguard (See Fig. t). When the oven is on, warm air is released through this vent. This venting is necessary for proper air circulation in the oven and good baking results. DO NOT BLOCK THE VENT. Always use pot holders or oven mitts when adjusting the oven racks. Wait until the oven has completely cooled if possible. Oven racks may be HOT and may cause burns. Fig.
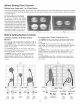
Before Setting Oven Controls Baking Layer Cakes with 1 or 2 Oven Racks For best results when baking cakes using 2 oven racks, place cookware on oven rack positions 2 & 5 (See Fig. 1 and Fig. 2 on page 9). For best results when using a single oven rack, place cookware on oven rack position 4 (See Fig. 2 and Fig. 2 on page page 9).
Surface Cooking • • Operating Gas Surface Burners Setting Proper Burner Flame Size Operating Triple Ring Burner Do not place plastic items such as salt and pepper shakers, spoon holders or plastic wrappings on top of the range when it is in use. These items could melt or ignite. Potholders, towels or wood spoons could catch fire if placed too close to a flame. Operating 1. 2. 3. 4. 5. the Gas Surface Burners: Place cooking utensil on surface burner.
Cooking Surface ,, • Operating Triple Ring Burner Conrd (some models) Operating the Bridge Burner (some models) Operating 1. 2. 3. 4. the Triple Ring Burner at the lowest setting: Push the right front surface control knob in and turn counterclockwise out of the OFF position (See Fig. 1). Release the knob and rotate to the LITE position (See Fig. 1 ). Note: Although all electronic surface ignitors will spark at the same time, only the selected surface Burner will lite.
Surface Cooking • • Care & Seasoning of the Griddle Using the Griddle Care & Seasoning [ of the Griddle i ..... ¸ ;:iiii:i: Before first use: Wash Griddle in hot soapy water. Rinse and then dry completely. Apply a thin coat of vegetable oil to the entire surface (front and back of griddle). Preheat your oven to 350°F. Place the griddle on the upper rack in your oven. ,, Bake griddle for 1 hour at 350°F, then turn oven OFF and let cool before removing.
Setting Warmer Drawer Controls ,_ • • Warmer Drawer & Bread Proofing Indicator Lights Setting Warmer Drawer & Bread Proofing Controls Warmer Drawer Food Temperature Settings Warmer (Warm & Ready TM) Drawer & Bread Proofing Indicator Lights The control and indicator lights for the Warmer Drawer and Bread Proofing features are located on the control panel. The indicator lights will turn ON when the control is set, and remain ON until the controls are turned OFF.
Warmer • • Drawer Removal Preparing Bread Dough forthe Warmer Drawer Removing & Replacing Warmer Drawer Preparing Bread Dough for the Warmer Drawer The Warmer Drawer has a "Proof Bread" feature that can be used to help prepare bread dough. The recommended length of time to keep the bread dough in the Warmer Drawer is about 45-60 minutes. Be sure however to followthe recipe's recommended times. The prepared bread dough should be placed in a large bowl because the dough will nearly double in volume.
Electronic Oven Control Pad Features READ THE INSTRUCTIONS DELAY START-- Use with BAKE, COOK TIME, and CLEAN to program a Delayed Timed Bake or Delay Self-Cleaning cycle start time. COOKTIME--Use to enter the length of the baking time. CAREFULLY BEFORE USING THE OVEN. For satisfactory use of your oven, become familiar with the various features and functions of the oven as described below. Detailed instructions for each feature and function follow later in this Use & Care Guide.
Setting Oven Controls • • • Setting the Clock Changing between t 2 or 24 hour display Silent Control Operation Setting the Clock The CLOCK _ pad is used to set the clock. The clock may be set for 12 or 24 hour time of day operation. The clock has been preset at the factory for the 12 hour operation. When the range is first plugged in, or when the power supply to the range has been interrupted, the timer in the display will flash with power failure "PF" (See Fig. 1). To set the clock 1. Press (_.
Setting Oven Controls • • Continuous Bake or Twelve Hour Energy Saving Mode ]]mer Setting Continuous Bake or 12 Hour The TIMER _-_si_oe_f_ and FLEX CLEAN _ Energy Saving pads control the Continuous Bake or 12 Hour Energy Saving features. The oven control has a factory preset built-in 12 Hour Energy Saving feature that will shut off the oven if the oven control is left on for more than 11 hours and 59 minutes. The oven can be programmed to override this feature for Continuous Baking.
Setting Oven Controls • • Oven Lockout Setting Temperature Display Lockout OVEN Setting Oven Feature IZCJLOCKOUT The _ pad controls the Oven Lockout feature. The Oven Lockout feature automatically locks the oven door, prevents the Warmer Drawer and most oven controls from being turned ON. It does not disable the clock, Timer or the interior oven light. INSTRUCTIONS To activate the Oven Lockout PRESS feature: 1. Press and hold _ 2.
Setting Oven Controls • Saving & Recalling Recipe Settings To Set the Recipe Recall Feature A The Recipe Recall feature may be used to record and recall your favorite recipe settings. This feature may store 1 setting for each of the 5 basic cooking pads. The key pads that a recipe may be stored with are BAKE _, _, CONV ROAST _, CAKES _ & BREADS @. CONV BAKE This feature will also store and recall Slow Cook, Cook Time or Warm & Hold added setting.
Setting Oven Controls • Preheat Setting Preheat For the best baking performance use the PREHEAT _ feature. The Preheat feature will bring the oven up to the set V baking temperature and then indicate when to place the food in the oven. Preheating is not necessary when roasting or cooking casseroles. The oven can be programmed to preheat at any temperature between 170°F to 550°F. INSTRUCTIONS To set the Preheat temperature 1. Arrangetheintedoroven 2. Press _. PRESS DISPLAY for 350°F: racks.
Setting Oven Controls • Setting Bake Some Important Things to Know Before Setting Cooking Features: The oven has been factory pre-set to start any BAKE, CONV BAKE, CONV ROAST, PREHEAT, CAKE or BREAD function with the oven set temperature automatically set for 350°F. If needed the oven set temperature may be adjusted at any time. Setting Bake The BAKE _-a_) pad controls normal baking. If preheating is necessary, refer to the PREHEAT _ feature for V instructions.
Setting Oven Controls • Setting Cook Time Setting Cook Time and COOK TiME _TTC_m_ek-_ pads control the Cook Time feature. The automatic timer of the Cook Time The BAKE _ak_ feature will turn the oven OFF after cooking for the desired amount of time you select. INSTRUCTIONS PRESS DISPLAY To program the oven to begin baking immediately and to shut off automatically: (example below to bake at 350°F for 50 minutes): 1. Arrange interior oven rack(s) and place the food in the oven. 2.
Setting Oven Controls • Setting Delay Start Setting Delay Start The BAKE (_, OVEN COOK TIME _j_ and DELAY START @ pads control the Delay Start feature. The automatic timer of the DELAY START feature will turn the oven ON and OFF at the times you select. INSTRUCTIONS PRESS DISPLAY To program the oven for a Delay Start and to shut off automatically (example for baking at 375°F for 50 minutes and starting at 5:30): 1. 2. Be sure that the clock is set with the correct time of day.
Setting Oven Controls • Setting Broil The _Broil_ pad controls the Broil featu re. When broiling, heat radiates downward from the oven broiler for even coverage. The Broil feature is preset to start broiling at 550°F, however, the Broil feature temperature may be set at any temperature between 400°F and 550°F. The broil pan and broil pan insert used together allows dripping grease to drain and be kept away from the high heat of the oven broiler. DO NOT use the broil pan without the insert (See Fig. 5).
Setting Oven Controls • • Benefits of Convection Roast: --Some foods cook up to 25 to 30% faster, saving time and energy. --Multiple oven rack baking. --No special pans or bakeware needed. Setting Convection Roast Setting Cakes or Breads Setting the Food Categories Features The CONV ROAST (,_'s't ), CAKES _ and BREADS B(._eadj)pads may be used when cooking certain food items. These pads have been designed to give optimum cook performance for the foods selected in each category.
Setting Oven Controls • Setting Convection Bake I Benefits --Multiple of Convection Bake: I oven rack baking. --No spec a pans or bakeware needed. Setting Convection The CONY BAKE _ I Bake pad controls the Convection Bake feature. Use the Convection Bake feature when cooking speed is desired. The oven can be programmed for Convection Bake at any temperature between 175 ° F to 77 ° F. Air circulation of Convection Cooking Fig.
Setting Oven Controls • • Setting Convection Convert Feature Setting Add 1 Minute Feature To set the Convection The _ Convert feature CONV CONVERT pad is used to automatically convert a standard Baking recipe for convection baking. When set properly, this feature is designed to display the oven set converted (reduced) temperature in the display. Convection Convert MUST be used with a Convection Bake keypad. Cook Time or Delay Start functions may be added.
Setting Oven Controls Setting the Slow Cook Feature Oven Light Setting The _ the Slow Cook Feature SLOW COOK pad is used to activate this feature. The Slow Cook feature may be used to cook foods more V slowly, at lower oven temperatures and provides cooking results much the same way as a Slow Cooker or Crock-Pot. The Slow Cook feature is ideal for roasting beef, pork & poultry. Slow Cooking meats may result in the exterior of meats becoming dark but not burnt. This is normal.
Oven •Setting Setting the Sabbath Controls Day Feature To Set the Sabbath The d_ Feature (for use on the Jewish Sabbath & Holidays) OVEN COOK TiME and @ DELAY START pads are used to set the Sabbath feature. The Sabbath feature may only be used with the __ake_ pad.
Setting Oven Controls • • Setting the Sabbath Day Feature (cont'd) Setting the Warm & Ho{d TM Feature It is recommended that any oven temperature change with the Sabbath feature activated be followed with 2 presses of the START pad. This will insure the oven remains ON even if the attempt to set the oven temperature was lower or higher than the oven control can accept. {f the oven temperature is set incorrectly, the oven temperature will default to 170°F or 550°F.
Self-Cleaning * Preparing fora Self-Clean cycle During the Self-Cleaning cycle, the outside of the range can become very hot to the touch. DO NOT leave small children unattended near the appliance. The health of some birds is extremely sensitive to the fumes given off during the Self-Cleaning cycle of any range. Move birds to another well-ventilated room. DO NOT line the oven walls, racks, bottom or any other part of the range with aluminum foil.
Self-Cleaning * Setting Flex Clean or Delay Flex Clean The FLEX CLEAN _'_ pad is used to start a Self-Cleaning cycle. When used with the DELAY START (,_x) pad, a delayed Self-Cleaning cycle may also be programmed. The FLEX CLEAN feature allows for any Self-Cleaning cycle time from 2 (2:00) to 4 hours (4:00) to be selected.
Self-Cleaning • Setting Flex Clean Setting Delay Flex Clean INSTRUCTIONS PRESS DISPLAY When the Self=Clean cycle is done: 1. The time of day,"DOOR LOCKED" and "CLEAN" icon will remain in the display. 2. Once the oven has cooled down for approximately 1 HOUR, and the "DOOR LOCKED" icon is no longer displayed, the oven door can then be opened. Stopping or Interrupting a Self-Cleaning cycle: If it becomes necessary to stop or interrupt a Self-Cleaning cycle duel.Press @.
Adjusting Oven Temperature • How to adjust the oven temperature higher or lower The cooking temperatures for in the oven have been pre-set at the factory. When using the oven for the first time, be sure to follow recipe times and temperatures. If you think the oven is too hot or too cool, the temperature in the oven may be adjusted. Before adjusting, test a recipe by using a temperature setting that is higher or lower than the recommended temperature.
General Care & Cleaning ,, Cleaning Table Surfaces: How to Clean: Aluminum & Vinyl Use hot, soapy water and a cloth. Dry with a clean cloth. Painted & plastic control panel parts & decorative trims For general cleaning, use hot, soapy water and a cloth. For more difficult soil and built-up grease, apply a liquid detergent directly onto the soil. Leave on soil for 30 to 60 minutes. Rinse with a damp cloth and dry. DO NOT use abrasive cleaners on any of these materials; they can scratch.
General Care & Cleaning • • • Removing & Replacing Lift-Off Oven Door Door Care instructions Care & Cleaning of Stainless Steel (some models) Removing & Replacing the Lift-Off Oven Door The door is heavy. For safe, temporary storage, lay the door flat with the inside of the door facing down. Door Hinge locations with oven door fully Fig. 1 Fig. 2 Oven Door open To Remove Oven Door: 1. Open oven door completely (horizontal with floor- See Fig. 1). 2.
General Care & Cleaning • Cleaning Cooktop, Burner Caps, Burner Heads & Grates Cleaning the Cooktop, Burner Heads, Caps & Grates The cooktop is designed to make cleaning easier. Because the gas Burners are sealed, cleanups are easy when spillovers are cleaned up immediately. The cooktop, Burner Heads and Caps should be routinely cleaned. Keeping the Burner Head Ports clean will prevent improper ignition and an uneven flame. Refer to the following instructions: THE COOKTOP IS NOT REMOVABLE.
General Care & Cleaning • • Ceramic Cooktop Cleaning & Maintenance Cleaning Recommendations for the Ceramic Glass Cooktop Cooktop Cleaning Consistent & Maintenance and proper (for models with a Ceramic cleaning is essential Glass Cooktop to maintaining only) your ceramic glass cooktop, Prior to using your cooktop for the first time, apply the recommended CookTopO Cleaning Creme to the ceramic surface (on the web visit www.sears.com for replacement cooktop cleaner, item number 40079).
General Care & Cleaning • • • Cleaning Recommendations for the Ceramic Glass Cooktop (for models with a Ceramic Glass Cooktop only) Special Caution for Aluminum Use on the Ceramic Cooktop (for models with a Ceramic Glass Cooktop only) Changing Oven Lights Do not use the following on the ceramic glass cooktop (for models with a Ceramic Glass Cooktop only): • Do not use abrasive cleaners and scouring pads, such as metal and some nylon pads. They may scratch the cooktop, making it more difficult to clean.
Before You Call • Solutions to Common Problems Before yeu call for service, review this list. it may save you time and expense. that are not the result of defective workmanship or materials in this appliance. The list includes common occurrences OCCURRENCE POSSIBLE CAUSE/SOLUTION Range is not level. Poor installation. Place oven rack in center of oven. Place a level on the oven rack. Adjust leveling legs at base of range until the oven rack is level.
Before You Call • Solutions to Common Problems (cont'd) OCCURRENCE Oven smokes POSSIBLE excessively during broiling. CAUSE/SOLUTION Meat is too close to the broil burner. Reposition the oven rack to provide more clearance between the meat and the broiler burner. Meat not properly prepared. Remove excess fat from meat. Slash remaining fatty edges to prevent curling, but do not cut into the lean. Broiler pan used without insert or insert covered with foil.
Recipes for Slow Cook with the pork chops. Sprinkle pepper seasoning and parsley on top of pork chops. Cover pan with lid or aluminum foil and place on rack in the oven. Using the Slow Cook feature pad, set control on "Lo" setting for 5 to 6 hours, or the "Hi" setting for 3 to 4 hours. 4 to 6 servings. Slow Cook Turkey Breast 1 turkey breast 2 cups chicken broth 1 medium onion, sliced 2 teaspoons minced garlic 1 teaspoon salt V2 teaspoon pepper In a roasting pan, place turkey breast meat-side up.
Your Home iiiiiiiiiiiiiiiiiiiiiiiiiiiiiiiiiiii Forrepair-in your home-of all majorbrand appliances iiiiiiiiiiiiiiiiiiiiiiiiiiiiiiiiiiii lawnandgardenequipment, orheatingandcoolingsystems, iiiiiiiiiiiiiiiiiiiiiiiiiiiiiiiiiiii nomatterwhomadeit, nomatterwhosoldit! iiiiiiiiiiiiiiiiiiiiiiiiiiiiiiiiiiii iiiiiiiiiiiiiiiiiiiiiiiiiiiiiiiiiiii For,thereplacementparts owners manualsthatyou iiiiiiiiiiiiiiiiii accessoriesand need todo-it-yourself, iiiiiiiiiiiiiiiiii For Sears professional installation of home a