
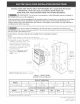
Installation guide


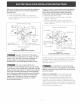


HeavyWeightHazard
• Use2 or morepeopleto moveand installwatt
oven.
• Failure to follow this instruction can resuJt in
injury or damage to the unit,
5. Cabinet Installation
The wall oven can tip when the door
is open. The mounting screws supplied with the
wall oven must be attached to the cabinet and the
appJiance to prevent tipping of the wall oven and
injury to persons.
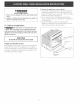
IMPORTANT
Do not lift the oven by the door handle.
Single and Double Ovens
Insert appliance into cutout. Use the screws provided to
fasten the front frame of the appliance to the cabinet.
The mounting holes in the front frame of appliance may
be used as a template to determine the location of the
mounting holes in the cabinet.
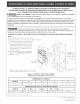
To fasten the appliance to the cabinet:
1. Line up the 2 mounting holes on the decorative trim
(ventilation) (taped to the oven side panel) with the
lower mounting holes on each side of tile oven frame,
below the oven door (see figure 7).
2. Use 2 screws from the miscellaneous parts bag to
secure the decorative trim (ventilation) and appliance
to the cabinetry.
3. Use the remaining 2 screws for mounting tile
appliance in the upper two mounting holes on each
side of the oven frame, above the door.
1
L
Fi ure 7
Mounting
Screw
Decorative
Trim
_/
Screw