Table of Contents Setting the Oven Controls... Wall Oven Warranty. Adjusting the Oven Temperature. IMPORTANT SAFETY INSTRUCTIONS Self-Cleaning Liquefied Petroleum (Propane) Gas Conversion General Care & Cleaning Product Record Before You Call... Serial Plate Location . Grounding Instructions Oven Vent and Racks ..
important Safety Instructions Im il instructions before using this appliance. Save these instructions for future reference. This manual contains important safety symbols and instructions. Please pay attention to these symbols and follow all instructions given, This sunbelt will help alert vou fo situations halt moy course serine bodily hom, death or property damage FTN this symbol will Bela ale vou fo Sm that may course bodily inquiry of property damage.
Important Safety Instructions PY Storage In or On Applionce—Flommable materials should not be stored in an oven, near surface units or in the storage drawer, broiler drawer, warmer drawer or lower oven. This Includes paper, plastic, and lath items, such as cookbooks, plastic ware, and towels, as well as flammable liquids. Do not stare explosives, such as aerosol cans, on ar near the oven, PAN bo not store items of interest to children in the cabinets above an appliance.
Important Safety Instructions SELF-CLEANING OVEN MODELS * {lean in the self-cleaning cycle only the parts of the appliance listed in this Owner's Guide. Before using the self-cleaning cycle of the appliance, remove all utensils stored in the appliance. Do not clean the oven door gasket. The door gasket is essential for a good seal. Care should be taken not to rub, damage or move the gasket. Do not use oven cleaners.
Important Safety Instructions Grounding Instructions QUIETEN avoid fire hazard or electrical shock. Do not use an adapter plug, an extension cord, or remove grounding prong farm electrical power card. Failure to follow this warning can cause serious injury, fire or death, This appliance is equipped with a 3-prong grounding plug for your protection against shock hazard and should be plugged directly into o properly grounded receptacle. DO NOT cut or remove the grounding prong from this plug.
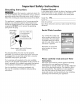
Oven Vent and Racks Even Vent Location Some models are equipped with a blower which runs in baking and self-cleaning mode to keep all internal components af « cool temperature. The blower may keep running even if the oven has been turned off, until the components have cooled down. Oven Vent Location The oven is vented through the upper control panel trim. When the vane is on, warm air is released through the vent. This venting is necessary for proper air circulation in the oven and good biking results.
Control Pad Features Note: The appearance of your vane control may differ slightly farm the one illustrated below. However, all functions are the same. Also, push buttons or pads may be shaped differently than those appearing in this Use and Care Guide. READ THE INSTRUCTIONS CAREFULLY BEFORE USING THE OVEN. For satisfactory use of your oven, become Familiar with the various functions of the oven os described below. Oven Control Key Pads 7 Door Lock Indicator Light -Will flash until the road 1.
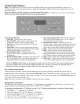
Setting Oven Controls Note: The time of day must first be set in order to operate the over. To Set the Clock ‘When the range is first plugged in, or when the power supply to the range has been interrupted, the display will flash "12:00" 1. Press “oJ once (do not hold pad down). 2. Within § seconds, press ond hold the #\ or V7 until the correct time of doy appears in the display. Note: The clock cannot be changed during any timed bake or Leif-Clean cycle. Te Set the Minute Timer: 1. Press Timer On/Off. 2.
Setting Oven Controls Te Set or Change the Temperature for Baking The oven can be programmed to bake at any temperature from 170°F fo 550°F (77°C to 287°C). Te Set the Controls for Baking: £\ CAUTION Always use pot holders or oven mitts when using the oven. When cooking, the oven interior, oven exterior, oven racks, and cook top will become very hot which can cause burns. Do not bake food directly on the oven bottom.
Setting Oven Controls To Set the Timed Bake Features The Cook Time and Delay Start pads operate the features that will turn the oven ON and OFF at the times you select in advance. The oven can be programmed to start immediately and shut off automatically {Timed Bake) or to begin baking af a liter time with a delayed start. Motes During Timed Bake the preheat indicator light will not function, PENNED Food Poisoning Hazard. Do not let food sit for more than one hour before or after cooking.
Setting Oven Controls Oven Baking For best cooking results, heat the oven before baling cookies, breads, cokes, pies or posties, ete. There is no need to preheat the oven for roasting meat or baking casseroles. The cooking times and temperatures needed to bake o product may vary slightly from your previously owned appliance.
Setting Oven Controls Adjusting the Oven Temperature Your oven control has been precisely set at the factory. This setting may differ farm your previous oven however, so your recipe times may not give you the results you expect. If you think that the oven is cooking too hot or too cool for your recipe times, you can adjust the control so that the oven cooks hotter ar cooler than the temperature displayed. To Adjust Oven Temperature: Press Bake.
Setting Oven Controls Broil Broiling is a method of cooking tender cuts of meat by direct heat under the broil element of the oven. Be sure you center your broiler pan directly under the broil element for best results, Arrange oven rack while oven is still cool. Position the rack as needed. The broiler pan and its insert allow dripping grease to drain and be kept away from the high heat of the broiler. BO NOT use the pan without its insert. DO NOT cover the insert with foil. The exposed grease could ignite.
Self-Cleaning During the self. cleaning cycle, the outside of the oven can become very hot to the touch. DO NOT leave small children unattended near the appliance. FTI The health of some birds is extremely sensitive to the fumes given off during the self-clone cycle of any will oven. Move birds to another well ventilated room. PREVENT 00 NOT line the oven walls, racks, bottom or any other part of the appliance with aluminum foil.
Self-Cleaning (cont'd) Starting the Select Self-Clean Cycle FIT 10 void possible NOTE: The kitchen area should be well ventilated using an open window, ventilation fan or exhaust hood during the st Self-Clean cycle. This will help eliminate the normal odors associated with the 1st Self-Clean cycle. burns use care when opening the oven door after the Self Cleaning cycle. Stand to the side of the oven when opening the door to allow hot air or steam to escape. To Set the Controls for a Self-Clean Cycle: 1.
General Care & Cleaning Cleaning Various Parts of Your Oven Before cleaning any part of the oven, be sure oll controls are turned OFF and the oven is COOL. REMOVE SPILLOVERS AND HEAVY SOILING AS SOON AS POSSIBLE, REGULAR CLEANINGS NOW Will REDUCE THE EXTENT AND DIFFICULTY OF MAJOR CLEANING LATER, Surfaces How to Clean Aluminum {Trim Pieces) & Vinyl Use hat, soppy tower and o cloth. Dry with o clean cloth. Do net scour or use all-purpose cleaners, ammonia, powdered cleaners or commercial oven cleaner.
General Care & Cleaning IE Door Hinge locations with oven door fully open Fig. 1 Even door Removing and Replacing the Oven Door PIX te door is heavy. For safe, temporary storage, lay the door flat with the inside of the door facing down, To Remove Oven Door 1. Open oven door completely (horizontal with floor See Fig. 1). 2. Pull the door hinge locks on both left and right door hinges down from the oven frame completely towards the oven door (See Fig. 2).
General Care & Cleaning Te Remove and Replace Oven Bottom Burner Horizon Lift Te Remove the Oven Bot torn: Bailey Tb Tah 1. Unscrew the two screws in the back of the oven bottom. 2. Lift up the rear of the oven bottom and push toward the rear of the oven, and then pull out. To Replace the Oven Bottom: 1. Place in the oven bottom, push toward the rear, and push down, 2. Screw the two screws in the back of the oven bottom.
Before You Cali Solutions to Common Problems Before you cull for service, review this list. It may save you dime and expense. The list includes conman occurrences that are not the result of defective workmanship or materials in this appliance. OCCURRENCE Oven Control Beeps and Displays any F code error (example Fi. Installation. Entire appliance does not operate. Oven light does not work Oven or broiler drawer smokes excessively during broiling.
OCCURRENCE Poor baking results. Self-cleaning cycle does not work. Appliance is not level. Cannot move appliance easily. Appliance must be accessible for service, Oven portion of appliance does not operate. Fan noise occurring after the even is turned off, Soil not completely removed after self cleaning cycle is completed. Flames inside oven or smoke from vent. Before You Call Solutions to Common Problems POSSIBLE Debilitation Many factors affect baking results.
Protection Agreement Master Protection Agreements Congratulations or making a smart purchase. Your new Kenmore” product is designed and manufactured for years of dependable operation.
Kenmore. For Sears Home Services in-home repair of all Kenmore major appliances. For the replacement parts, accessories and Use & Care Guides that you need to do-it-yourself. For professional installation of major home appliances and items like air conditioners and water heaters. 1-844-553-6667 www.kenmore.com In Canada 1-800-469-4663 WWW SEURAT Call anytime for the location of your nearest Sears Parts & Repair Service Center 1-800-488-1222 ws.