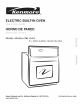
® ELECTRIC Ui LT-I OVE HORNO : ........ i Models, Modelos 790. 4045_',-" -'- Sears Roebuck www.sears.com and Co., Hoffman Color number, nL_mero de color Estates, IL 60179 U.S.A. PIN 318205132 Rev.
Table of Contents Wall Oven Warranty ....................................................... 2 Product Record .............................................................. 2 Serial Plate Location ...................................................... 2 IMPORTANT SAFETY INSTRUCTIONS ....................... 3-4 Wall Oven Features ........................................................ 5 Oven Vent and Racks ..................................................... 6 Air Circulation in the Oven ..................
important Safety instructions Read all instructions before using this appliance. Save these instructions for future reference. This manual contains important safety symbols and instructions. Please pay attention to these symbols and follow all instructions given. This symbol will help alert you to situations that may cause serious bodily harm, death or property damage. This symbol will help alert you to situations that may cause bodily injury or property damage.
important Safety instructions • Do Not Heat Unopened Food Containers. Buildup of pressure may cause the container to burst and result in injury. IMPORTANT--Do not attempt to operate the appliance during a power failure. If power fails, always turn off the appliance. If the appliance is not turned off and the power resumes, it will begin to operate again. Once the power resumes, reset the clock and oven function.
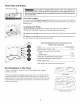
Wall Oven Features Your Electric Wall Oven Features At a Glance Oven Vent Electronic Oven Controls with Clock and Kitchen Timer Oven Light Interior Broil Element i iiil ................ Oven Light ........... ii....... Self-Clean Adjustable Racks Glass Oven Door Door Handle Decorative Bottom Trim -- \ \
Oven Vent and Racks Oven Vent Location Some models are equipped with a blower which runs in baking and self=cleaning mode to keep all internal components at a cool temperature. The blower may keep running even ifthe oven has been turned off, until the components have cooled down. Oven Vent Location j ......... @ The oven is vented through the upper trim. When the oven is on, warm air is released through the vent. This venting is necessary for proper air circulation in the oven and good baking results.
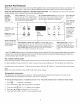
Control Pad Features Note: The appearance of your oven control may differ slightly from the one illustrated below. However, all functions are the same. Also, push buttons or pads may be shaped differently than those appearing in this Use and Care Guide• READ THE INSTRUCTIONS CAREFULLY BEFORE USING THE OVEN. familiar with the various functions of the oven as described below• FEATURE INDICATOR LIGHTS-- STOP CLEAR PAD-- Used to clear any function previously entered except the time of day and minute timer.
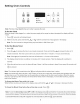
Setting Oven Controls 0 F:_ 3 sec .................................... 'qi ' ® Oven ® o O Preheat Stop Time ®OoerLocked Note: The time 0f day must first be Setin order t0 operate the oven: To Set the Clock When the range is first plugged in, or when the power supply to the range has been interrupted, the display will flash "12:00". 1. Press once (do not hold pad down). 2. Within 5 seconds, press and hold the A or V until the correct time of day appears in the display.
Setting Oven Controls (cont'd) To Set or Change for Baking the Temperature The oven can be programmed to bake at any temperature To Set the Controls for Baking: 1 Press _. 2. Within 5 seconds, press the ,/_ or V, 3. from 170°F to 550°F (77°C to 287°C). " "' appears in the display. the temperature As soon as the A The display will show "350°F (177°C)." By pressing and holding the A can then be adjusted in 5°F increments (1°C if the control is set to display Celsius).
Setting Oven Controls To Set the Timed (cont'd) Bake and Delay Start Features The c00,T, oo COOK TiME and _'°"T,,,o STOP TiME pads operate the features that will turn the oven ON and OFF at the times you select in advance. The oven can be programmed to start immediately and shut off automatically begin baking at a later time with a delayed start time (Delay Start).
Setting Oven Controls Oven Baking For best cooking results, heat the oven before baking cookies, breads, cakes, pies or pastries, etc. There is no need to preheat the oven for roasting meat or baking casseroles. The cooking times and temperatures needed to bake a product may vary slightly from your previously owned appliance. Baking Problems and Solutions Baking Problems Cookies and bis= cuits burn on the bottom. Causes • • Cakes too dark on top or bottom. • • Cakes not done in the center.
Setting Oven Controls Broiling information Broiling is a method of cooking tender cuts of meat by direct heat under the broil element of the oven. Always use a broiler pan and grid for broiling. Preheating Preheating the oven is suggested when searing rare steaks. (Remove all utensils from the oven before preheating. Foods will stick if placed on hot metal.) To preheat, set the control(s) to BROIL as instructed in this Use & Care Guide. Wait for the element to become red-hot, usually about 2 minutes.
Setting Oven Controls Broil Broiling is a method of cooking tender cuts of meat by direct heat under the broil element of the oven. Be sure you center the broiler pan directly under the broil element for best results. Arrange oven rack while oven is still cool. Position the rack as needed. Broiler pan and its insert allow dripping grease to drain and be kept away from the high heat of the broiler. DO NOT use a pan without its insert. DO NOT cover the insert with foil. The exposed grease could ignite.
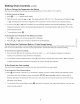
Self=Cleaning During the self=cleaning cycle, the outside of the oven can become very hot to the touch. DO NOT leave small children unattended near the appliance. • _l 3 see ,0v0,, ® Q Preheat ii ii , Timer ;: Set/Off • Door Locked The health of some birds is extremely sensitive to the fumes given off during the self-clean cycle of any wall oven. Move birds to another well ventilated room. DO NOT line the oven wails, racks, bottom or any other part of the appliance with aluminum foil.
Self-Cleaning (cont'd) Starting the Select Self-Clean Cycle For satisfactory results, use a 2 hour Self-Clean cycle for light soils and a 3 hour cycle for average to heavy soils. NOTE: The kitchen area should be well ventilated using an open window, ventitlation fan or exhaust hood during the 1st Self-Clean cycle. This will help eliminate the normal odors associated with the 1st Self-Clean cycle. To Set the Controls for a Self-Clean 1. Be sure the clock shows the correct 2. Press 3. Press V .
General Care & Cleaning Cleaning Various Parts of Your Oven Before cleaning any part of the oven, be sure all controls are turned OFF and the oven is COOL. REMOVE SPILLOVERS AND HEAVY SOILING AS SOON AS POSSIBLE. REGULAR CLEANINGS NOW WILL REDUCE THE EXTENT AND DIFFICULTY OF MAJOR CLEANING LATER. Surfaces How to Clean Aluminum (Trim Pieces) & Vinyl Use hot, soapy water and a cloth. Dry with a clean cloth. Do not scour or use allpurpose cleaners, ammonia, powdered cleaners or commercial oven cleaner.
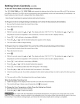
General Care & Cleaning Hinge suppor e lever hook Removing and Replacing the Oven Door The door is heavy. For safe, temporary storage, lay the door flat with the inside of the door facing down. To Remove Oven Door: Lock engaged for door removal Figure 1 1. Open the door to the fully opened position. 2. Pull up the lock located on both hinge supports and engage it in the hinge lever hooks (Figure 1).
Adjusting the Oven Temperature Your new oven has been factory calibrated and tested to ensure an accurate baking temperature. For the first few uses, follow your recipe times and temperature recommendations carefully. If you feel your oven is too hot or too cool from your baking experience, the oven temperature may be adjusted to your liking, see instructions below. Note: DO NOT adjust your oven temperature because they may not be accurate.
Before You Call Solutions to Common Problems OCCURRENCE POSSIBLE CAUSE/SOLUTION Entire oven does not operate. House fuse has blown or circuit breaker has tripped immediately following installation. House fuse may not be fully engaged. Check fuse and screw or engage circuit breaker securely. House fuse has blown or circuit breaker has tripped after the oven has been installed and previously operating. Call Sears or another qualified servicer. Oven light does not work. Burned-out or loose bulb.
Notes 20
PROTECTION AGREEMENTS Master Protection Agreements Acuerdos Congratulations on making a smart purchase. Your new Kenmore®product is designed and manufactured for years of Enhorabuena por haber hecho una compra intetigente. Su nuevo producto Kenmore®esta diseSado y fabricado para brindarle aSos de funcionamiento fiable. Pero, como cualquier producto, puede necesitar mantenimiento preventivo o reparaciones peri6dicas.
Your Home For expert troubleshooting and home solutions advice: www.managemyhome.com For repair - in your home - of all major brand appliances, lawn and garden equipment, or heating and cooling systems, no matter who made it, no matter who sold it! For the replacement parts, accessories and owner's manuals that you need to do-it-yourself. For Sears professional installation of home appliances and items like garage door openers and water heaters.
® ELECTRIC OVE E Models, Modelos 790. 4045_',_" .,_ = Color number, nL_mero de color Sears Roebuck www.sears.com and Co., Hoffman Estates, IL 60179 U.S.A. P/N 318205132 Rev.
Tabla de materias Garantia del homo de pared ......................................... 2 Registro del Producto .................................................... 2 Ubicaci6n de la placa de serie ...................................... 2 INSTRUCCIONES IMPORTANTES DE SEGURIDAD .... 3=4 Caracteristicas del homo de pared .............................. 5 Respirado del homo y las parrillas del homo ............. 6 Circulaci6n del Aire en el Homo ...................................
Instrucciones Importantes de Seguridad Lea todas las instrucciones Guarde estas instrucciones antes de utilizar el aparato para futura consultaci6n Este manual contiene s[mbolos e instrucciones de seguridad importantes. Preste mucha atenci6n a estos s[mbolos y siga todas las instrucciones. Este s[mbolo le advertirA sobre situaciones que pueden causar lesiones corporales graves, muerte o daRos materiales. Este s[mbolo le advertirA sobre situaciones que pueden causar lesiones corporales o daSos materiales.
Instrucciones Irnportantes de Seguridad • Use una vestimenta apropiada= No use ropa que es suelta u holgada cuando utilice el aparato. No ponga la ropa u otros materiales inflamables en contacto con las areas calientes. Nunca utilice su aparato calentar o entibiar para la pieza. • No utilice agua o harina para apagar un fuegoApague el fuego con la tapa de una sart_n o use soda c_ustica, un quimico seco o un extinguidor en aeros61. • Cuando caliente substancias grasosas, tenga cuidado.
Caracteristicas Caracteristicas de su Homo Electrico de Pared del homo de pared Ubicaci6n del Respiradero del Homo Controles Eiectr6nicos del Horno con Reloj y Contador de Tiempo Apagador de la luz del horno Luz interior Homo Elemento -de Asar Homo Auto -Limpieza -- Rejillas del Horno Adjustables i:" ' Puerta Delantera de Vidrio del Horno Manijas de la Puerta Banda decorativa de abajo
Respiradero del Homo y las Parrillas del Homo Ubicaci6n del Respiradero del Homo AIgunos modelos vienen equipado con un ventilador que trabaja bajo el ciclo de horneado y auto-limpieza para mantener todos los componentes a una temperatura fria. Es posible que este ventilador continue trabajando aun si el horno este apagada y trabajara hasta que el homo este totalmente fria. Ubicaci6n del Respiradero del Homo El horno se ventila en la moldura central.
Funciones de la Teclas de Control Nota: LEER El aspecto del control de su homo puede diferir levemente del que se ilustra mAs abajo. Sin embargo, todas las funciones son iguales. AdemAs, las botoneras pueden tenor una forma diferente de las que aparecen en esta Gufa de Uso y Mantenimiento. LAS INSTRUCClONES CON ATENClON ANTES DE UTILIZAR EL HORNO.
Ajuste de los controles del homo i .̧..... ili ® Oven ® Q Preheat Set/Off • ® ....................................... Timer .............................. Stop Deer Lacked Time ....................................................................... Nota: Hay que regular la h0ra antes de hacer funci0nar el homo: RegulaciCn del reloj Cuando se conecta el homo la primera vez, o cuando se interrumpe la alimentaciCn al homo, en el display destellarA '12:00'. 1.
Ajuste de los Controles del Homo Prograrnar o cambiar la ternperatura de cocci6n El homo se puede programar para cocer a cualquier temperatura Regular los mandos para cooer: 1 Apretar _ 2. Dentro de 5 segundos, apretar A V, entre 170°F y 550°F (77°C y 287°C). " la temperatura " aparece en el display• o V. El display mostrarA "350°F (177°C). ' Apretando y manteniendo A o se podrA regular con incrementos de 5°F (1°C si el control estA programado para mostrar grados Celsius) a la vez. 3.
Ajuste de los Controles del Horno Para regular las funciones de cocci6n Los mandos _CookT,,,o TIEMPO DE COCCION y programada y encendido diferido st0,,T, ........ENCENDIDO DIFERIDO mandan la cocci6n programada para ENCENDER o APAGAR el homo a los momentos precedentemente programados. E[ homo se puede programar para [niciar inmediatamente y apagarse autom&ticamente ('Timed Bake') o para iniciar la cocci6n en un momento posterior con un tiempo de encendido diferido (Delay Start).
Ajuste de los controles del homo Horneado Para mejores resultados, caliente el horno antes de hornear galletas, panes, tortas, pasteles o dulces, etc. No necesita precalentar el homo para rostizar la came o para cocer caserolas. Los tiempos de cocido y las temperaturas que se necesitan para hornear un producto pueden variar lijeramente de sus aparatos antiguos.
Ajuste de los Controles del Horno Asar es un metodo para cocer cortes finos de came aplicando el calor directo debajo del elemento asador del homo. Precalentarniento El precalentamiento es sugerido cuando grille pedazos de biftec (retire la parilla antes de precalentar. La comida puede adherirse si es colocada en el metal caliente). Para precalentar, ajuste los controles del homo en BROIL como indica en la minuterfa o en la secci6n "CONTROL DEL HORNO ELECTRONICO".
Ajuste de los Controles del Horno Broil (Asar a la parrilla) Asar es un metodo para cocinar cortes tiernos de came por medio del calor directo debajo del elemento para asar del horno. Para obtener los mejores resultados, verificar que la asadera este centrada directamente debajo del elemento para asar. Colocar la parrilla del homo mientras el homo estA frio. Colocar la parrilla en la posici6n deseada.
Limpieza del Homo O Durante el ciclo de autolimpieza la parte exterior de la estufa se calienta mucho. NO deje a los ni_os sin vigilancia cerca del electrodom_stico pues se pueden quemar si tocan las superficies calientes de la puerta del homo. _ 3 see i i¢_,_ i ® Oven . r0,,0o, • Door Locked Los vapores emitidos durante el ciclo de autolimpieza de cualquier estufa pueden afectar la salud de algunos p_.jaros. Cambie los p_.jaros a otra habitaci6n bien venfilada.
Limpieza del Homo Duraci6n de un ciclo de autolimpieza Para obtener resultados satisfactorios, haga uso de un ciclo de autolimpieza de dos horas de duraci6n para manchas ligeras o un ciclo de 3 horas para manchas promedio y manchas dificiles. NOTA: El Area de la cocina debe estar bien ventilada empleando una ventana abierta, ventilador o campana de escape durante el ciclo de autolimpieza.
Cuidado y Limpieza General Limpieza de diferentes partes del home de pared Antes de limpiar cualquier parte del homo, aseg_rese que todos los controles estb.n apagados y que el horno este fria. RETIRE LOS DERRAMES Y LAS MANCHAS DIFfCILES TAN PRONTO COMO PUEDA. LA LIMPIEZA CONSTANTE DISMINUIRA EL ESFUERZO DE UNA LIMPIEZA A FONDO. Superficies Como Limpiar Aluminio & Vinilo Use agua caliente jabonosa y un paRo. Seque con un paRo limpio.
Cuidado y Limpieza General Para retirar o remplazar la puerta del homo La puerta es pesada. Para guardarla temporalmente de manera segura, deposite la puerta horizontalmente, con el lado interior dirigido hacia abajo. Agujero para la bisagra puerta quitada deJ homo Figura 1 Para retirar [a puerta del homo: 1. Abra la puerta completamente. 2. Tire el cierre situado en cada una de las bisagras de ambos [ados y col6quelo en las palancas de las bisagras (Figura 1).
Ajuste de la temperatura del homo El control del homo ha sido fijado de manera precisa en f_brica. Sin embargo, esta configuraci6n puede diferir de su homo anterior, de manera que sus horas de receta pueden no darle los resultados que espera. Si cree que el homo est& cocinando demasiado caNente o demasiado fifo para sus horas de recetas, puede ajustar el control de manera que el homo cocine m&s caNente o m&s fifo que la temperatura visualizada. Para ajustar la temperatura del homo: , 2.
Antes de Solicitar Servicio Soluciones de Problemas Comunes SITUACI6N POSIBLE CAUSA/SOLUCI6N El horno no funciona. Se ha quemado un fusible de la casa o el disyuntor salt6 de inmediato despues de la instalaci6n. El fusible puede no estar bien conectado. Verificar el fusible y activar el disyuntor correctamente. Se ha quemado un fusible de la casa o el disyuntor salt6 de inmediato despues de que el homo fue instalado y estaba funcionando. Llamar a un representante de servicio tecnico autorizado.
Notas 20
ACUERDOS DE PROTECCION Master Protection Agreements Congratulations Acuerdos on making a smart purchase. Enhorabuena Your new Kenmord _ product is designed and manufactured for years of dependable operation. But like all products, it may require preventive maintenance or repair from time to time. That's when having a Master Protection and aggravation. The Master Protection Agreement Agreement can save you money also helps extend the life of your new product.
Your Home For expert troubleshooting and home solutions advice: www.managemyhome.com For repair - in your home - of all major brand appliances, lawn and garden equipment, or heating and cooling systems, no matter who made it, no matter who sold it! For the replacement parts, accessories and owner's manuals that you need to do-it-yourself. For Sears professional installation of home appliances and items like garage door openers and water heaters.