Table of Contents Setting Delay Start Setting Warm & Hold ™ Hefting Broil Adjusting Oven Temperatures Hefting the Sabbath Feature Self Clean Care and Cleaning Cleaning Various Parts of Your Oven Replacing the oven light Removing and Replacing the Oven Door Before You Call Oven Baking Solutions to Common Problems KENMORE UNITED WARRANTY Before Hefting Oven Corals Oven vent faction ..
IMPORTANT SAFETY INSTRUCTIONS Read all instructions before using this appliance. Read all instructions before using this appliance. This manual contains important safety symbols and instructions. Pay attention to these symbols and follow all instructions given, Do not attempt to install or operate your appliance until you have read the safety precautions in this manual, Safety items throughout this manual are labeled with a WARNING or CAUTION statement based on the hazard type.
IMPORTANT SAFETY INSTRUCTIONS Read all instructions before using this appliance. Stepping, leaning, or sitting on the door or drawers of an oven can result in serious injuries and also cause damage to the appliance. Do not allow children to climb or play around the oven. The weight of a child on an open over door may cause the oven to tip, resulting in serious burns or other injury.
» IMPORTANT SAFETY INSTRUCTIONS Read all instructions before using this appliance. Do not attempt to operate the oven during a power failure, If the power fails, always turn off the oven. If the oven is not turned off and the power resumes, the vane will begin to operate again. Once the power resumes, reset the clock and oven function, Cold temperatures can damage the electronic control.
IMPORTANT SAFETY INSTRUCTIONS Read all instructions before using this appliance. IMPORTANT INSTRUCTIONS FOR SELF-CLEANING OVENS * Clean only the ports listed in this manual, Before using self-clean, remove the broiler pan, any food, utensils, and bake ware from the oven. Remove oven racks unless otherwise instructed. * Do Not Use Oven Cleaners, No commercial oven cleaner or oven liner protective coating of any kind should be used in or around any part of the oven. * Do Not Clean Door Gasket.
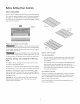
Before Setting Oven Controls Oven vent location The oven vent is located under the control panel. When the oven is om, warm cir passes through this vent, This venting is necessary for proper cir circulation in the oven and good baking results. Do net block vane vent. Steam or moisture may appear near the oven vent. This is normal. oven vent Is cation sii Figure 2: Do not block oven vent location GITE Protective Liners — Do not use aluminum foil fo line the oven bottom.
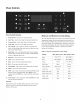
Oven Controls Lo Bri Oven Control Features Timer Set-Off Use to set or cancel the timer. 2. Cook Time Use to enter length of deiced cooking time, 3. Warm & Hold Use fo select Warm & Hold function. 4 Oven Light Use to turn oven lights on and off. 5. Add 1 Minute Use to add one minute to the timer, This quarks with the kitchen timer and does not affect any cock time or start time functions. 6. Delay Start Use fo set the desired start time for baking.
Setting the Clock When the appliance is first powered on, 12:00 will flash in the display (Figure 4}. The dime of day must first be set before operating the oven. La Hi Figure 4: 12:00 To set clock for B30: 1 Press @ 2. Enter 13 0 using numeric keypad. 3. Press ish. Important note: The clack catnap be changed when a Cook Time, Self Clean, Delay Start, or cooking feature is active, Setting Timer The minute dimer allows you to track your cooking dimes without interfering with the cooking process.
Oven Controls Changing Oven Temperature Display The vane control is preset fo display temperatures in Fahrenheit {°F} when shipped from the factory. The control can be changed to display either {°F} or Celsius To change the temperature to display Press and hold Broil for 6 seconds. 2. Once F for C) appears in the display, press Self Clean fo tangle between (°F and {°C} temperature display modes (Figure 9 and Figure 10}. 3. Press {yf to accept choice.
Setting Bake Use the bake feature whenever the recipe calls for baking using normal temperatures. A reminder tone will sound indicating when the set bake temperature is reached and fo place the food in the oven. Bake may be set for any oven temperature between 170°F (77°C) and 550°F (288°C). To sat Bake with default temperature of 350°F: 1. Press Bake. 2. Press {ho To cancel Bake at anytime, pass Loon). To set Bake for oven temperature of 425°F: 1. Press Bake. 2. Enter 425 using numeric keypad. 3.
Even Controls Setting Cook Time Use Cook Time to program the vane control to automatically tum off after « desired length of time. To program oven to Bake with oven default temperature of 350°F and to shut-off after 30 minutes: Food Poisoning Hazard, Do not let food sit for more than ane hour before or after cooking. Doing so can result in food poisoning or sickness. Roads that can easily spell such as milk, eggs, fish, meat, or epaulet should be chilled in the refrigerator first.
Setting Warm & Hold™ Warm & Hold will keep cooked foods warm and ready for serving for up te 3 hours after cooking has finished. After 3 hours, the Warm & Hold will shut-off automatically. Warm & Hold should only be used with foods that are already at serving temperatures. Warm & Hold will maintain the oven temperature at 170° F To set Warm & Hold: 1 If needed, arrange vane racks and place cocked food in oven. 2. Press Warm & Hold. HLd will appear in the display.
Oven Controls Setting Broil Use the Broil function to cook meats that require direct exposure to radiant heat for optimum browning results. The Broil feature is factory preset to broil at 550°F Broil temperature may be set at any temperature between 400°F {205°C} and 550°F (286°C). Suggested broil settings are recommendations only [Table 2). Depending on preferences, you can increase or decrease cooking dimes or move food to a different rack position.
Adjusting Oven Temperatures Your appliance has been factory calibrated and tested to ensure accurate baking temperatures. For the first few uses, follow your recipe times and temperature recommendations carefully. If you think the oven is cooking foo hot or foo cool for your recipe dimes, you may adjust the control so the oven cooks hotter or cooler than the oven temperature displayed. The oven temperature may be increased as much as +35°F or decreased -35°F from the factory calibrated settings.
Oven Controls Setting the Sabbath Feature (for use on the Jewish Sabbath and Holidays) For further assistance, guidelines for proper usage, and a complete list of models with the Sabbath feature, please visit the web at: This appliance provides special settings far use when observing the Jewish Sabbath Holidays. Sabbath made disciples all audible tones or visual display changes on the ven central. Bake heating is the only cooking feature available while in the Sabbath mode.
To turn the oven off and keep the Sabbath feature active: u Press (8. To turn off the Sabbath feature: Press nd hold both Cook Time and Delay Start keys simultaneously for at least 3 seconds to turn the Sabbath feature off. The control will provide cn acceptance phone, and $Ab will disappear from the display.
Oven Controls Self Clean A self cleaning oven cleans with very high temperatures well above normal cocking temperatures. The high temperature elm inmates sails completely or reduces them to o fine powdered ash you can wipe away afterwards with a damp cloth. The Self Clean function allows you fo set « cleaning dime from 2 hours to 4 hours. A 3 hour cleaning time is recommended for normal cleaning, 2 hours for light cleaning, and 4 hours for heavy cleaning.
gala Figure 24: Hot {L) and door OPn {R} When Leif Clean is Finished IL The Cin message will turn off, and Hot will appear in display window (Figure 24}. 2. Once the oven has cooled down {about 1 hour) ond Hot is no longer displayed, the door Opn message will appear. When this message turns off, the oven door may be opened. 3. When the oven interior has completely cooled, wipe away any residue or powdered ash with a damp cloth or paper towel.
Care and Cleaning Cleaning Various Parts of Your Oven Before clenching any part of the oven, be sure all controls are turned off and the oven is cool. Remove spills and any heavy sailing as soon cs possible. Regular cleaning will reduce the difficulty and dime of major cleaning later. Surface Type Recommendation Control knobs For general cleaning, use hot, soapy wetter and a cloth. For more difficult soils and bull-up Painted body parts grease, apply © liquid detergent directly onto the soil.
Aluminum foil and utensils PETRA Before manually cleaning any part of the appliance, be sure all controls are fumed off and it is cool. The oven Mary be hot dint can cause burns, Field {Tel Ammonia must be rinsed before operating the vane. Provide adequate ventilation. FRETTING Never cover any slots, holes, or passages in the oven bottom or caver an entire oven rack with materials such cs aluminum foil. Doing so blocks air flow through the oven and may cause carbon monoxide poisoning.
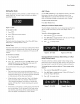
Care and Cleaning Removing and Replacing the Oven Door FETTER The door is heavy. For safe, temporary storage, lay the door flat with the inside of the door facing down. To remove the oven door: 1. Open oven door completely, horizontal with floor {Figure 27). 2. Bull the door hinge locks on both left and right door hinges down from the oven frame completely forward the oven door (Figure 28]. A tool such as a small flat-blade screwdriver may be required. 3.
Before You Call Oven Baking For best cooking results, heat the oven before baking cookies, breads, cakes, pies or pastries, sfc. Thea is no need to preheat the van for roasting meat or baking casseroles. The cooking times and temperatures needed fo bake a product may vary slightly from your previously owned appliance. Baking Problems Cookies and biscuits burn on the bottom. Cakes too dark on top or bottom Foods pot done when cooking time is over.
Before You Call Solutions to Common Problems Before you call for service, review the following list. 1 may save you time and expense. Possible solutions are provided with the problem list Problem Paar baking results Oven does not operate. Appliance is not level. Oven light does not quark. Flames inside oven or smoking from oven vent. Self clean does not work. Gr van racks discolored or do not skids easily. Soil nat completely removed after self clean.
Before You Call Oven smokes excessively when broiling. Fan noise during cooking operation Oven control panel beeps and displays any F code error. Incorrect setting. Follow broiling instructions in the “Setting Bella” section on page 14. Meat too close to the broil element. Reposition broil rack to provide proper clearance between the meat and broil element. Remove excess fat from meat. Cut remaining fatty edges fo prevent curling. Grease build up an oven surfaces.
Kenmore. For Sears Home Services in-home repair of all Kenmore major appliances. For the replacement parts, accessories and Use & Care Guides that you need to do-it-yourself. For professional installation of major home appliances and items like air conditioners and water heaters. 1-844-553-6667 www. kenmore.com in Canada 1-800-469-4663 WWW.