Use & Care Manual Guide de Uso y Cuidado English / Espafiol Model/ModUle.. 970-4952*, -4953* I(enmoreo dobl ,,,,z color numbe_, nF_me_ode colo_ P/N 139900107_ A Sears Brands Management Hoffman Corporation Estates, IL 60179 U.S.A .www.kenmore.com www.sears.com Sears Canada Inc.
Table of Contents Please carefully Kenmore Before setting Oven Oven and save Warranty vent location these instructions ............................... ......................................................................... ..................................................................................... Replacing Replacing the oven Oven the Oven light ................................................. Door ............................................ 21 22 ......................
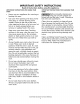
IMPORTANT SAFETY INSTRUCTIONS Read all instructions before using this appliance. When heating fat or grease, closely. Grease may catch fire if it becomes too hot. This manual contains important safety symbols and instructions. Pay attention to these symbols and follow all instructions given. watch it Never cover any slots, holes, or passages Jn the oven bottom or cover an entire oven rack with materials, such as aluminum foil. Aluminum foil linings may trap heat, causing a fire hazard.
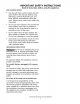
IMPORTANT SAFETY INSTRUCTIONS Read all instructions before Do not use water or flour on _s. Cover the fire with a pan lid, use baking soda, or use a dry chemical or foam type extinguisher. Use dry potholders. Moist or olders on hot surfaces may result in burns from steam.Do not let potholders touch hot cooking areas. Do not use towels or other bulky cloths.
IMPORTANT SAFETY INSTRUCTIONS Read all instructions IMPORTANT OVEN Never heating INSTRUCTIONS use your before FOR USING YOUR appliance for warming using this appliance. IMPORTANT INSTRUCTIONS OVEN Before manually cleaning any part ot the oven, be sure all controls are turned off and the oven is cool. Cleaning a hot oven can cause burns. or the room. Use care when opening oven door, lower oven door, or warmer drawer (some models). Stand to the side of the oven when opening the door of a hot oven.
IMPORTANT SAFETY INSTRUCTIONS Read all instructions before using this appliance. SELF-CLEANING OVENS Use the self-clean cycle to clean only the parts listed in this manual. Before using self-clean, remove the broiler pan, any food, utensils, and bakeware from the oven. Remove oven racks unless otherwise instructed. Do not use oven cleaners. No commercial oven cleaner, oven liner, or protective coating of any kind should be used in or around any part of the oven. Do not clean the oven door gasket.
Before setting oven controls Oven vent location The oven vent is located (Figure 1). When under the left side of the control the oven is on, warm vent. This venting oven and good Type of oven racks is necessary baking for proper air circulation results. Steam or moisture near the oven vent, this is normal. panel air passes through Do not block this oven rack in the may appear oven vent: ___ fiat oven fiat handle rack oven vent location Figure 1: _ Always the oven.
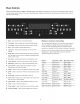
Oven Controls READ THE INSTRUCTIONS various features CAREFULLY BEFORE USING and functions of the oven as described THE OVEN. below. For satisfactory Detailed instructions use of your oven, become for each feature familiar and function with follow the later in this Use & Care Guide. 1. Bake - Used to enter the normal 2. Conv Bake - Used to select the Convection Bake feature. 3. Conv Roast - Used to select the Convection Roast mode. 4. Broil - Used to select variable 5.
Oven Setting Setting Continuous Bake or 12 Hour Energy Saving the Clock The Q key is used to set the clock. 12 or 24 hour time of day operation. at the factory plugged display may be set for The Timer has been preset Bake or 12 hour Energy Saving the range has been factory preset 12 Hour Energy Saving feature that shuts off the oven control if left on for more than 11 hours and59 minutes. The the power _ oven can be programed supply the time in the display When to the range will flash.
Oven Controls To Set Add 1 Minute The Feature Setting Silent Control Operation Add 1 key is used to set the Add Minute the key is pressed, 1 minute is added feature active. active is already and the Add 1 Minute 1 Minute feature. to the Timer If the Minute Timer feature is pressed, the Timer feature Setting The from the Oven _ feature Timer instructions controls automatically Press and hold 2. After lockout _ whenever Delay feature. The Oven Lockout the clock, 1.
Oven Setting Temperature display -- Fahrenheit The Broil and Self-Clean temperature display programmed keys control modes. to display temperatures both ovens will To change be changed display from or Celsius The Bake and Cook Time keys control can be The automatic in Fahrenheit or Celsius. to display in Fahrenheit.
Oven Controls Setting Delay Start The Bake, Cook Time, and Start feature. 10. Press _). display.'_ne 11. When The current time of day will appear in the set temperature will also show in the display. Delay Start keys control the Delay The automatic timer of the Delay Start will turn the oven on and off at the time you select in advance.
Oven Controls Setting Bake Use the bake feature normal whenever temperatures. the recipe A reminder when the set baking food in the oven. calls for baking tone will sound indicating temperature is reached and to place Bake may be set for any oven temperature (77°C) to 550°F Table using between Suggested Broiling meats, chicken, Cookies, 170°F Press Bake. 2. Press 3. To cancel Bake at any time, press 1. Press Bake. 2. Enter 4 2 5 using numeric 3.
Setting Broil Should an oven fire occur, leave the oven door closed and turn off the oven. If the fire continues, The Broil key controls radiates downward the Broil feature. from The Broil temperature (Table When the oven broiler broiling, heat soda on the fire or use a fire extinguisher. for even coverage. may be set between 400°F flour and 550°F. grease 2) to drain oven broiler and be kept away (Figure from allow could catch 4-MY-HOME dripping 5).
Oven Setting Convection Roast Setting Convection The Conv Roast key may be used when items. Conv Roast combines fan and element necessary the food all sides, sealing on the outside not cover food 1. during while staying convection roast. food The Convect with the convection Heated in juices - To Set the Convection Arrange cooking certain cycle to roast meats and poultry. for meats and poultry. from crisp brown Example a cook Preheating is not air circulates and flavors.
Note: To set the oven for Convection 1. Arrange 2. Press Convect 3. Press _. Note: interior Bake and temperature oven racks and place The actual start running cating oven temperature used with a Cook Time or a Delay Convert in the display. the food element fan will in the display At this time the oven control indi- is on to help the oven reach intervals the until baking completely temperature.
Cooking • and Preparation tips for Slow Completely thaw all frozen Slow Cook feature. • When • Position foods Restoring factory default settings Cook before cooking with the Your appliance is programmed using a single rack, place in position following 2 or 3. options utensils when • racks to accommodate cooking multiple food Do not open the oven door often when checking foods. size of cooking items.
Oven Controls Setting the Sabbath and Holidays) Feature (for use on Jewish Sabbath The Cook Time and Delay Start to set the Sabbath feature. For further assistance, guidelines usage, and a complete Sabbath feature, keys are used for proper list of models please Note: with the visit the web at Once feature may only be used with the Bake function. the oven is properly feature active, Sabbath Saving overrides until cancelled.
Oven Self-Cleaning During the range can become children Self-Cleaning Operation unattended the self-cleaning very another the self-clean well ventilated sensitive heat distribution, permanent interior damage surface Do not force to the fumes cycle of any range. Move birds to oven cleans itself with above temperatures) which with aluminum produce to the interior foil. poor baking (aluminum Doing or any • so will door locking the self-cleaning cycle when is completed.
Oven Controls To Start the Self-Clean The Self-Clean planning key controls the self Clean feature. to use the oven directly remember to allow door to unlock. self-clean hour cycle takes about will actually take about feature is desired, finish step 6-9. Dashes will appear in the display. 5. Press Self-Clean. 6. Enter the start time numbers down and the oven DELAY, LOCK, and DOOR 4 3 0 and press STy. will CLEAN, be displayed. 4 hours to complete.
Care and Cleaning Cleaning Various Parts of Your Oven Before cleaning any part of the oven, be sure all controls soon as possible. Surface Painted cleaning Type Aluminum Painted Regular will reduce Use hot, soapy water body parts Use a soft cloth decorative and water. trims cleaners cleaning Stainless Steel and a cloth. and clean control and display area.
Care and Cleaning Removing and Replacing the Oven The door is heavy. lay the door the 1. Open oven door completely, Figure 9). oven Pull the door down from 5. handle Oven the door frame (See Figure both sides of oven door along handle on the door sides. (See Figure Holding the oven door at the same angle position (See Figure 11). ! as the removal Figure 10: Door hinge locks 11), seat the hook of the hinge arm over pins located on each side of the oven door frame 12).
Care and Cleaning Replacing the oven light Be sure the oven is unplugged cool before replacing The interior oven lights are located and are covered place The glass shield the oven is in use (See Figure To replace the oven interior Important note: Do not allow at the rear of the oven cavity with a glass shield. whenever and all parts are oven light. your fingers light bulb: to touch the new bulb when replacing. This will shorten the life of the bulb. Use a paper glove 1.
Before You Call Oven Baking For best cooking results, heat the oven before oven for roasting meat The cooking or baking baking cookies, breads, cakes, pies or pastries, etc. There is no need to preheat the casseroles. times and temperatures needed to bake a product may vary slightly from your previously owned appliance. Baking Problems and Solutions Causes Baking Problems Cookies and biscuits burn Cookies on the bottom.
Before You Call Solutions to Common Before you call for service, problem Problems review the following list. It may save you time and expense. Problem Many factors effect baking and space pans to allow food does not operate. Oven Service Flames does not work. inside oven or smoking from does not work. racks discolored or do not slide easily, spills in oven. Grease spills before smokes excessively when broiling. Bake" Oven racks left in oven cavity Meat a self-clean setting.
Master Protection Acuerdos Agreements Congratulations on making a smart purchase. Your new Kenmore ® product is designed and manufactured for years of dependable operation. But like all products, it may require preventive maintenance or repair from time to time. That's when having a Master Protection Agreement can save you money and aggravation. The Master Protection Agreement also helps extend the life of your new product.
®Registered Trademark / TMTrademark of KCD IP, LLC in the United States, or Sears Brands, LLC in other countries ® Marca Registrada / TMMarca de Fabfica de KCD IP, LLC en Estados Unidos, o Sears Brands, LLC in otros paises MCMarque de commerce / MDMarque ddpos_e de Sears Brands, LLC